Sony PDWHD1500 User Manual (PDW-HD1500 Operation Manual for Firmware Version 1 - Page 49
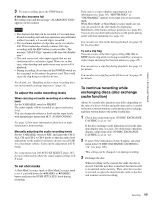
To continue recording while exchanging discs (disc exchange cache function)
 |
View all Sony PDWHD1500 manuals
Add to My Manuals
Save this manual to your list of manuals |
Page 49 highlights
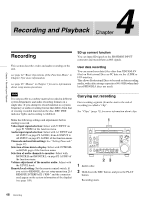
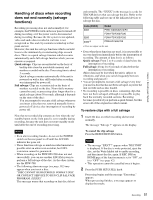
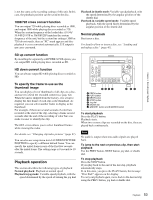
Chapter 4 Recording and Playback 3 To stop recording, press the STOP button. If the disc becomes full Recording stops and the message "ALARM DISC END." appears on the monitor. Notes • The shortest clip that can be recorded is 2 seconds long. Even if recording start and stop operations are performed within 2 seconds, a 2-second clip is recorded. • The maximum number of clips that can be recorded is 300. If the loaded disc already contains 300 clips, recording with the REC button is not possible. (The message "MAX # Clips" appears in the time data display area.) • This unit can record video input signals that are not synchronized to a reference signal. However, in that case, video breakup and audio noise may occur in E-E playback. • During recording, do not turn off the POWER switch on the rear panel or disconnect the power cord. This could cause the clip being recorded to be lost. For details, see "Handling of discs when recording does not end normally (salvage functions)" (page 51). To adjust the audio recording levels When carrying out audio recording at a reference level Set the VARIABLE switch to PRESET. The audio signals will be recorded at a preset reference level. You can change the reference level and the input levels with maintenance menu item M37: AUDIO CONFIG. See page 123 for more information about how to make maintenance menu settings. Manually adjusting the audio recording levels Set the VARIABLE switch to REC and adjust the CH-1/ ALL CH and CH-2 to CH-4 knobs so that the audio level indications on the audio level meters do not exceed 0 dB for a maximum volume. Carry out the adjustment in E-E mode. See setup menu item 108 AUTO EE SELECT (page 107) for more information about the signal output settings in EE mode. To set shot marks A Shot Mark1 essence mark or Shot Mark2 essence mark is set if you hold down the V/MARK1 or v/MARK2 button and press the PUSH SET(S.SEL) knob during recording. If the unit is set up to display superimposed text information (see page 39), "SHOTMARK1" or "SHOTMARK2" appears every time you set an essence mark. When Shot Mark1 or Shot Mark2 essence marks are set, you can search for the shot marks by displaying thumbnails of the frames at those positions (see page 66). You can also use shot mark positions as edit points during scene selection operations (see page 72). You can also set shot marks during playback. See page 54 for the procedure. To set a clip flag You can set one of the three types of flag (OK, NG or KEEP) for the clip while it is being recorded by viewing its video image and using the function menu (see page 45). You can also set a clip flag during playback. See page 54 for details. You can also set a clip flag on the GUI screen. See page 70 for details. To continue recording while exchanging discs (disc exchange cache function) About 30 seconds (this duration may differ depending on the state of a disc) of video and audio data can be recorded to the unit's internal memory cache during a disc exchange, and then written back to the newly loaded disc. 1 Check that setup menu item 150 DISC EXCHANGE CACHING is set to "on". If the disc exchange cache indication is lit in the time data display area (see page 20) of the basic operation display, setup menu item 150 DISC EXCHANGE CACHING is set to "on". 2 If none of the indications of step 1 appear, set setup menu item 150 DISC EXCHANGE CACHING to "on" (see page 108). This setting can be changed even during recording. 3 Exchange the disc. When recording on the current disc ends, the disc is ejected. Until the next disc is inserted, the unit records to its internal cache memory. Then, after the new disc is inserted, it copies the data from the cache to the disc and resumes normal recording. 49 Recording
-
 1
1 -
2
-
3
-
4
-
5
-
6
-
7
-
8
-
9
-
10
-
11
-
12
-
13
-
14
-
15
-
16
-
17
-
18
-
19
-
20
-
21
-
22
-
23
-
24
-
25
-
26
-
27
-
28
-
29
-
30
-
31
-
32
-
33
-
34
-
35
-
36
-
37
-
38
-
39
-
40
-
41
-
42
-
43
-
 44
44 -
 45
45 -
 46
46 -
 47
47 -
 48
48 -
 49
49 -
 50
50 -
 51
51 -
 52
52 -
 53
53 -
 54
54 -
55
-
56
-
57
-
58
-
59
-
60
-
61
-
62
-
63
-
64
-
65
-
66
-
67
-
68
-
69
-
70
-
71
-
72
-
73
-
74
-
75
-
76
-
77
-
78
-
79
-
80
-
81
-
82
-
83
-
84
-
85
-
86
-
87
-
88
-
89
-
90
-
91
-
92
-
93
-
94
-
95
-
96
-
97
-
98
-
99
-
100
-
101
-
102
-
103
-
104
-
105
-
106
-
107
-
108
-
109
-
110
-
111
-
112
-
113
-
114
-
115
-
116
-
117
-
118
-
119
-
120
-
121
-
122
-
123
-
124
-
125
-
126
-
127
-
128
-
129
-
130
-
131
-
132
-
133
-
134
-
135
-
136
-
137
-
138
-
139
-
140
-
141
-
142
-
143
-
144
-
145
-
146
-
147
-
148
-
149
-
150
-
151
-
152
-
153
-
154
-
155
-
156
-
157
-
158
 |
 |