Sony PDWHD1500 User Manual (PDW-HD1500 Operation Manual for Firmware Version 1 - Page 18
Display window, Basic operation display
 |
View all Sony PDWHD1500 manuals
Add to My Manuals
Save this manual to your list of manuals |
Page 18 highlights
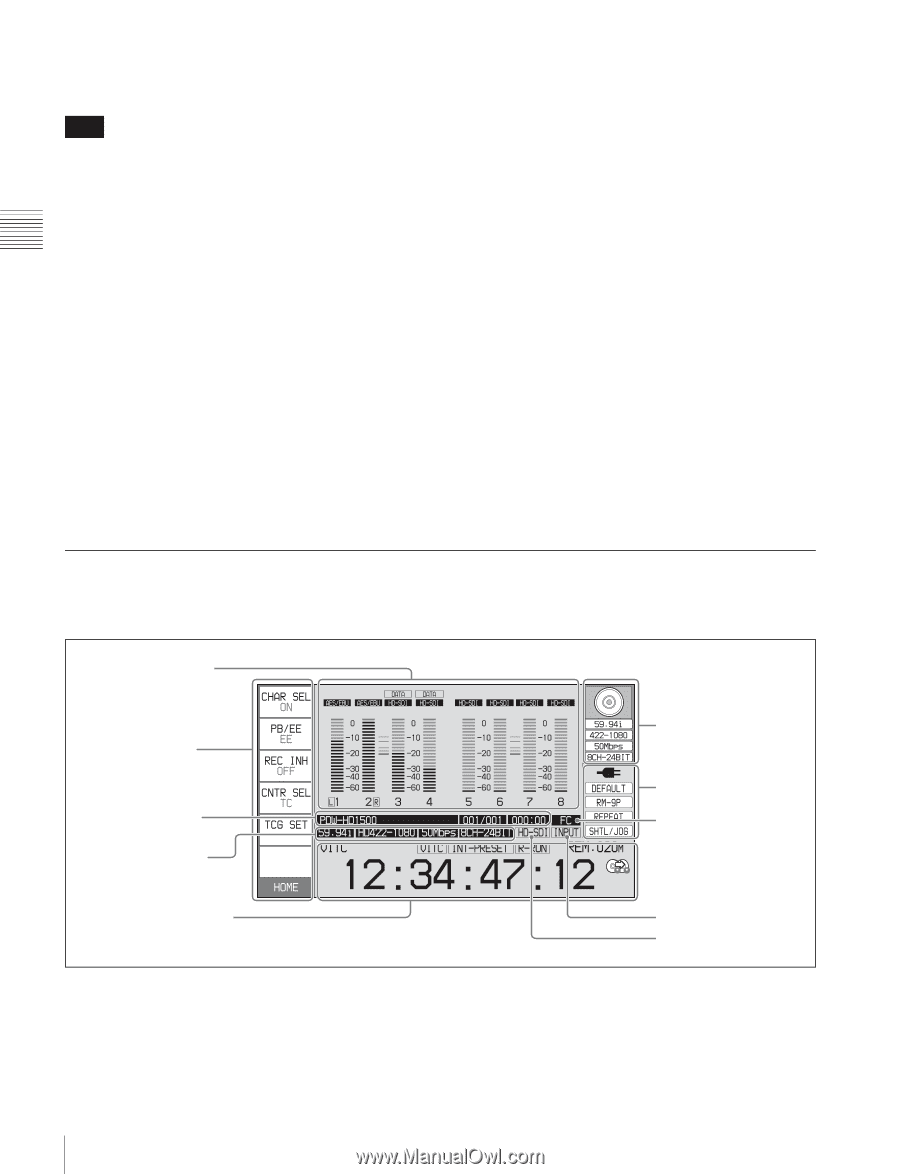
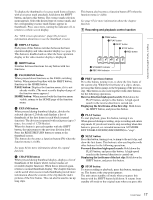
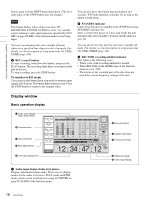
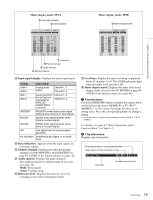
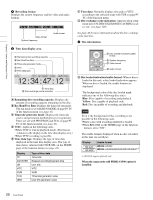
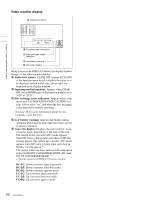
Chapter 2 Names and Functions of Parts button again with the SHIFT button held down. (The lit or unlit status of the STOP button does not change.) Note This button flashes when setup menu item 105 REFERENCE SYSTEM ALARM is set to "on" and the correct reference video input signal (as specified by OUT REF on page P6 REF of the function menu) is not being input. This unit can automatically enter standby off mode whenever a specified time elapses in disc stop mode. For details, see the description of setup menu item 501 STILL TIMER (page 109). e REC (record) button To start recording, hold down this button, and press the PLAY button. The recording takes place on an unrecorded part of the disc. To stop recording, press the STOP button. To monitor in E-E mode You can press this button from stop mode to monitor input signals in E-E mode. The button lights when pressed. Press the STOP button to return to the original video. You can also press this button during playback and searches. E-E mode playback continues for as long as the button is held down. f STANDBY indicator Lights when the unit is in standby mode (STOP button and, STANDBY indicator lit). After a certain time passes in a disc stop mode, the unit automatically enters standby off mode and the indicator goes off. You can specify the time until the unit enters standby off mode. For details, see the description of setup menu item 501 STILL TIMER (page 109). g REC INHI (recording inhibit) indicator This lights in the following cases. • When a disc with recording inhibited is loaded. • When REC INH on the HOME page of the function menu is set to "ON". • The format of the recorded part of the disc does not match the system frequency settings of the unit. Display window Basic operation display 1 Audio input display/ Audio level meters 2 Function menu 3 Clip information 4 Recording format 6 Disc information 7 System information 8 Format conversion 5 Time data display area a Audio input display/Audio level meters Displays information about audio. There are two display modes for the audio level meter: FULL mode and FINE mode, which can be switched over using AU METER on page P4 AUDIO of the function menu. 9 Reference signal q; Video input display 18 Front Panel
-
 1
1 -
2
-
3
-
4
-
5
-
6
-
7
-
8
-
9
-
10
-
11
-
12
-
 13
13 -
 14
14 -
 15
15 -
 16
16 -
 17
17 -
 18
18 -
 19
19 -
 20
20 -
 21
21 -
 22
22 -
 23
23 -
24
-
25
-
26
-
27
-
28
-
29
-
30
-
31
-
32
-
33
-
34
-
35
-
36
-
37
-
38
-
39
-
40
-
41
-
42
-
43
-
44
-
45
-
46
-
47
-
48
-
49
-
50
-
51
-
52
-
53
-
54
-
55
-
56
-
57
-
58
-
59
-
60
-
61
-
62
-
63
-
64
-
65
-
66
-
67
-
68
-
69
-
70
-
71
-
72
-
73
-
74
-
75
-
76
-
77
-
78
-
79
-
80
-
81
-
82
-
83
-
84
-
85
-
86
-
87
-
88
-
89
-
90
-
91
-
92
-
93
-
94
-
95
-
96
-
97
-
98
-
99
-
100
-
101
-
102
-
103
-
104
-
105
-
106
-
107
-
108
-
109
-
110
-
111
-
112
-
113
-
114
-
115
-
116
-
117
-
118
-
119
-
120
-
121
-
122
-
123
-
124
-
125
-
126
-
127
-
128
-
129
-
130
-
131
-
132
-
133
-
134
-
135
-
136
-
137
-
138
-
139
-
140
-
141
-
142
-
143
-
144
-
145
-
146
-
147
-
148
-
149
-
150
-
151
-
152
-
153
-
154
-
155
-
156
-
157
-
158
 |
 |