Sony PDWHD1500 User Manual (PDW-HD1500 Operation Manual for Firmware Version 1 - Page 79
Disc Operations, Checking disc properties
 |
View all Sony PDWHD1500 manuals
Add to My Manuals
Save this manual to your list of manuals |
Page 79 highlights
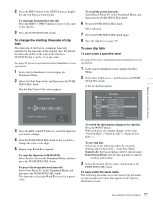
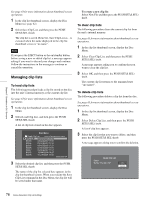
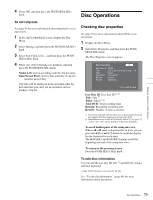
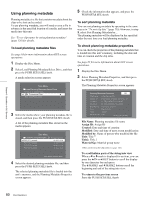
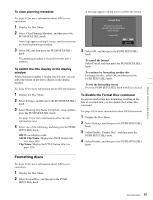
Chapter 5 Operations in GUI Screens 4 Select OK, and then press the PUSH SET(S.SEL) knob. To sort clip lists See page 63 for more information about thumbnail screen operations. 1 In the clip list thumbnail screen, display the Disc Menu. 2 Select Settings, and then press the PUSH SET(S.SEL) knob. 3 Select Sort Clip List by..., and then press the PUSH SET(S.SEL) knob. 4 Select one of the following sort methods, and then press the PUSH SET(S.SEL) knob. Name(A-Z): Sort in ascending order by clip list name. Date(Newest First): Sort by date and time of clip list creation, newest first. Clip lists will be displayed in the specified order the next time that you carry out an operation such as loading a clip list. Disc Operations Checking disc properties See page 63 for more information about GUI screen operations. 1 Display the Disc Menu. 2 Select Disc Properties, and then press the PUSH SET(S.SEL) knob. The Disc Properties screen appears. Disc Properties OK User Disc ID 12345 Title One of the memories of sum... Title2 (none) Total DUR 01:23:45:00 Remain 031min Rewrite 1234times Horizontal Scroll User Disc ID: User disc ID 1), 2) Title: Title 1) Title2: Title2 1), 2) Total DUR: Total recording time Remain: Remaining recording time Rewrite: Number of times rewritten 1) This can be specified with the PDZ-1 Proxy Browsing Software on the supplied XDCAM Application Software CD-ROM. 2) When the unit's area of use (UC/J MODEL SELECT) (see page 27) is set to "UC", titles can be displayed in European languages. To scroll hidden parts of the string into view When a b or B mark is displayed for an item, you can press the B/IN or b/OUT button to scroll the display by one character for each press. The V/MARK1 and v/MARK2 buttons scroll the beginning and end of the string into view. To return to the previous screen Press the PUSH SET(S.SEL) knob. To edit disc information You can edit the user disc ID, title 1), and title2 by using a software keyboard. 1) Only ASCII characters can be used for the title. See "To edit clip information" (page 68) for more information about operations. 79 Disc Operations
-
 1
1 -
2
-
3
-
4
-
5
-
6
-
7
-
8
-
9
-
10
-
11
-
12
-
13
-
14
-
15
-
16
-
17
-
18
-
19
-
20
-
21
-
22
-
23
-
24
-
25
-
26
-
27
-
28
-
29
-
30
-
31
-
32
-
33
-
34
-
35
-
36
-
37
-
38
-
39
-
40
-
41
-
42
-
43
-
44
-
45
-
46
-
47
-
48
-
49
-
50
-
51
-
52
-
53
-
54
-
55
-
56
-
57
-
58
-
59
-
60
-
61
-
62
-
63
-
64
-
65
-
66
-
67
-
68
-
69
-
70
-
71
-
72
-
73
-
 74
74 -
 75
75 -
 76
76 -
 77
77 -
 78
78 -
 79
79 -
 80
80 -
 81
81 -
 82
82 -
 83
83 -
 84
84 -
85
-
86
-
87
-
88
-
89
-
90
-
91
-
92
-
93
-
94
-
95
-
96
-
97
-
98
-
99
-
100
-
101
-
102
-
103
-
104
-
105
-
106
-
107
-
108
-
109
-
110
-
111
-
112
-
113
-
114
-
115
-
116
-
117
-
118
-
119
-
120
-
121
-
122
-
123
-
124
-
125
-
126
-
127
-
128
-
129
-
130
-
131
-
132
-
133
-
134
-
135
-
136
-
137
-
138
-
139
-
140
-
141
-
142
-
143
-
144
-
145
-
146
-
147
-
148
-
149
-
150
-
151
-
152
-
153
-
154
-
155
-
156
-
157
-
158
 |
 |