Sony PDWHD1500 User Manual (PDW-HD1500 Operation Manual for Firmware Version 1 - Page 68
Checking clip properties, To edit clip information
 |
View all Sony PDWHD1500 manuals
Add to My Manuals
Save this manual to your list of manuals |
Page 68 highlights
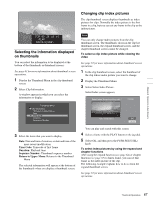
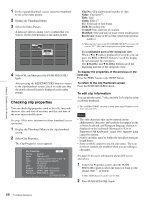
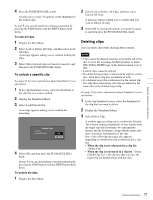
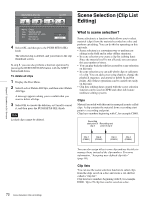
Chapter 5 Operations in GUI Screens 1 In the expand thumbnail screen, select the thumbnail to set as the index picture. 2 Display the Thumbnail Menu. 3 Select Set Index Picture. A message appears asking you to confirm that you want to set the current frame as the index picture. Expand 001/012 TC 00:01:35:17 TC 00:01:38:00 Set Index Picture TC 00:01:36:14 OK Cancel TC 00:01:36:27 TC 00:01:37:11 TC 00:01:37:24 TC 00:01:38:08 TC 00:01:38:22 TC 00:01:39:06 TC 00:01:38:19 CLIP Tene TC 00:01:40:02 TC 00:01:40:16 DUR 0:00:00:13 4 Select OK, and then press the PUSH SET(S.SEL) knob. After pressing the RESET/RETURN button to return to the clip thumbnail screen, check to make sure that the newly selected frame is displayed as the index picture. Checking clip properties You can check clip properties such as the title, timecode, duration, date and time of creation, and date and time of the more recent modification. See page 63 for more information about thumbnail screen operations. 1 Display the Thumbnail Menu in the clip thumbnail screen. 2 Select Clip Properties. The Clip Properties screen appears. Clip Properties OK Clip No. 001/035 Name TèlèvisionLCD Title Capping Literally years of spe... Title2 Rétroprpjecteurs BRAVIA TC 00:23:00:25 DUR 0:00:09:22 Created 30 NOV 2005 13:35±00:00 Modified 20 MAY 2006 15:02±00:00 Rec Device PDW-700(SN-10001) Horizontal Scroll Clip No.: Clip number/total number of clips Name: Clip name 1) Title: Title Title2: Title 2 1) TC: Timecode of first frame DUR: Recording time Created: Date and time of creation Modified: Date and time of most recent modification Rec Device: Name of device that created clip (product number) 1) When the unit's area of use (UC/J MODEL SELECT) (see page 27) is set to "UC", titles can be displayed in European languages. To scroll hidden parts of the string into view When a b or B mark is displayed for an item, you can press the B/IN or b/OUT button to scroll the display by one character for each press. The V/MARK1 and v/MARK2 buttons scroll the beginning and end of the string into view. To display the properties of the previous or the next clip Press the PREV button or the NEXT button. To return to the clip thumbnail screen Press the PUSH SET(S.SEL) knob. To edit clip information You can edit the name, 1) title, and title 2 of a clip by using a software keyboard. 1) The "NAMING FORM" sub-item on setup menu item 036 must be set to "free" (see page 103). Notes • The only characters that can be entered are the alphanumeric characters and symbols that appear on the software keyboard, and European language characters displayed on the keyboards illustrated in "List of Supported USB Keyboards" (page 148). Japanese kanji cannot be entered. • Names and titles must be within the specified character length limits. • Some symbols cannot be used in clip names. The keys for those symbols are disabled when you are editing a clip name. See page 63 for more information about GUI screen operations. 1 In the Clip Properties screen, turn the PUSH SET(S.SEL) knob to select the item you want to edit (Name, Title 1), or Title2). 1) Only ASCII characters can be used for Title. 2 Press PUSH SET(S.SEL) knob. 68 Thumbnail Operations
-
 1
1 -
2
-
3
-
4
-
5
-
6
-
7
-
8
-
9
-
10
-
11
-
12
-
13
-
14
-
15
-
16
-
17
-
18
-
19
-
20
-
21
-
22
-
23
-
24
-
25
-
26
-
27
-
28
-
29
-
30
-
31
-
32
-
33
-
34
-
35
-
36
-
37
-
38
-
39
-
40
-
41
-
42
-
43
-
44
-
45
-
46
-
47
-
48
-
49
-
50
-
51
-
52
-
53
-
54
-
55
-
56
-
57
-
58
-
59
-
60
-
61
-
62
-
 63
63 -
 64
64 -
 65
65 -
 66
66 -
 67
67 -
 68
68 -
 69
69 -
 70
70 -
 71
71 -
 72
72 -
 73
73 -
74
-
75
-
76
-
77
-
78
-
79
-
80
-
81
-
82
-
83
-
84
-
85
-
86
-
87
-
88
-
89
-
90
-
91
-
92
-
93
-
94
-
95
-
96
-
97
-
98
-
99
-
100
-
101
-
102
-
103
-
104
-
105
-
106
-
107
-
108
-
109
-
110
-
111
-
112
-
113
-
114
-
115
-
116
-
117
-
118
-
119
-
120
-
121
-
122
-
123
-
124
-
125
-
126
-
127
-
128
-
129
-
130
-
131
-
132
-
133
-
134
-
135
-
136
-
137
-
138
-
139
-
140
-
141
-
142
-
143
-
144
-
145
-
146
-
147
-
148
-
149
-
150
-
151
-
152
-
153
-
154
-
155
-
156
-
157
-
158
 |
 |
