Sony PDWHD1500 User Manual (PDW-HD1500 Operation Manual for Firmware Version 1 - Page 52
Playback, Disc playback start position
 |
View all Sony PDWHD1500 manuals
Add to My Manuals
Save this manual to your list of manuals |
Page 52 highlights
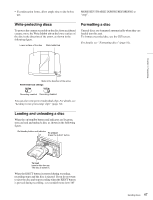
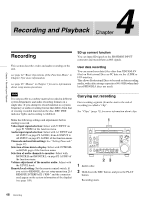
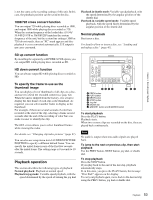
Chapter 4 Recording and Playback If the message reads "Incomplete!", the clips that failed were lost. Playback This section describes playback of video and audio on the unit. Before starting playback, make the following settings and adjustments. Selection of time data to display: Select with CNTR SEL on HOME page of the function menu. Selection of audio channels to monitor: Select with MONITR L and MONITR R on page P2 AUDIO of the function menu. Volume adjustment of the monitor audio: Adjust with the LEVEL knob. Remote/local setting: Set the remote control switch. If you set it to REMOTE, also set setup menu item 214 REMOTE INTERFACE ("RM-" and the connector used appear on the display) (see page 109). Disc playback start position Although this unit uses optical discs, it is designed to offer the most convenient features of tape playback by VTRs. One of these is the playback start position, which works in the same way as tape, as described below. After playback stop The unit stops at the position where the STOP button was pressed. Press the PLAY button to resume playback at the stop position. After recording The unit stops at the position where recording ended. To play back a clip, press the PREV button to move to the start frame of any clip or press the PREV button with the PLAY button held down to move to any position. After disc insertion The unit stops at the position of the disc when it was most recently ejected. Press the PLAY button to resume playback at the most recent position. The playback position is saved to the disc when the disc is ejected, which allows playback to start at that position whenever it is loaded into any XDCAM player. Note This function is not available when the Write Inhibit tab of the disc is set to the recording disabled position, and when REC INH on HOME page of the function menu is set to "ON". The REC INHI indicator may light when neither of the above is true if the format of recorded sections on the disc 52 Playback
-
 1
1 -
2
-
3
-
4
-
5
-
6
-
7
-
8
-
9
-
10
-
11
-
12
-
13
-
14
-
15
-
16
-
17
-
18
-
19
-
20
-
21
-
22
-
23
-
24
-
25
-
26
-
27
-
28
-
29
-
30
-
31
-
32
-
33
-
34
-
35
-
36
-
37
-
38
-
39
-
40
-
41
-
42
-
43
-
44
-
45
-
46
-
 47
47 -
 48
48 -
 49
49 -
 50
50 -
 51
51 -
 52
52 -
 53
53 -
 54
54 -
 55
55 -
 56
56 -
 57
57 -
58
-
59
-
60
-
61
-
62
-
63
-
64
-
65
-
66
-
67
-
68
-
69
-
70
-
71
-
72
-
73
-
74
-
75
-
76
-
77
-
78
-
79
-
80
-
81
-
82
-
83
-
84
-
85
-
86
-
87
-
88
-
89
-
90
-
91
-
92
-
93
-
94
-
95
-
96
-
97
-
98
-
99
-
100
-
101
-
102
-
103
-
104
-
105
-
106
-
107
-
108
-
109
-
110
-
111
-
112
-
113
-
114
-
115
-
116
-
117
-
118
-
119
-
120
-
121
-
122
-
123
-
124
-
125
-
126
-
127
-
128
-
129
-
130
-
131
-
132
-
133
-
134
-
135
-
136
-
137
-
138
-
139
-
140
-
141
-
142
-
143
-
144
-
145
-
146
-
147
-
148
-
149
-
150
-
151
-
152
-
153
-
154
-
155
-
156
-
157
-
158
 |
 |