Dell 2130 Color Laser User Guide - Page 112
Adjusting Color Registration
 |
View all Dell 2130 Color Laser manuals
Add to My Manuals
Save this manual to your list of manuals |
Page 112 highlights
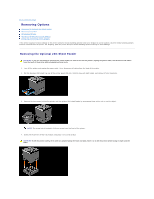
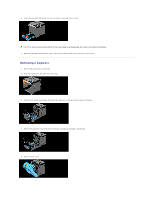
8. Insert the standard 250-sheet tray into the printer, and push until it stops. CAUTION: Do not use excessive force on the tray. Doing so could damage the tray or the inside of the printer. Adjusting Color Registration To adjust the color registration after moving it to a new location, follow the procedure below. Printing the Color Registration Chart When Using the Operator Panel 1. Press Menu button. 2. Press button until Admin Menu appears, and then press (Set) button. 3. Press button until Maintenance appears, and then press (Set) button. 4. Press button until Color Reg Adj appears, and then press (Set) button. 5. Press button until ColorRegi Chart appears, and then press (Set) button. The color registration chart is printed. When Using the Tool Box 1. Click start® All Programs® Dell Printers® Dell 2130cn Color Laser Printer® Tool Box. The Select Printer dialog box opens. 2. Click the name of this printer listed in Printer Name, and then click OK. The Tool Box opens. 3. Click the Printer Maintenance tab. 4. Select Registration Adjustment from the list at the left side of the page. The Registration Adjustment page is displayed. 5. Click the Start button next to Color Regi Chart. The color registration chart is printed. Determining Values On the color registration chart, there are two types of charts: Chart 1 (fast scan) and Chart 2 (slow scan). The Chart 1 is used to adjust the color registration for the fast scan direction, which is vertical to paper feed direction. The Chart 2 is used to adjust the color registration for the slow scan direction, which is horizontal to paper feed direction.
-
 1
1 -
2
-
3
-
4
-
5
-
6
-
7
-
8
-
9
-
10
-
11
-
12
-
13
-
14
-
15
-
16
-
17
-
18
-
19
-
20
-
21
-
22
-
23
-
24
-
25
-
26
-
27
-
28
-
29
-
30
-
31
-
32
-
33
-
34
-
35
-
36
-
37
-
38
-
39
-
40
-
41
-
42
-
43
-
44
-
45
-
46
-
47
-
48
-
49
-
50
-
51
-
52
-
53
-
54
-
55
-
56
-
57
-
58
-
59
-
60
-
61
-
62
-
63
-
64
-
65
-
66
-
67
-
68
-
69
-
70
-
71
-
72
-
73
-
74
-
75
-
76
-
77
-
78
-
79
-
80
-
81
-
82
-
83
-
84
-
85
-
86
-
87
-
88
-
89
-
90
-
91
-
92
-
93
-
94
-
95
-
96
-
97
-
98
-
99
-
100
-
101
-
102
-
103
-
104
-
105
-
106
-
 107
107 -
 108
108 -
 109
109 -
 110
110 -
 111
111 -
 112
112 -
 113
113 -
 114
114 -
 115
115 -
 116
116 -
 117
117 -
118
-
119
-
120
-
121
-
122
-
123
-
124
-
125
-
126
-
127
-
128
-
129
-
130
-
131
-
132
-
133
-
134
-
135
-
136
-
137
-
138
-
139
-
140
-
141
-
142
-
143
-
144
-
145
-
146
-
147
-
148
-
149
-
150
-
151
-
152
-
153
-
154
-
155
-
156
-
157
-
158
-
159
-
160
-
161
-
162
-
163
-
164
-
165
-
166
-
167
-
168
-
169
-
170
-
171
-
172
-
173
-
174
-
175
-
176
-
177
-
178
-
179
-
180
-
181
-
182
-
183
-
184
-
185
-
186
-
187
-
188
-
189
-
190
-
191
-
192
-
193
-
194
-
195
-
196
-
197
-
198
-
199
-
200
-
201
-
202
-
203
-
204
 |
 |
