Dell 2130 Color Laser User Guide - Page 139
Turn On the Printer, Print and Check the Printer Settings
 |
View all Dell 2130 Color Laser manuals
Add to My Manuals
Save this manual to your list of manuals |
Page 139 highlights
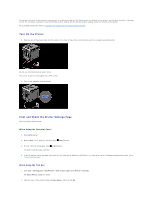
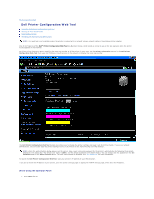
To connect the printer to the network, plug one end of an Ethernet cable into the Ethernet port on the back of the printer, and the other end into a LAN drop or hub. For a wireless connection, insert the wireless printer adapter into the wireless printer adapter socket on the back of the printer. For a wireless connection, refer to "Installing and Configuring the Wireless Printer Adapter". Turn On the Printer 1. Plug one end of the power cable into the socket at the back of the printer and the other end into a properly grounded outlet. Do not use extension cords or power strips. The printer should not be plugged into a UPS system. 2. Turn on the computer and the printer. Print and Check the Printer Settings Page Print the printer settings page. When Using the Operator Panel 1. Press Menu button. 2. Ensure Report/List appears, and then press (Set) button. 3. Printer Setting is displayed. Press (Set) button. The printer settings page is printed. 4. If the IP address shows anything other than 0.0.0.0 (the factory default) or 169.254.xx.xx, the printer has an IP address assigned and stored. Go to "Verify the IP Settings." When Using the Tool Box 1. Click start® All Programs® Dell Printers® Dell 2130cn Color Laser Printer® Tool Box. The Select Printer dialog box opens. 2. Click the name of this printer listed in Printer Name, and then click OK.
-
 1
1 -
2
-
3
-
4
-
5
-
6
-
7
-
8
-
9
-
10
-
11
-
12
-
13
-
14
-
15
-
16
-
17
-
18
-
19
-
20
-
21
-
22
-
23
-
24
-
25
-
26
-
27
-
28
-
29
-
30
-
31
-
32
-
33
-
34
-
35
-
36
-
37
-
38
-
39
-
40
-
41
-
42
-
43
-
44
-
45
-
46
-
47
-
48
-
49
-
50
-
51
-
52
-
53
-
54
-
55
-
56
-
57
-
58
-
59
-
60
-
61
-
62
-
63
-
64
-
65
-
66
-
67
-
68
-
69
-
70
-
71
-
72
-
73
-
74
-
75
-
76
-
77
-
78
-
79
-
80
-
81
-
82
-
83
-
84
-
85
-
86
-
87
-
88
-
89
-
90
-
91
-
92
-
93
-
94
-
95
-
96
-
97
-
98
-
99
-
100
-
101
-
102
-
103
-
104
-
105
-
106
-
107
-
108
-
109
-
110
-
111
-
112
-
113
-
114
-
115
-
116
-
117
-
118
-
119
-
120
-
121
-
122
-
123
-
124
-
125
-
126
-
127
-
128
-
129
-
130
-
131
-
132
-
133
-
 134
134 -
 135
135 -
 136
136 -
 137
137 -
 138
138 -
 139
139 -
 140
140 -
 141
141 -
 142
142 -
 143
143 -
 144
144 -
145
-
146
-
147
-
148
-
149
-
150
-
151
-
152
-
153
-
154
-
155
-
156
-
157
-
158
-
159
-
160
-
161
-
162
-
163
-
164
-
165
-
166
-
167
-
168
-
169
-
170
-
171
-
172
-
173
-
174
-
175
-
176
-
177
-
178
-
179
-
180
-
181
-
182
-
183
-
184
-
185
-
186
-
187
-
188
-
189
-
190
-
191
-
192
-
193
-
194
-
195
-
196
-
197
-
198
-
199
-
200
-
201
-
202
-
203
-
204
 |
 |
