Dell 2130 Color Laser User Guide - Page 72
Removing Print Jams From the Fuser
 |
View all Dell 2130 Color Laser manuals
Add to My Manuals
Save this manual to your list of manuals |
Page 72 highlights
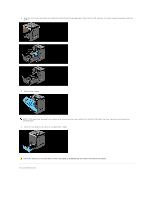
8. Insert the tray into the printer, and push until it stops. CAUTION: Do not use excessive force on the tray. Doing so could damage the tray or the inside of the printer. Removing Print Jams From the Fuser NOTE: To resolve the error displayed on the operator panel, you must clear all print media from the print media path. 1. Wait for 30 minutes. 2. Push the side button and open the front cover. 3. Open the belt unit until it stops. 4. Lift the levers at both ends of the fuser, and remove the jammed paper. If any jammed paper cannot be found, go to the next step. The fuser is hot. Do not touch it, doing so may cause burns. 5. Open the cover of the fuser and remove the jammed paper.
-
 1
1 -
2
-
3
-
4
-
5
-
6
-
7
-
8
-
9
-
10
-
11
-
12
-
13
-
14
-
15
-
16
-
17
-
18
-
19
-
20
-
21
-
22
-
23
-
24
-
25
-
26
-
27
-
28
-
29
-
30
-
31
-
32
-
33
-
34
-
35
-
36
-
37
-
38
-
39
-
40
-
41
-
42
-
43
-
44
-
45
-
46
-
47
-
48
-
49
-
50
-
51
-
52
-
53
-
54
-
55
-
56
-
57
-
58
-
59
-
60
-
61
-
62
-
63
-
64
-
65
-
66
-
 67
67 -
 68
68 -
 69
69 -
 70
70 -
 71
71 -
 72
72 -
 73
73 -
 74
74 -
 75
75 -
 76
76 -
 77
77 -
78
-
79
-
80
-
81
-
82
-
83
-
84
-
85
-
86
-
87
-
88
-
89
-
90
-
91
-
92
-
93
-
94
-
95
-
96
-
97
-
98
-
99
-
100
-
101
-
102
-
103
-
104
-
105
-
106
-
107
-
108
-
109
-
110
-
111
-
112
-
113
-
114
-
115
-
116
-
117
-
118
-
119
-
120
-
121
-
122
-
123
-
124
-
125
-
126
-
127
-
128
-
129
-
130
-
131
-
132
-
133
-
134
-
135
-
136
-
137
-
138
-
139
-
140
-
141
-
142
-
143
-
144
-
145
-
146
-
147
-
148
-
149
-
150
-
151
-
152
-
153
-
154
-
155
-
156
-
157
-
158
-
159
-
160
-
161
-
162
-
163
-
164
-
165
-
166
-
167
-
168
-
169
-
170
-
171
-
172
-
173
-
174
-
175
-
176
-
177
-
178
-
179
-
180
-
181
-
182
-
183
-
184
-
185
-
186
-
187
-
188
-
189
-
190
-
191
-
192
-
193
-
194
-
195
-
196
-
197
-
198
-
199
-
200
-
201
-
202
-
203
-
204
 |
 |

8.
Insert the tray into the printer, and push until it stops.
Removing Print Jams From the Fuser
1.
Wait for 30 minutes.
2.
Push the side button and open the front cover.
3.
Open the belt unit until it stops.
4.
Lift the levers at both ends of the fuser, and remove the jammed paper. If any jammed paper cannot be found, go to the next step.
The fuser is hot. Do not touch it, doing so may cause burns.
5.
Open the cover of the fuser and remove the jammed paper.
CAUTION:
Do not use excessive force on the tray. Doing so could damage the tray or the inside of the printer.
NOTE:
To resolve the error displayed on the operator panel, you must clear all print media from the print media path.