Dell 2130 Color Laser User Guide - Page 78
Part of the output is too light.
 |
View all Dell 2130 Color Laser manuals
Add to My Manuals
Save this manual to your list of manuals |
Page 78 highlights
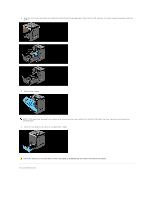
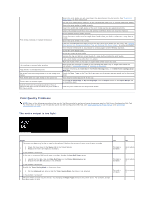
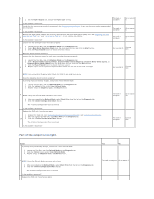
4 1. On the Paper/Output tab, change the Paper Type setting. The task is complete. Go to action 5. Is the problem recovered? Verify that the correct print media is being used. See "Supported Paper Sizes". If not, use the print media recommended for the printer. 5 Is the problem recovered? Ensure that eight yellow ribbons are correctly removed from the Print Head Device (PHD) unit. See "Replacing the Print Head Device (PHD) Unit" and "Installing the PHD Unit". If not, remove the ribbons. 6 Is the problem recovered? Ensure that the developer motor functions properly. The task is complete. The task is complete. Go to action 6. Go to action 7. 1. Launch the Tool Box, and click Machine Check on the Diagnosis tab. 7 2. Select Main Motor Operation Check from the drop-down list box and click the Start button. 3. Click the Play of Sound button to check the motor sound. Contact Go to action 8. Dell. Does the motor function properly? Ensure that the dispense motor for each toner cartridge functions properly. 1. Launch the Tool Box, and click Machine Check on the Diagnosis tab. 2. Select Dispense Motor Check (Yellow), Dispense Motor Check (Magenta), Dispense Motor Check (Cyan), or Dispense Motor Check (Black) from the drop-down list box, and click the Start button. 3. Click the Play of Sound button to check the motor sound. 8 4. Repeat step 2 and 3 to perform Dispense Motor Check for the rest of the toner cartridges. Contact Go to action 9. Dell. NOTE: You can perform Dispense Motor Check for CMYK in any order you desire. Does the dispense motor function properly? If printing many low density images, execute the Toner Refresh Mode. 1. Launch the Tool Box, and click Refresh Mode on the Diagnosis tab. 2. Click the Yellow button under Toner Refresh Mode. 3. Repeat step 2 for Magenta, Cyan, and Black buttons. 9 NOTE: Using the Refresh Mode consumes extra toner. 4. After you complete the Refresh Mode, select Chart Print from the list on the Diagnosis tab. 5. Click the 4 Colors Configuration Chart button. The 4 Colors Configuration Chart is printed. Is the problem recovered? Replace the PHD unit if you have a spare. 1. Replace the PHD unit. See "Replacing the Print Head Device (PHD) Unit" and "Installing the PHD Unit". 2. After you replace the PHD unit, click Chart Print on the Diagnosis tab. 10 3. Click the 4 Colors Configuration Chart button. The 4 Colors Configuration Chart is printed. Is the problem recovered? The task is complete. Go to action 10. The task is complete. Contact Dell. Part of the output is too light. Action If printing many low density images, execute the Toner Refresh Mode. 1. Launch the Tool Box, and click Refresh Mode on the Diagnosis tab. 2. Click the Yellow button under Toner Refresh Mode. 3. Repeat step 2 for Magenta, Cyan, and Black buttons. 1 NOTE: Using the Refresh Mode consumes extra toner. 4. After you complete the Refresh Mode, select Chart Print from the list on the Diagnosis tab. 5. Click the 4 Colors Configuration Chart button. The 4 Colors Configuration Chart is printed. Is the problem recovered? Replace the PHD unit if you have a spare. Yes No The task is complete. Go to action 2.
-
 1
1 -
2
-
3
-
4
-
5
-
6
-
7
-
8
-
9
-
10
-
11
-
12
-
13
-
14
-
15
-
16
-
17
-
18
-
19
-
20
-
21
-
22
-
23
-
24
-
25
-
26
-
27
-
28
-
29
-
30
-
31
-
32
-
33
-
34
-
35
-
36
-
37
-
38
-
39
-
40
-
41
-
42
-
43
-
44
-
45
-
46
-
47
-
48
-
49
-
50
-
51
-
52
-
53
-
54
-
55
-
56
-
57
-
58
-
59
-
60
-
61
-
62
-
63
-
64
-
65
-
66
-
67
-
68
-
69
-
70
-
71
-
72
-
 73
73 -
 74
74 -
 75
75 -
 76
76 -
 77
77 -
 78
78 -
 79
79 -
 80
80 -
 81
81 -
 82
82 -
 83
83 -
84
-
85
-
86
-
87
-
88
-
89
-
90
-
91
-
92
-
93
-
94
-
95
-
96
-
97
-
98
-
99
-
100
-
101
-
102
-
103
-
104
-
105
-
106
-
107
-
108
-
109
-
110
-
111
-
112
-
113
-
114
-
115
-
116
-
117
-
118
-
119
-
120
-
121
-
122
-
123
-
124
-
125
-
126
-
127
-
128
-
129
-
130
-
131
-
132
-
133
-
134
-
135
-
136
-
137
-
138
-
139
-
140
-
141
-
142
-
143
-
144
-
145
-
146
-
147
-
148
-
149
-
150
-
151
-
152
-
153
-
154
-
155
-
156
-
157
-
158
-
159
-
160
-
161
-
162
-
163
-
164
-
165
-
166
-
167
-
168
-
169
-
170
-
171
-
172
-
173
-
174
-
175
-
176
-
177
-
178
-
179
-
180
-
181
-
182
-
183
-
184
-
185
-
186
-
187
-
188
-
189
-
190
-
191
-
192
-
193
-
194
-
195
-
196
-
197
-
198
-
199
-
200
-
201
-
202
-
203
-
204
 |
 |
