Dell 2130 Color Laser User Guide - Page 116
Removing Options
 |
View all Dell 2130 Color Laser manuals
Add to My Manuals
Save this manual to your list of manuals |
Page 116 highlights
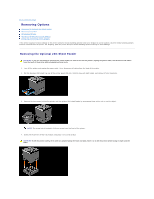
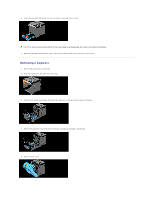
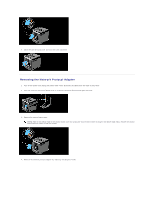
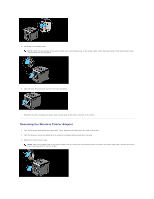
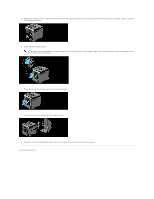
Back to Contents Page Removing Options Removing the Optional 250-Sheet Feeder Removing a Duplexer Removing a Memory Removing the Network Protocol Adapter Removing the Wireless Printer Adapter If the printer location needs to change or the printer and print media handling options need to be shipped to a new location, all print media handling options must be removed from the printer. For shipping, pack the printer and print media handling options securely to avoid damage. Removing the Optional 250-Sheet Feeder CAUTION: If you are removing an optional 250-sheet feeder, be sure to turn off the printer, unplug the power cable, and disconnect all cables from the back of the printer before completing these tasks. 1. Turn off the printer and unplug the power cable. Then, disconnect all cables from the back of the printer. 2. Pull the standard 250-sheet tray out of the printer about 200 mm. Hold the tray with both hands, and remove it from the printer. 3. Remove the two screws joining the printer and the optional 250-sheet feeder by unscrewing them with a coin or similar object. NOTE: The screw hole is located in 216 mm recess from the front of the printer. 4. Gently lift the printer off the tray module, and place it on a level surface. CAUTION: To lift the printer safely, lift it with two people facing the front and back. Never try to lift the printer while facing its right and left sides.
-
 1
1 -
2
-
3
-
4
-
5
-
6
-
7
-
8
-
9
-
10
-
11
-
12
-
13
-
14
-
15
-
16
-
17
-
18
-
19
-
20
-
21
-
22
-
23
-
24
-
25
-
26
-
27
-
28
-
29
-
30
-
31
-
32
-
33
-
34
-
35
-
36
-
37
-
38
-
39
-
40
-
41
-
42
-
43
-
44
-
45
-
46
-
47
-
48
-
49
-
50
-
51
-
52
-
53
-
54
-
55
-
56
-
57
-
58
-
59
-
60
-
61
-
62
-
63
-
64
-
65
-
66
-
67
-
68
-
69
-
70
-
71
-
72
-
73
-
74
-
75
-
76
-
77
-
78
-
79
-
80
-
81
-
82
-
83
-
84
-
85
-
86
-
87
-
88
-
89
-
90
-
91
-
92
-
93
-
94
-
95
-
96
-
97
-
98
-
99
-
100
-
101
-
102
-
103
-
104
-
105
-
106
-
107
-
108
-
109
-
110
-
 111
111 -
 112
112 -
 113
113 -
 114
114 -
 115
115 -
 116
116 -
 117
117 -
 118
118 -
 119
119 -
 120
120 -
 121
121 -
122
-
123
-
124
-
125
-
126
-
127
-
128
-
129
-
130
-
131
-
132
-
133
-
134
-
135
-
136
-
137
-
138
-
139
-
140
-
141
-
142
-
143
-
144
-
145
-
146
-
147
-
148
-
149
-
150
-
151
-
152
-
153
-
154
-
155
-
156
-
157
-
158
-
159
-
160
-
161
-
162
-
163
-
164
-
165
-
166
-
167
-
168
-
169
-
170
-
171
-
172
-
173
-
174
-
175
-
176
-
177
-
178
-
179
-
180
-
181
-
182
-
183
-
184
-
185
-
186
-
187
-
188
-
189
-
190
-
191
-
192
-
193
-
194
-
195
-
196
-
197
-
198
-
199
-
200
-
201
-
202
-
203
-
204
 |
 |
