Dell 2130 Color Laser User Guide - Page 169
When Using the Operator Panel, When Using the Tool Box
 |
View all Dell 2130 Color Laser manuals
Add to My Manuals
Save this manual to your list of manuals |
Page 169 highlights
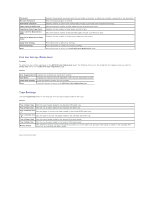
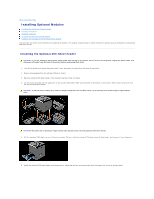
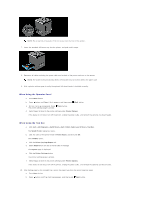
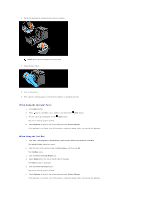
NOTE: The screw hole is located in 216 mm recess from the front of the printer. 7. Insert the standard 250-sheet tray into the printer, and push until it stops. 8. Reconnect all cables including the power cable into the back of the printer and turn on the printer. NOTE: The printer will automatically detect the attached tray but will not detect the paper type. 9. Print a printer settings page to verify the optional 250-sheet feeder is installed correctly. When Using the Operator Panel a. Press Menu button. b. Press button until Report/List appears, and then press (Set) button. c. Printer Setting is displayed. Press (Set) button. The printer settings page is printed. d. Verify Tray 2 is listed in the printer settings under Printer Options. If the feeder is not listed, turn off the printer, unplug the power cable, and reinstall the optional 250-sheet feeder. When Using the Tool Box a. Click start® All Programs® Dell Printers® Dell 2130cn Color Laser Printer® Tool Box. The Select Printer dialog box opens. b. Click the name of this printer listed in Printer Name, and then click OK. The Tool Box opens. c. Click the Printer Settings Report tab. d. Select Reports from the list at the left side of the page. The Reports page is displayed. e. Click the Printer Settings button. The printer settings page is printed. f. Verify Tray 2 is listed in the printer settings under Printer Options. If the feeder is not listed, turn off the printer, unplug the power cable, and reinstall the optional 250-sheet feeder. 10. After loading paper in the installed tray, specify the paper type from the printer operator panel. a. Press Menu button. b. Press button until Tray Settings appears, and then press (Set) button.
-
 1
1 -
2
-
3
-
4
-
5
-
6
-
7
-
8
-
9
-
10
-
11
-
12
-
13
-
14
-
15
-
16
-
17
-
18
-
19
-
20
-
21
-
22
-
23
-
24
-
25
-
26
-
27
-
28
-
29
-
30
-
31
-
32
-
33
-
34
-
35
-
36
-
37
-
38
-
39
-
40
-
41
-
42
-
43
-
44
-
45
-
46
-
47
-
48
-
49
-
50
-
51
-
52
-
53
-
54
-
55
-
56
-
57
-
58
-
59
-
60
-
61
-
62
-
63
-
64
-
65
-
66
-
67
-
68
-
69
-
70
-
71
-
72
-
73
-
74
-
75
-
76
-
77
-
78
-
79
-
80
-
81
-
82
-
83
-
84
-
85
-
86
-
87
-
88
-
89
-
90
-
91
-
92
-
93
-
94
-
95
-
96
-
97
-
98
-
99
-
100
-
101
-
102
-
103
-
104
-
105
-
106
-
107
-
108
-
109
-
110
-
111
-
112
-
113
-
114
-
115
-
116
-
117
-
118
-
119
-
120
-
121
-
122
-
123
-
124
-
125
-
126
-
127
-
128
-
129
-
130
-
131
-
132
-
133
-
134
-
135
-
136
-
137
-
138
-
139
-
140
-
141
-
142
-
143
-
144
-
145
-
146
-
147
-
148
-
149
-
150
-
151
-
152
-
153
-
154
-
155
-
156
-
157
-
158
-
159
-
160
-
161
-
162
-
163
-
 164
164 -
 165
165 -
 166
166 -
 167
167 -
 168
168 -
 169
169 -
 170
170 -
 171
171 -
 172
172 -
 173
173 -
 174
174 -
175
-
176
-
177
-
178
-
179
-
180
-
181
-
182
-
183
-
184
-
185
-
186
-
187
-
188
-
189
-
190
-
191
-
192
-
193
-
194
-
195
-
196
-
197
-
198
-
199
-
200
-
201
-
202
-
203
-
204
 |
 |
