Dell 2130 Color Laser User Guide - Page 171
the arrow mark on the front cover.
 |
View all Dell 2130 Color Laser manuals
Add to My Manuals
Save this manual to your list of manuals |
Page 171 highlights
2. Remove all packaging from the duplexer. 3. Push the side button and open the front cover. 4. Remove the connector cap. 5. Install the duplexer into the inside of the front cover. NOTE: Ensure that the duplexer is parallel to the front cover when action is being carried out. NOTE: Align the groove on the right tip of the duplexer to the projection on the front cover. Align the arrow mark on the left tip of the duplexer to the arrow mark on the front cover. NOTE: Align the connector on the right side of the duplexer to the connector on the front cover as shown in the illustration. The guiding rib on the left side of the front cover needs to be well aligned to the window on the left side of the duplexer.
-
 1
1 -
2
-
3
-
4
-
5
-
6
-
7
-
8
-
9
-
10
-
11
-
12
-
13
-
14
-
15
-
16
-
17
-
18
-
19
-
20
-
21
-
22
-
23
-
24
-
25
-
26
-
27
-
28
-
29
-
30
-
31
-
32
-
33
-
34
-
35
-
36
-
37
-
38
-
39
-
40
-
41
-
42
-
43
-
44
-
45
-
46
-
47
-
48
-
49
-
50
-
51
-
52
-
53
-
54
-
55
-
56
-
57
-
58
-
59
-
60
-
61
-
62
-
63
-
64
-
65
-
66
-
67
-
68
-
69
-
70
-
71
-
72
-
73
-
74
-
75
-
76
-
77
-
78
-
79
-
80
-
81
-
82
-
83
-
84
-
85
-
86
-
87
-
88
-
89
-
90
-
91
-
92
-
93
-
94
-
95
-
96
-
97
-
98
-
99
-
100
-
101
-
102
-
103
-
104
-
105
-
106
-
107
-
108
-
109
-
110
-
111
-
112
-
113
-
114
-
115
-
116
-
117
-
118
-
119
-
120
-
121
-
122
-
123
-
124
-
125
-
126
-
127
-
128
-
129
-
130
-
131
-
132
-
133
-
134
-
135
-
136
-
137
-
138
-
139
-
140
-
141
-
142
-
143
-
144
-
145
-
146
-
147
-
148
-
149
-
150
-
151
-
152
-
153
-
154
-
155
-
156
-
157
-
158
-
159
-
160
-
161
-
162
-
163
-
164
-
165
-
 166
166 -
 167
167 -
 168
168 -
 169
169 -
 170
170 -
 171
171 -
 172
172 -
 173
173 -
 174
174 -
 175
175 -
 176
176 -
177
-
178
-
179
-
180
-
181
-
182
-
183
-
184
-
185
-
186
-
187
-
188
-
189
-
190
-
191
-
192
-
193
-
194
-
195
-
196
-
197
-
198
-
199
-
200
-
201
-
202
-
203
-
204
 |
 |

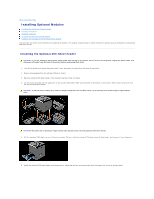
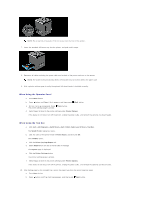
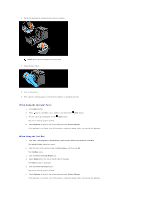
2.
Remove all packaging from the duplexer.
3.
Push the side button and open the front cover.
4.
Remove the connector cap.
5.
Install the duplexer into the inside of the front cover.
NOTE:
Ensure that the duplexer is parallel to the front cover when action is being carried out.
NOTE:
Align the groove on the right tip of the duplexer to the projection on the front cover. Align the arrow mark on the left tip of the duplexer to
the arrow mark on the front cover.
NOTE:
Align the connector on the right side of the duplexer to the connector on the front cover as shown in the illustration. The guiding rib on the
left side of the front cover needs to be well aligned to the window on the left side of the duplexer.