Dell 2130 Color Laser User Guide - Page 118
Removing a Memory
 |
View all Dell 2130 Color Laser manuals
Add to My Manuals
Save this manual to your list of manuals |
Page 118 highlights
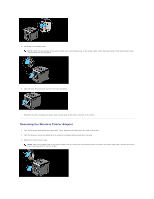
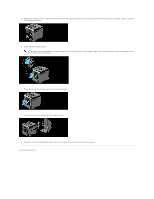
Removing a Memory 1. Ensure that the printer is turned off. 2. Turn the screw on the control board cover in a counter-clockwise direction and open the cover. 3. Remove the control board cover. NOTE: Take off the below edge of the control board cover by turning the control board cover on hinge in the above edge. Next, remove the control board cover by pulling it from the printer. 4. Push the latches on both edges of the socket outward at the same time to raise the memory up. 5. Hold the memory and pull it out. 6. Install the control board cover. NOTE: Insert the above hinge of the control board cover into the above slit on the printer. Next, insert the below hinge of the control board cover into the below slit on the printer.
-
 1
1 -
2
-
3
-
4
-
5
-
6
-
7
-
8
-
9
-
10
-
11
-
12
-
13
-
14
-
15
-
16
-
17
-
18
-
19
-
20
-
21
-
22
-
23
-
24
-
25
-
26
-
27
-
28
-
29
-
30
-
31
-
32
-
33
-
34
-
35
-
36
-
37
-
38
-
39
-
40
-
41
-
42
-
43
-
44
-
45
-
46
-
47
-
48
-
49
-
50
-
51
-
52
-
53
-
54
-
55
-
56
-
57
-
58
-
59
-
60
-
61
-
62
-
63
-
64
-
65
-
66
-
67
-
68
-
69
-
70
-
71
-
72
-
73
-
74
-
75
-
76
-
77
-
78
-
79
-
80
-
81
-
82
-
83
-
84
-
85
-
86
-
87
-
88
-
89
-
90
-
91
-
92
-
93
-
94
-
95
-
96
-
97
-
98
-
99
-
100
-
101
-
102
-
103
-
104
-
105
-
106
-
107
-
108
-
109
-
110
-
111
-
112
-
 113
113 -
 114
114 -
 115
115 -
 116
116 -
 117
117 -
 118
118 -
 119
119 -
 120
120 -
 121
121 -
 122
122 -
 123
123 -
124
-
125
-
126
-
127
-
128
-
129
-
130
-
131
-
132
-
133
-
134
-
135
-
136
-
137
-
138
-
139
-
140
-
141
-
142
-
143
-
144
-
145
-
146
-
147
-
148
-
149
-
150
-
151
-
152
-
153
-
154
-
155
-
156
-
157
-
158
-
159
-
160
-
161
-
162
-
163
-
164
-
165
-
166
-
167
-
168
-
169
-
170
-
171
-
172
-
173
-
174
-
175
-
176
-
177
-
178
-
179
-
180
-
181
-
182
-
183
-
184
-
185
-
186
-
187
-
188
-
189
-
190
-
191
-
192
-
193
-
194
-
195
-
196
-
197
-
198
-
199
-
200
-
201
-
202
-
203
-
204
 |
 |

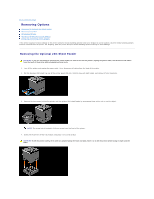
Removing a Memory
1.
Ensure that the printer is turned off.
2.
Turn the screw on the control board cover in a counter-clockwise direction and open the cover.
3.
Remove the control board cover.
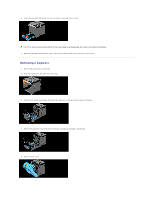
4.
Push the latches on both edges of the socket outward at the same time to raise the memory up.
5.
Hold the memory and pull it out.
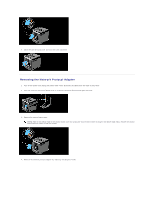
6.
Install the control board cover.
NOTE:
Take off the below edge of the control board cover by turning the control board cover on hinge in the above edge. Next, remove the control
board cover by pulling it from the printer.
NOTE:
Insert the above hinge of the control board cover into the above slit on the printer. Next, insert the below hinge of the control board cover
into the below slit on the printer.