Dell 2130 Color Laser User Guide - Page 77
Print Quality Problems
 |
View all Dell 2130 Color Laser manuals
Add to My Manuals
Save this manual to your list of manuals |
Page 77 highlights
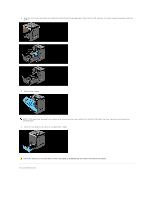
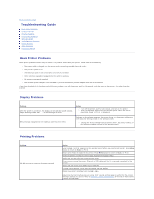
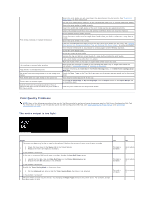
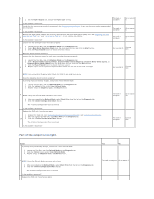
Print media misfeeds or multiple feeds occur The envelope is creased after printing. Page breaks in unexpected places. Job prints from the wrong source or on the wrong print media. Print media does not stack neatly in the output bin. Printer does not duplex pages. Cannot print from the standard 250-sheet tray or optional 250-sheet feeder because the print media in the tray is curled. Ensure the print media you are using meets the specifications for your printer. See "Supported Paper Sizes" for more information. Fan the print media before loading it in the standard 250-sheet tray or optional 250-sheet feeder. Ensure the print media is loaded correctly. Ensure the width and length guides of the print media sources are adjusted correctly. Ensure the standard 250-sheet tray and optional 250-sheet feeder are securely inserted. Do not overfill the print media sources. Do not force print media into the single sheet feeder when you load it; otherwise, it may skew or buckle. Ensure the print media is not curled. Load the recommended print side correctly for the type of print media you are using. See "Loading Print Media in the Standard 250-Sheet Tray and Optional 250-Sheet Feeder" for more information. Turn the print media over or around and try printing again to see if feeding improves. Do not mix print media types. Do not mix reams of print media. Remove the top and bottom curled sheets of a ream before loading the print media. Load a print media source only when it is empty. Wipe the retard rollers in the trays or single sheet feeder with a dry cloth. Ensure that the envelope is loaded in the standard 250-sheet tray or single sheet feeder as instructed in "Loading Envelopes" or "Loading an Envelope". Increase the setting for Time-Out in the Printer Settings menu in the Dell Printer Configuration Web Tool. Check the Paper Types in the Tray Settings menu on the printer operator panel and in the printer driver. Turn the print media stack over in the tray. Select Flip on Short Edge or Flip on Long Edge from the Duplex menu on the Paper/Output tab in the printer driver. Load the print media into the single sheet feeder. Print Quality Problems NOTE: Some of the following procedures that use the Tool Box can also be performed using the operator panel or Dell Printer Configuration Web Tool. For information on how to use the operator panel and Dell Configuration Web Tool, see "Understanding the Printer Menus" and "Dell Printer Configuration Web Tool". The entire output is too light. Action The toner cartridges may be low or need to be replaced. Confirm the amount of toner in each toner cartridge. Yes 1. Check the toner level in the Status tab in the Status Monitor. 1 2. Replace the toner cartridges as necessary. The task is complete. Is the problem recovered? If the user is using non-Dell brand toner cartridges, disable the Non-Dell Toner option. 1. Launch the Tool Box, and click Non-Dell Toner on the Printer Maintenance tab. 2 2. Ensure that the On check box is not selected. The task is complete. Is the problem recovered? Disable the Toner Saving Mode in the printer driver. 3 1. On the Advanced tab, ensure that the Toner Saving Mode check box is not selected. Is the problem recovered? The print media surface may be uneven. Try changing the Paper Type setting in the printer driver. For example, change the plain paper to thick. The task is complete. No Go to action 2. Go to action 3. Go to action 4.
-
 1
1 -
2
-
3
-
4
-
5
-
6
-
7
-
8
-
9
-
10
-
11
-
12
-
13
-
14
-
15
-
16
-
17
-
18
-
19
-
20
-
21
-
22
-
23
-
24
-
25
-
26
-
27
-
28
-
29
-
30
-
31
-
32
-
33
-
34
-
35
-
36
-
37
-
38
-
39
-
40
-
41
-
42
-
43
-
44
-
45
-
46
-
47
-
48
-
49
-
50
-
51
-
52
-
53
-
54
-
55
-
56
-
57
-
58
-
59
-
60
-
61
-
62
-
63
-
64
-
65
-
66
-
67
-
68
-
69
-
70
-
71
-
 72
72 -
 73
73 -
 74
74 -
 75
75 -
 76
76 -
 77
77 -
 78
78 -
 79
79 -
 80
80 -
 81
81 -
 82
82 -
83
-
84
-
85
-
86
-
87
-
88
-
89
-
90
-
91
-
92
-
93
-
94
-
95
-
96
-
97
-
98
-
99
-
100
-
101
-
102
-
103
-
104
-
105
-
106
-
107
-
108
-
109
-
110
-
111
-
112
-
113
-
114
-
115
-
116
-
117
-
118
-
119
-
120
-
121
-
122
-
123
-
124
-
125
-
126
-
127
-
128
-
129
-
130
-
131
-
132
-
133
-
134
-
135
-
136
-
137
-
138
-
139
-
140
-
141
-
142
-
143
-
144
-
145
-
146
-
147
-
148
-
149
-
150
-
151
-
152
-
153
-
154
-
155
-
156
-
157
-
158
-
159
-
160
-
161
-
162
-
163
-
164
-
165
-
166
-
167
-
168
-
169
-
170
-
171
-
172
-
173
-
174
-
175
-
176
-
177
-
178
-
179
-
180
-
181
-
182
-
183
-
184
-
185
-
186
-
187
-
188
-
189
-
190
-
191
-
192
-
193
-
194
-
195
-
196
-
197
-
198
-
199
-
200
-
201
-
202
-
203
-
204
 |
 |
