Epson PowerLite Pro G5750WU User's Guide - Page 106
To select an input source, click it in the, button see
 |
View all Epson PowerLite Pro G5750WU manuals
Add to My Manuals
Save this manual to your list of manuals |
Page 106 highlights
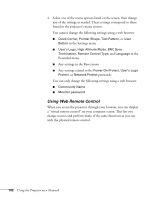
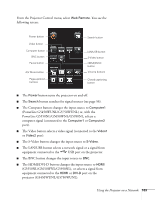
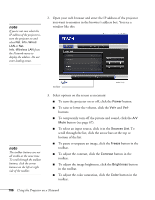
note If you're not sure what the IP address of the projector is, turn the projector on and select Net. Info.-Wired LAN or Net. Info.-Wireless LAN from the Network menu to display the address. Do not enter leading zeroes. 2. Open your web browser and enter the IP address of the projector you want to monitor in the browser's address box. You see a window like this: toolbar note The toolbar buttons are not all visible at the same time. To scroll through the toolbar buttons, click the arrow buttons on the left or right side of the toolbar. 3. Select options on the screen as necessary: ■ To turn the projector on or off, click the Power button. ■ To raise or lower the volume, click the Vol+ and Volbuttons. ■ To temporarily turn off the picture and sound, click the A/V Mute button (see page 67). ■ To select an input source, click it in the Sources List. To scroll through the list, click the arrow bars at the top or bottom of the list. ■ To pause or unpause an image, click the Freeze button in the toolbar. ■ To adjust the contrast, click the Contrast button in the toolbar. ■ To adjust the image brightness, click the Brightness button in the toolbar. ■ To adjust the color saturation, click the Color button in the toolbar. 106 Using the Projector on a Network
-
 1
1 -
2
-
3
-
4
-
5
-
6
-
7
-
8
-
9
-
10
-
11
-
12
-
13
-
14
-
15
-
16
-
17
-
18
-
19
-
20
-
21
-
22
-
23
-
24
-
25
-
26
-
27
-
28
-
29
-
30
-
31
-
32
-
33
-
34
-
35
-
36
-
37
-
38
-
39
-
40
-
41
-
42
-
43
-
44
-
45
-
46
-
47
-
48
-
49
-
50
-
51
-
52
-
53
-
54
-
55
-
56
-
57
-
58
-
59
-
60
-
61
-
62
-
63
-
64
-
65
-
66
-
67
-
68
-
69
-
70
-
71
-
72
-
73
-
74
-
75
-
76
-
77
-
78
-
79
-
80
-
81
-
82
-
83
-
84
-
85
-
86
-
87
-
88
-
89
-
90
-
91
-
92
-
93
-
94
-
95
-
96
-
97
-
98
-
99
-
100
-
 101
101 -
 102
102 -
 103
103 -
 104
104 -
 105
105 -
 106
106 -
 107
107 -
 108
108 -
 109
109 -
 110
110 -
 111
111 -
112
-
113
-
114
-
115
-
116
-
117
-
118
-
119
-
120
-
121
-
122
-
123
-
124
-
125
-
126
-
127
-
128
-
129
-
130
-
131
-
132
-
133
-
134
-
135
-
136
-
137
-
138
-
139
-
140
-
141
-
142
-
143
-
144
-
145
-
146
-
147
-
148
-
149
-
150
-
151
-
152
-
153
-
154
-
155
-
156
-
157
-
158
-
159
-
160
-
161
-
162
-
163
-
164
-
165
-
166
-
167
-
168
-
169
-
170
-
171
-
172
-
173
-
174
-
175
-
176
-
177
-
178
-
179
-
180
-
181
-
182
-
183
-
184
-
185
-
186
-
187
-
188
-
189
-
190
-
191
-
192
-
193
-
194
-
195
-
196
-
197
-
198
-
199
-
200
-
201
-
202
-
203
-
204
-
205
-
206
-
207
-
208
-
209
-
210
-
211
-
212
-
213
-
214
-
215
-
216
-
217
 |
 |
