Epson PowerLite Pro G5750WU User's Guide - Page 107
using Crestron RoomView Express., pointer button on
 |
View all Epson PowerLite Pro G5750WU manuals
Add to My Manuals
Save this manual to your list of manuals |
Page 107 highlights
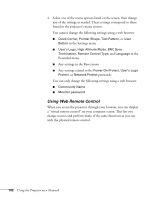
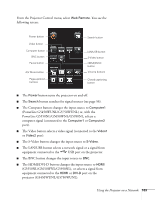
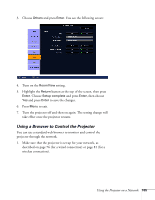
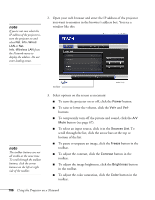
■ To adjust the image sharpness, click the Sharpness button in the toolbar. ■ To enlarge the image without changing the projection size, click the Zoom button in the toolbar. Then click the button to enlarge the image or the button to reduce an image that was enlarged with the button. Click the arrow buttons the change the position of an enlarged image. 4. Use the following buttons in place of the buttons on the projector's remote control: Crestron RoomView button Remote control button OK Enter Menu Menu Auto Auto (see page 117) Search Search (see page 66) Esc Esc Additionally, the arrow buttons in the Crestron RoomView window can be used in place of the pointer button on the remote control. 5. Select the Info tab in the top right corner of the window to display information about the projector. 6. Select the Contact IT Help tab in the top right corner of the window to display the Help Desk window, which can be used to send messages to and receive messages from an administrator using Crestron RoomView Express. Using the Projector on a Network 107
-
 1
1 -
2
-
3
-
4
-
5
-
6
-
7
-
8
-
9
-
10
-
11
-
12
-
13
-
14
-
15
-
16
-
17
-
18
-
19
-
20
-
21
-
22
-
23
-
24
-
25
-
26
-
27
-
28
-
29
-
30
-
31
-
32
-
33
-
34
-
35
-
36
-
37
-
38
-
39
-
40
-
41
-
42
-
43
-
44
-
45
-
46
-
47
-
48
-
49
-
50
-
51
-
52
-
53
-
54
-
55
-
56
-
57
-
58
-
59
-
60
-
61
-
62
-
63
-
64
-
65
-
66
-
67
-
68
-
69
-
70
-
71
-
72
-
73
-
74
-
75
-
76
-
77
-
78
-
79
-
80
-
81
-
82
-
83
-
84
-
85
-
86
-
87
-
88
-
89
-
90
-
91
-
92
-
93
-
94
-
95
-
96
-
97
-
98
-
99
-
100
-
101
-
 102
102 -
 103
103 -
 104
104 -
 105
105 -
 106
106 -
 107
107 -
 108
108 -
 109
109 -
 110
110 -
 111
111 -
 112
112 -
113
-
114
-
115
-
116
-
117
-
118
-
119
-
120
-
121
-
122
-
123
-
124
-
125
-
126
-
127
-
128
-
129
-
130
-
131
-
132
-
133
-
134
-
135
-
136
-
137
-
138
-
139
-
140
-
141
-
142
-
143
-
144
-
145
-
146
-
147
-
148
-
149
-
150
-
151
-
152
-
153
-
154
-
155
-
156
-
157
-
158
-
159
-
160
-
161
-
162
-
163
-
164
-
165
-
166
-
167
-
168
-
169
-
170
-
171
-
172
-
173
-
174
-
175
-
176
-
177
-
178
-
179
-
180
-
181
-
182
-
183
-
184
-
185
-
186
-
187
-
188
-
189
-
190
-
191
-
192
-
193
-
194
-
195
-
196
-
197
-
198
-
199
-
200
-
201
-
202
-
203
-
204
-
205
-
206
-
207
-
208
-
209
-
210
-
211
-
212
-
213
-
214
-
215
-
216
-
217
 |
 |
