Epson PowerLite Pro G5750WU User's Guide - Page 85
Selecting Wireless Network Settings in Mac OS, Making a WPS (Wi-Fi Protected Setup) Connection
 |
View all Epson PowerLite Pro G5750WU manuals
Add to My Manuals
Save this manual to your list of manuals |
Page 85 highlights
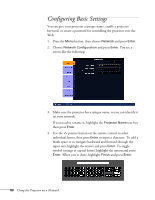
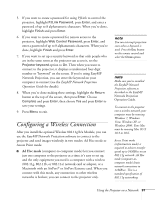
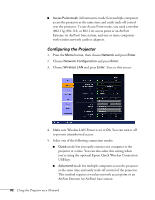
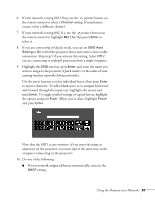
Selecting Wireless Network Settings in Mac OS Before connecting to the projector, select the correct wireless network on your computer. 1. Click the AirPort icon on the menu bar at the top of the screen. 2. Make sure AirPort is turned on, then do one of the following: ■ If your projector is set up on an existing network (Advanced mode), select the network name (SSID). ■ If your projector is configured for Quick mode, select the SSID you assigned to the projector. Making a WPS (Wi-Fi Protected Setup) Connection If you are using a WPS-compatible access point, you can configure the settings for the connection between the projector and the access point from the projector's Configuration menu using one of these methods: ■ Push Button Method Press both the Enter button on the projector and the button on the access point to make the SSID and security settings. This method is recommended when the projector and access point are close together. ■ PIN Code Method With the PIN code method, you enter an 8-digit code from the computer to enable the SSID and security settings. The connection between the computer and the access point must have already been established. (For connection instructions, refer to the manual provided with the access point.) This method lets you make the settings without having to press any buttons on the projector, and is recommended when the projector is mounted on the ceiling. Follow these steps to open the WPS connection screen: 1. Press the Menu button, then choose Network and press Enter. 2. Choose Network Configuration and press Enter. Using the Projector on a Network 85
-
 1
1 -
2
-
3
-
4
-
5
-
6
-
7
-
8
-
9
-
10
-
11
-
12
-
13
-
14
-
15
-
16
-
17
-
18
-
19
-
20
-
21
-
22
-
23
-
24
-
25
-
26
-
27
-
28
-
29
-
30
-
31
-
32
-
33
-
34
-
35
-
36
-
37
-
38
-
39
-
40
-
41
-
42
-
43
-
44
-
45
-
46
-
47
-
48
-
49
-
50
-
51
-
52
-
53
-
54
-
55
-
56
-
57
-
58
-
59
-
60
-
61
-
62
-
63
-
64
-
65
-
66
-
67
-
68
-
69
-
70
-
71
-
72
-
73
-
74
-
75
-
76
-
77
-
78
-
79
-
 80
80 -
 81
81 -
 82
82 -
 83
83 -
 84
84 -
 85
85 -
 86
86 -
 87
87 -
 88
88 -
 89
89 -
 90
90 -
91
-
92
-
93
-
94
-
95
-
96
-
97
-
98
-
99
-
100
-
101
-
102
-
103
-
104
-
105
-
106
-
107
-
108
-
109
-
110
-
111
-
112
-
113
-
114
-
115
-
116
-
117
-
118
-
119
-
120
-
121
-
122
-
123
-
124
-
125
-
126
-
127
-
128
-
129
-
130
-
131
-
132
-
133
-
134
-
135
-
136
-
137
-
138
-
139
-
140
-
141
-
142
-
143
-
144
-
145
-
146
-
147
-
148
-
149
-
150
-
151
-
152
-
153
-
154
-
155
-
156
-
157
-
158
-
159
-
160
-
161
-
162
-
163
-
164
-
165
-
166
-
167
-
168
-
169
-
170
-
171
-
172
-
173
-
174
-
175
-
176
-
177
-
178
-
179
-
180
-
181
-
182
-
183
-
184
-
185
-
186
-
187
-
188
-
189
-
190
-
191
-
192
-
193
-
194
-
195
-
196
-
197
-
198
-
199
-
200
-
201
-
202
-
203
-
204
-
205
-
206
-
207
-
208
-
209
-
210
-
211
-
212
-
213
-
214
-
215
-
216
-
217
 |
 |
