Epson PowerLite Pro G5750WU User's Guide - Page 83
to input a character. To add a blank space or to navigate backward, and forward through the input text
 |
View all Epson PowerLite Pro G5750WU manuals
Add to My Manuals
Save this manual to your list of manuals |
Page 83 highlights
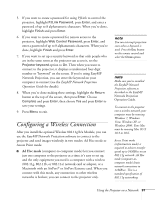
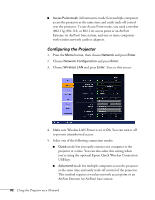
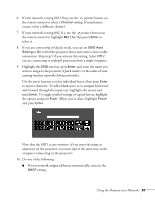
6. If your network is using 802.11b/g, use the pointer button on the remote control to select a Channel setting. If interference occurs, select a different channel. 7. If your network is using 802.11a, use the pointer button on the remote control to highlight 802.11a, then press Enter to select it. 8. If you are connecting in Quick mode, you can set SSID Auto Setting to On to find the projector faster and create a more stable connection. Skip step 9 if you activate this setting. Select Off if you are connecting to multiple projectors from a single computer. 9. Highlight the SSID text box, press Enter, and enter the name you want to assign to the projector (Quick mode), or the name of your existing wireless network (Advanced mode): Use the arrow buttons to select individual letters, then press Enter to input a character. To add a blank space or to navigate backward and forward through the input text, highlight the arrows and press Enter. To toggle symbol settings or capital letters, highlight the option and press Enter. When you're done, highlight Finish and press Enter. Note that the SSID is case-sensitive (if you enter the name in uppercase on the projector, you must type it the same way on the computer connecting to the projector). 10. Do one of the following: ■ If your network assigns addresses automatically, turn on the DHCP setting. Using the Projector on a Network 83
-
 1
1 -
2
-
3
-
4
-
5
-
6
-
7
-
8
-
9
-
10
-
11
-
12
-
13
-
14
-
15
-
16
-
17
-
18
-
19
-
20
-
21
-
22
-
23
-
24
-
25
-
26
-
27
-
28
-
29
-
30
-
31
-
32
-
33
-
34
-
35
-
36
-
37
-
38
-
39
-
40
-
41
-
42
-
43
-
44
-
45
-
46
-
47
-
48
-
49
-
50
-
51
-
52
-
53
-
54
-
55
-
56
-
57
-
58
-
59
-
60
-
61
-
62
-
63
-
64
-
65
-
66
-
67
-
68
-
69
-
70
-
71
-
72
-
73
-
74
-
75
-
76
-
77
-
 78
78 -
 79
79 -
 80
80 -
 81
81 -
 82
82 -
 83
83 -
 84
84 -
 85
85 -
 86
86 -
 87
87 -
 88
88 -
89
-
90
-
91
-
92
-
93
-
94
-
95
-
96
-
97
-
98
-
99
-
100
-
101
-
102
-
103
-
104
-
105
-
106
-
107
-
108
-
109
-
110
-
111
-
112
-
113
-
114
-
115
-
116
-
117
-
118
-
119
-
120
-
121
-
122
-
123
-
124
-
125
-
126
-
127
-
128
-
129
-
130
-
131
-
132
-
133
-
134
-
135
-
136
-
137
-
138
-
139
-
140
-
141
-
142
-
143
-
144
-
145
-
146
-
147
-
148
-
149
-
150
-
151
-
152
-
153
-
154
-
155
-
156
-
157
-
158
-
159
-
160
-
161
-
162
-
163
-
164
-
165
-
166
-
167
-
168
-
169
-
170
-
171
-
172
-
173
-
174
-
175
-
176
-
177
-
178
-
179
-
180
-
181
-
182
-
183
-
184
-
185
-
186
-
187
-
188
-
189
-
190
-
191
-
192
-
193
-
194
-
195
-
196
-
197
-
198
-
199
-
200
-
201
-
202
-
203
-
204
-
205
-
206
-
207
-
208
-
209
-
210
-
211
-
212
-
213
-
214
-
215
-
216
-
217
 |
 |
