Epson PowerLite Pro G5750WU User's Guide - Page 37
Connecting an HDMI Video Source, R/G/B, see Connecting an RGB Video Source
 |
View all Epson PowerLite Pro G5750WU manuals
Add to My Manuals
Save this manual to your list of manuals |
Page 37 highlights
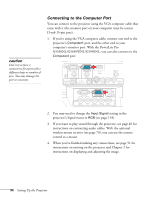
■ If your video player has an RGB video port (either a single connector for a VGA monitor cable or three connectors labeled R/G/B), see "Connecting an RGB Video Source" on page 43. VGA connector (RGB video) After connecting video cables, you may also want to connect an audio cable to play sound through the projector; see page 46. If you connect using an HDMI cable, the video and sound are both transferred and you won't need to connect any additional cables for audio. Connecting an HDMI Video Source For best image quality, connect your video equipment to the HDMI (High-Definition Multimedia Interface) port, if possible. 1. Locate an HDMI cable. 2. Connect the cable to the HDMI connector on your player and the HDMI connector on the projector. 3. See page 51 for instructions on turning on the projector and Chapter 2 for instructions on displaying and adjusting the image. Setting Up the Projector 37
-
 1
1 -
2
-
3
-
4
-
5
-
6
-
7
-
8
-
9
-
10
-
11
-
12
-
13
-
14
-
15
-
16
-
17
-
18
-
19
-
20
-
21
-
22
-
23
-
24
-
25
-
26
-
27
-
28
-
29
-
30
-
31
-
 32
32 -
 33
33 -
 34
34 -
 35
35 -
 36
36 -
 37
37 -
 38
38 -
 39
39 -
 40
40 -
 41
41 -
 42
42 -
43
-
44
-
45
-
46
-
47
-
48
-
49
-
50
-
51
-
52
-
53
-
54
-
55
-
56
-
57
-
58
-
59
-
60
-
61
-
62
-
63
-
64
-
65
-
66
-
67
-
68
-
69
-
70
-
71
-
72
-
73
-
74
-
75
-
76
-
77
-
78
-
79
-
80
-
81
-
82
-
83
-
84
-
85
-
86
-
87
-
88
-
89
-
90
-
91
-
92
-
93
-
94
-
95
-
96
-
97
-
98
-
99
-
100
-
101
-
102
-
103
-
104
-
105
-
106
-
107
-
108
-
109
-
110
-
111
-
112
-
113
-
114
-
115
-
116
-
117
-
118
-
119
-
120
-
121
-
122
-
123
-
124
-
125
-
126
-
127
-
128
-
129
-
130
-
131
-
132
-
133
-
134
-
135
-
136
-
137
-
138
-
139
-
140
-
141
-
142
-
143
-
144
-
145
-
146
-
147
-
148
-
149
-
150
-
151
-
152
-
153
-
154
-
155
-
156
-
157
-
158
-
159
-
160
-
161
-
162
-
163
-
164
-
165
-
166
-
167
-
168
-
169
-
170
-
171
-
172
-
173
-
174
-
175
-
176
-
177
-
178
-
179
-
180
-
181
-
182
-
183
-
184
-
185
-
186
-
187
-
188
-
189
-
190
-
191
-
192
-
193
-
194
-
195
-
196
-
197
-
198
-
199
-
200
-
201
-
202
-
203
-
204
-
205
-
206
-
207
-
208
-
209
-
210
-
211
-
212
-
213
-
214
-
215
-
216
-
217
 |
 |
