Epson PowerLite Pro G5750WU User's Guide - Page 165
Installing and Removing the Cable Cover
 |
View all Epson PowerLite Pro G5750WU manuals
Add to My Manuals
Save this manual to your list of manuals |
Page 165 highlights
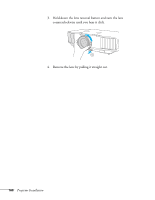
■ Lens theft deterrent screw. You can lock the lens with the supplied screw, so that the lens cannot be removed. In addition, the projector includes several menu-operated security features. See page 121. Installing and Removing the Cable Cover Install the rear cable cover to enhance the appearance of the projector and prevent any cables from being loosened or removed. To install the cover, follow these steps: 1. Insert its tabs into the slots as shown, then push the cover against the projector. note These illustrations show the projector mounted on the ceiling. Projector Installation 165
-
 1
1 -
2
-
3
-
4
-
5
-
6
-
7
-
8
-
9
-
10
-
11
-
12
-
13
-
14
-
15
-
16
-
17
-
18
-
19
-
20
-
21
-
22
-
23
-
24
-
25
-
26
-
27
-
28
-
29
-
30
-
31
-
32
-
33
-
34
-
35
-
36
-
37
-
38
-
39
-
40
-
41
-
42
-
43
-
44
-
45
-
46
-
47
-
48
-
49
-
50
-
51
-
52
-
53
-
54
-
55
-
56
-
57
-
58
-
59
-
60
-
61
-
62
-
63
-
64
-
65
-
66
-
67
-
68
-
69
-
70
-
71
-
72
-
73
-
74
-
75
-
76
-
77
-
78
-
79
-
80
-
81
-
82
-
83
-
84
-
85
-
86
-
87
-
88
-
89
-
90
-
91
-
92
-
93
-
94
-
95
-
96
-
97
-
98
-
99
-
100
-
101
-
102
-
103
-
104
-
105
-
106
-
107
-
108
-
109
-
110
-
111
-
112
-
113
-
114
-
115
-
116
-
117
-
118
-
119
-
120
-
121
-
122
-
123
-
124
-
125
-
126
-
127
-
128
-
129
-
130
-
131
-
132
-
133
-
134
-
135
-
136
-
137
-
138
-
139
-
140
-
141
-
142
-
143
-
144
-
145
-
146
-
147
-
148
-
149
-
150
-
151
-
152
-
153
-
154
-
155
-
156
-
157
-
158
-
159
-
 160
160 -
 161
161 -
 162
162 -
 163
163 -
 164
164 -
 165
165 -
 166
166 -
 167
167 -
 168
168 -
 169
169 -
 170
170 -
171
-
172
-
173
-
174
-
175
-
176
-
177
-
178
-
179
-
180
-
181
-
182
-
183
-
184
-
185
-
186
-
187
-
188
-
189
-
190
-
191
-
192
-
193
-
194
-
195
-
196
-
197
-
198
-
199
-
200
-
201
-
202
-
203
-
204
-
205
-
206
-
207
-
208
-
209
-
210
-
211
-
212
-
213
-
214
-
215
-
216
-
217
 |
 |

Projector Installation
165
■
Lens theft deterrent screw.
You can lock the lens with the
supplied screw, so that the lens cannot be removed.
In addition, the projector includes several menu-operated security
features. See page 121.
Installing and Removing the Cable
Cover
Install the rear cable cover to enhance the appearance of the projector
and prevent any cables from being loosened or removed. To install the
cover, follow these steps:
1.
Insert its tabs into the slots as shown, then push the cover against
the projector.
note
These illustrations show the
projector mounted on the
ceiling.