Epson PowerLite Pro G5750WU User's Guide - Page 56
Displaying an Image, Adjusting the Image
 |
View all Epson PowerLite Pro G5750WU manuals
Add to My Manuals
Save this manual to your list of manuals |
Page 56 highlights
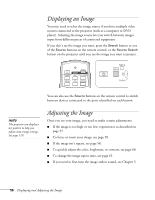
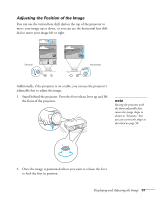
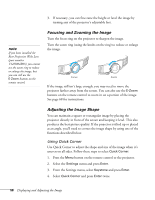
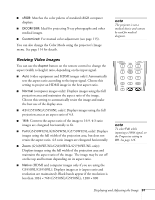
Displaying an Image You may need to select the image source if you have multiple video sources connected to the projector (such as a computer or DVD player). Selecting the image source lets you switch between images input from different pieces of connected equipment. If you don't see the image you want, press the Search button or one of the Source buttons on the remote control, or the Source Search button on the projector until you see the image you want to project. You can also use the Source buttons on the remote control to switch between devices connected to the ports identified on each button. note The projector can display a test pattern to help you adjust some image settings. See page 119. Adjusting the Image Once you see your image, you need to make certain adjustments: ■ If the image is too high or too low, reposition it as described on page 57. ■ To focus or zoom your image, see page 58. ■ If the image isn't square, see page 58. ■ To quickly adjust the color, brightness, or contrast, see page 60. ■ To change the image aspect ratio, see page 61. ■ If you need to fine-tune the image and/or sound, see Chapter 5. 56 Displaying and Adjusting the Image
-
 1
1 -
2
-
3
-
4
-
5
-
6
-
7
-
8
-
9
-
10
-
11
-
12
-
13
-
14
-
15
-
16
-
17
-
18
-
19
-
20
-
21
-
22
-
23
-
24
-
25
-
26
-
27
-
28
-
29
-
30
-
31
-
32
-
33
-
34
-
35
-
36
-
37
-
38
-
39
-
40
-
41
-
42
-
43
-
44
-
45
-
46
-
47
-
48
-
49
-
50
-
 51
51 -
 52
52 -
 53
53 -
 54
54 -
 55
55 -
 56
56 -
 57
57 -
 58
58 -
 59
59 -
 60
60 -
 61
61 -
62
-
63
-
64
-
65
-
66
-
67
-
68
-
69
-
70
-
71
-
72
-
73
-
74
-
75
-
76
-
77
-
78
-
79
-
80
-
81
-
82
-
83
-
84
-
85
-
86
-
87
-
88
-
89
-
90
-
91
-
92
-
93
-
94
-
95
-
96
-
97
-
98
-
99
-
100
-
101
-
102
-
103
-
104
-
105
-
106
-
107
-
108
-
109
-
110
-
111
-
112
-
113
-
114
-
115
-
116
-
117
-
118
-
119
-
120
-
121
-
122
-
123
-
124
-
125
-
126
-
127
-
128
-
129
-
130
-
131
-
132
-
133
-
134
-
135
-
136
-
137
-
138
-
139
-
140
-
141
-
142
-
143
-
144
-
145
-
146
-
147
-
148
-
149
-
150
-
151
-
152
-
153
-
154
-
155
-
156
-
157
-
158
-
159
-
160
-
161
-
162
-
163
-
164
-
165
-
166
-
167
-
168
-
169
-
170
-
171
-
172
-
173
-
174
-
175
-
176
-
177
-
178
-
179
-
180
-
181
-
182
-
183
-
184
-
185
-
186
-
187
-
188
-
189
-
190
-
191
-
192
-
193
-
194
-
195
-
196
-
197
-
198
-
199
-
200
-
201
-
202
-
203
-
204
-
205
-
206
-
207
-
208
-
209
-
210
-
211
-
212
-
213
-
214
-
215
-
216
-
217
 |
 |
