Epson PowerLite Pro G5750WU User's Guide - Page 167
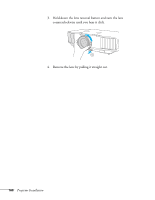
Removing the Lens, Turn off the projector and unplug the power cord.
 |
View all Epson PowerLite Pro G5750WU manuals
Add to My Manuals
Save this manual to your list of manuals |
Page 167 highlights
2. Turn the focus ring clockwise until it stops moving. 3. Make sure the white dot on the lens is facing up. Insert the lens straight into the projector, then turn clockwise until you hear it click into place. white dot note Only install or remove the lens when necessary. If dust enters the projector, projection quality may deteriorate and/or the projector may malfunction. Do not install or remove the lens when the projector's lens insertion section is facing up. Dust could enter the projector. Do not touch the lens with your hand or fingers. If fingerprints or oils are left on the surface of the lens, projection quality will deteriorate. 4. If necessary, attach the lens theft deterrent screw (see page 165). Removing the Lens 1. Turn off the projector and unplug the power cord. 2. If you've attached the lens theft deterrent screw, remove it (see page 165). note If you have moved the lens with the lens shift dials (see page 57), center the lens again before removing it. Projector Installation 167
-
 1
1 -
2
-
3
-
4
-
5
-
6
-
7
-
8
-
9
-
10
-
11
-
12
-
13
-
14
-
15
-
16
-
17
-
18
-
19
-
20
-
21
-
22
-
23
-
24
-
25
-
26
-
27
-
28
-
29
-
30
-
31
-
32
-
33
-
34
-
35
-
36
-
37
-
38
-
39
-
40
-
41
-
42
-
43
-
44
-
45
-
46
-
47
-
48
-
49
-
50
-
51
-
52
-
53
-
54
-
55
-
56
-
57
-
58
-
59
-
60
-
61
-
62
-
63
-
64
-
65
-
66
-
67
-
68
-
69
-
70
-
71
-
72
-
73
-
74
-
75
-
76
-
77
-
78
-
79
-
80
-
81
-
82
-
83
-
84
-
85
-
86
-
87
-
88
-
89
-
90
-
91
-
92
-
93
-
94
-
95
-
96
-
97
-
98
-
99
-
100
-
101
-
102
-
103
-
104
-
105
-
106
-
107
-
108
-
109
-
110
-
111
-
112
-
113
-
114
-
115
-
116
-
117
-
118
-
119
-
120
-
121
-
122
-
123
-
124
-
125
-
126
-
127
-
128
-
129
-
130
-
131
-
132
-
133
-
134
-
135
-
136
-
137
-
138
-
139
-
140
-
141
-
142
-
143
-
144
-
145
-
146
-
147
-
148
-
149
-
150
-
151
-
152
-
153
-
154
-
155
-
156
-
157
-
158
-
159
-
160
-
161
-
 162
162 -
 163
163 -
 164
164 -
 165
165 -
 166
166 -
 167
167 -
 168
168 -
 169
169 -
 170
170 -
 171
171 -
 172
172 -
173
-
174
-
175
-
176
-
177
-
178
-
179
-
180
-
181
-
182
-
183
-
184
-
185
-
186
-
187
-
188
-
189
-
190
-
191
-
192
-
193
-
194
-
195
-
196
-
197
-
198
-
199
-
200
-
201
-
202
-
203
-
204
-
205
-
206
-
207
-
208
-
209
-
210
-
211
-
212
-
213
-
214
-
215
-
216
-
217
 |
 |
