Garmin GPSMAP 740/740s Owner's Manual - Page 12
Mariner's Eye 3D, Fishing Chart Setup
 |
View all Garmin GPSMAP 740/740s manuals
Add to My Manuals
Save this manual to your list of manuals |
Page 12 highlights
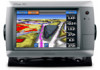
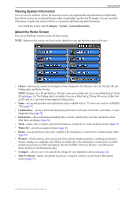
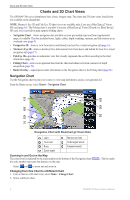
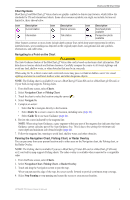
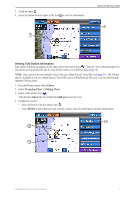
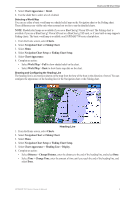
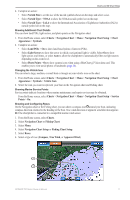
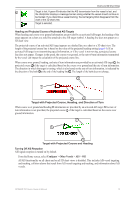
Charts and 3D Chart Views Showing and Configuring Tides and Currents You can show and configure tide and current information on the Navigation chart or the Fishing chart. 1. From the Home screen, select Charts. 2. Select Navigation Chart or Fishing Chart. 3. Select Menu. 4. Select Navigation Chart Setup or Fishing Chart Setup. 5. Select Tides/Currents. 6. Complete an action: • Select On to show current station indicators and tide station indicators on the chart, or select Off to hide current station indicators and tide station indicators. • Select Animated to show animated tide station indicators and animated current direction indicators on the chart (page 21). Viewing Details about Navaids From the Navigation chart, the Fishing chart, Perspective 3D, or Mariner's Eye 3D, you can view details about various types of navigation aids, including beacons, lights, and obstructions. See (page 10) to configure the appearance of navaid symbols. Note: The Mariner's Eye 3D chart view is available only if you use a BlueChart g2 Vision SD card (page 16). The Fishing chart is available if you use a BlueChart g2 Vision SD card or a BlueChart g2 SD card, or if your built-in map supports Fishing charts. 1. From the Home screen, select Charts. 2. Select Navigation Chart, Fishing Chart, Perspective 3D, or Mariner's Eye 3D. 3. Select a navaid with the cursor ( ). An option describing the navaid appears, such as Beacon or Light. 4. Select the name of the navaid (or Review and then the name of the navaid) or to view details about the navaid. Navigation Chart Appearance Changing the Map Orientation You can set the perspective of the map in the Navigation chart or the Fishing chart. 1. From the Home screen, select Charts. 2. Select Navigation Chart or Fishing Chart. 3. Select Menu. 4. Select Navigation Chart Setup or Fishing Chart Setup. 5. Select Chart Appearance > Orientation. 6. Complete an action: • Select North Up to set the top of the map to a north heading. • Select Head Up to set the top of the map according to the heading data received from a heading sensor (also known as magnetic heading) or to use GPS heading data. The heading line appears vertically on the screen. • Select Course Up to set the map so the direction of navigation is always up. Changing the Map Zoom Detail You can adjust the amount of detail shown on the map, at different zoom levels, for the Navigation Chart or the Fishing chart. 1. From the Home screen, select Charts. 2. Select Navigation Chart or Fishing Chart. 3. Select Menu. 4. Select Navigation Chart Setup or Fishing Chart Setup. 8 GPSMAP 700 Series Owner's Manual
-
 1
1 -
2
-
3
-
4
-
5
-
6
-
 7
7 -
 8
8 -
 9
9 -
 10
10 -
 11
11 -
 12
12 -
 13
13 -
 14
14 -
 15
15 -
 16
16 -
 17
17 -
18
-
19
-
20
-
21
-
22
-
23
-
24
-
25
-
26
-
27
-
28
-
29
-
30
-
31
-
32
-
33
-
34
-
35
-
36
-
37
-
38
-
39
-
40
-
41
-
42
-
43
-
44
-
45
-
46
-
47
-
48
-
49
-
50
-
51
-
52
-
53
-
54
-
55
-
56
-
57
-
58
-
59
-
60
-
61
-
62
-
63
-
64
-
65
-
66
-
67
-
68
-
69
-
70
-
71
-
72
-
73
-
74
-
75
-
76
-
77
-
78
-
79
-
80
-
81
-
82
-
83
-
84
-
85
-
86
-
87
-
88
-
89
-
90
-
91
-
92
-
93
-
94
-
95
-
96
-
97
-
98
-
99
-
100
 |
 |