Garmin GPSMAP 740/740s Owner's Manual - Page 15
Light Sectors, Photo Points
 |
View all Garmin GPSMAP 740/740s manuals
Add to My Manuals
Save this manual to your list of manuals |
Page 15 highlights
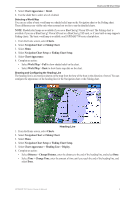
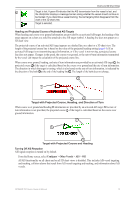
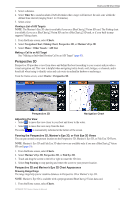
Charts and 3D Chart Views 6. Complete an action: • Select Navaid Size to set the size of the navaid symbols shown on the map, and select a size. • Select Navaid Type > NOAA to show the NOAA navaid symbol set on the map. • Select Navaid Type > IALA to show the International Association of Lighthouse Authorities (IALA) navaid symbol set on the map. Showing Additional Chart Details You can show land POIs, light sectors, and photo points on the Navigation chart. 1. From the Home screen, select Charts > Navigation Chart > Menu > Navigation Chart Setup > Chart Appearance > Symbols. 2. Complete an action: • Select Land POIs > On to show land-based points of interest (POIs). • Select Light Sectors to show the sector in which a navigational light is visible. Select On to show light sectors at all times, or select Auto to allow the chartplotter to automatically filter out light sectors depending on the zoom level. • Select Photo Points > On to show camera icons when using a BlueChart g2 Vision data card. This enables you to view aerial photos of landmarks (page 20). Changing the Vehicle Icon You can select a large, medium, or small boat or triangle as your vehicle icon on the chart. 1. From the Home screen, select Charts > Navigation Chart > Menu > Navigation Chart Setup > Chart Appearance > Symbols > Vehicle Icon. 2. Select the icon you want to represent your boat on the Navigation chart and Fishing chart. Showing Marine Service Points Service points indicate locations where marine maintenance and repair services may be obtained. From the Home screen, select Charts > Navigation Chart > Menu > Navigation Chart Setup > Service Points > On. Showing and Configuring Roses On the Navigation chart or the Fishing chart, you can show a compass rose ➊ around your boat, indicating compass direction oriented to the heading of the boat. True wind direction or apparent wind direction appears ➋ if the chartplotter is connected to a compatible marine wind sensor. 1. From the Home screen, select Charts. 2. Select Navigation Chart or Fishing Chart. 3. Select Menu. 4. Select Navigation Chart Setup or Fishing Chart Setup. 5. Select Roses. 6. Select a type of rose (Compass, True Wind, or Apparent Wind). ➋ ➊ GPSMAP 700 Series Owner's Manual 11
-
 1
1 -
2
-
3
-
4
-
5
-
6
-
7
-
8
-
9
-
 10
10 -
 11
11 -
 12
12 -
 13
13 -
 14
14 -
 15
15 -
 16
16 -
 17
17 -
 18
18 -
 19
19 -
 20
20 -
21
-
22
-
23
-
24
-
25
-
26
-
27
-
28
-
29
-
30
-
31
-
32
-
33
-
34
-
35
-
36
-
37
-
38
-
39
-
40
-
41
-
42
-
43
-
44
-
45
-
46
-
47
-
48
-
49
-
50
-
51
-
52
-
53
-
54
-
55
-
56
-
57
-
58
-
59
-
60
-
61
-
62
-
63
-
64
-
65
-
66
-
67
-
68
-
69
-
70
-
71
-
72
-
73
-
74
-
75
-
76
-
77
-
78
-
79
-
80
-
81
-
82
-
83
-
84
-
85
-
86
-
87
-
88
-
89
-
90
-
91
-
92
-
93
-
94
-
95
-
96
-
97
-
98
-
99
-
100
 |
 |
