HP Dc7700 HP Compaq dx7300 and dc7700 Business PC Technical Reference Guide, 1 - Page 138
Network Boot (F12) Support, 8.3.3 Memory Detection and Configuration, Installing an OS.
 |
UPC - 882780715318
View all HP Dc7700 manuals
Add to My Manuals
Save this manual to your list of manuals |
Page 138 highlights
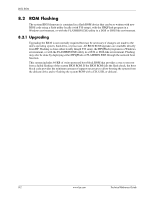
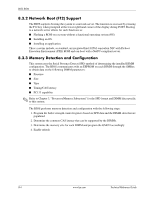
BIOS ROM 8.3.2 Network Boot (F12) Support The BIOS supports booting the system to a network server. The function is accessed by pressing the F12 key when prompted at the lower right hand corner of the display during POST. Booting to a network server allows for such functions as: ■ Flashing a ROM on a system without a functional operating system (OS). ■ Installing an OS. ■ Installing an application. These systems include, as standard, an integrated Intel 82562-equivalent NIC with Preboot Execution Environment (PXE) ROM and can boot with a NetPC-compliant server. 8.3.3 Memory Detection and Configuration This system uses the Serial Presence Detect (SPD) method of determining the installed DIMM configuration. The BIOS communicates with an EEPROM on each DIMM through the SMBus to obtain data on the following DIMM parameters: ■ Presence ■ Size ■ Type ■ Timing/CAS latency ■ PC133 capability ✎ Refer to Chapter 3, "Processor/Memory Subsystem" for the SPD format and DIMM data specific to this system. The BIOS performs memory detection and configuration with the following steps: 1. Program the buffer strength control registers based on SPD data and the DIMM slots that are populated. 2. Determine the common CAS latency that can be supported by the DIMMs. 3. Determine the memory size for each DIMM and program the GMCH accordingly. 4. Enable refresh 8-4 www.hp.com Technical Reference Guide
-
 1
1 -
2
-
3
-
4
-
5
-
6
-
7
-
8
-
9
-
10
-
11
-
12
-
13
-
14
-
15
-
16
-
17
-
18
-
19
-
20
-
21
-
22
-
23
-
24
-
25
-
26
-
27
-
28
-
29
-
30
-
31
-
32
-
33
-
34
-
35
-
36
-
37
-
38
-
39
-
40
-
41
-
42
-
43
-
44
-
45
-
46
-
47
-
48
-
49
-
50
-
51
-
52
-
53
-
54
-
55
-
56
-
57
-
58
-
59
-
60
-
61
-
62
-
63
-
64
-
65
-
66
-
67
-
68
-
69
-
70
-
71
-
72
-
73
-
74
-
75
-
76
-
77
-
78
-
79
-
80
-
81
-
82
-
83
-
84
-
85
-
86
-
87
-
88
-
89
-
90
-
91
-
92
-
93
-
94
-
95
-
96
-
97
-
98
-
99
-
100
-
101
-
102
-
103
-
104
-
105
-
106
-
107
-
108
-
109
-
110
-
111
-
112
-
113
-
114
-
115
-
116
-
117
-
118
-
119
-
120
-
121
-
122
-
123
-
124
-
125
-
126
-
127
-
128
-
129
-
130
-
131
-
132
-
 133
133 -
 134
134 -
 135
135 -
 136
136 -
 137
137 -
 138
138 -
 139
139 -
 140
140 -
 141
141 -
 142
142 -
 143
143 -
144
-
145
-
146
-
147
-
148
-
149
-
150
-
151
-
152
-
153
-
154
-
155
-
156
-
157
-
158
-
159
-
160
-
161
-
162
-
163
-
164
-
165
-
166
-
167
-
168
-
169
-
170
-
171
-
172
-
173
-
174
-
175
-
176
-
177
-
178
-
179
-
180
-
181
-
182
-
183
-
184
-
185
-
186
-
187
-
188
-
189
-
190
-
191
-
192
-
193
-
194
-
195
-
196
 |
 |