HP J5780 User Guide - Microsoft Windows - Page 134
Start Copy Black, High Resolution
 |
UPC - 882780940253
View all HP J5780 manuals
Add to My Manuals
Save this manual to your list of manuals |
Page 134 highlights
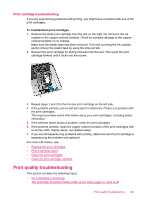
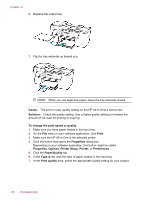
Chapter 12 Solution: Check the quality setting. Use a higher quality setting to increase the amount of ink used for printing or copying. To change the print speed or quality 1. Make sure you have paper loaded in the input tray. 2. On the File menu in your software application, click Print. 3. Make sure the HP All-in-One is the selected printer. 4. Click the button that opens the Properties dialog box. Depending on your software application, this button might be called Properties, Options, Printer Setup, Printer, or Preferences. 5. Click the Paper/Quality tab. 6. In the Type is list, click the type of paper loaded in the input tray. 7. In the Print quality area, select the appropriate quality setting for your project. To change the copy quality 1. Make sure you have paper loaded in the input tray. 2. Load your original print side down on the right front corner of the glass or print side up in the document feeder tray. If you use the document feeder tray, place the pages so that the top edge of the document goes in first. 3. In the Copy area, press Quality until the appropriate quality setting is lit. 4. Press Start Copy Black or Start Copy Color. The text edges are jagged Cause: The font is a custom size. Solution: Some software applications offer custom fonts that have jagged edges when enlarged or printed. Also, if you want to print bitmapped text, it might have jagged edges when enlarged or printed. Use TrueType fonts to ensure that the HP All-in-One is able to print smooth fonts. When selecting a font, look for the TrueType icon. The printout has a horizontal band of distortion near the bottom of the page Cause: Your image has light blue, gray, or brown hues that print near the bottom of the page. Solution: Load high-quality paper in the input tray and print the image with a high print quality setting, such as Best, Maximum dpi, or High Resolution. Always make sure the paper you are printing on is flat. For best results when printing images, use HP Premium Plus Photo Paper. If the problem persists, use the software you installed with the HP All-in-One or another software application to rotate your image 180 degrees so that the light blue, gray, or brown hues in your image do not print at the bottom of the page. Print the image using six-ink printing. To do so, install the photo print cartridge in place of the 132 Troubleshooting
-
 1
1 -
2
-
3
-
4
-
5
-
6
-
7
-
8
-
9
-
10
-
11
-
12
-
13
-
14
-
15
-
16
-
17
-
18
-
19
-
20
-
21
-
22
-
23
-
24
-
25
-
26
-
27
-
28
-
29
-
30
-
31
-
32
-
33
-
34
-
35
-
36
-
37
-
38
-
39
-
40
-
41
-
42
-
43
-
44
-
45
-
46
-
47
-
48
-
49
-
50
-
51
-
52
-
53
-
54
-
55
-
56
-
57
-
58
-
59
-
60
-
61
-
62
-
63
-
64
-
65
-
66
-
67
-
68
-
69
-
70
-
71
-
72
-
73
-
74
-
75
-
76
-
77
-
78
-
79
-
80
-
81
-
82
-
83
-
84
-
85
-
86
-
87
-
88
-
89
-
90
-
91
-
92
-
93
-
94
-
95
-
96
-
97
-
98
-
99
-
100
-
101
-
102
-
103
-
104
-
105
-
106
-
107
-
108
-
109
-
110
-
111
-
112
-
113
-
114
-
115
-
116
-
117
-
118
-
119
-
120
-
121
-
122
-
123
-
124
-
125
-
126
-
127
-
128
-
 129
129 -
 130
130 -
 131
131 -
 132
132 -
 133
133 -
 134
134 -
 135
135 -
 136
136 -
 137
137 -
 138
138 -
 139
139 -
140
-
141
-
142
-
143
-
144
-
145
-
146
-
147
-
148
-
149
-
150
-
151
-
152
-
153
-
154
-
155
-
156
-
157
-
158
-
159
-
160
-
161
-
162
-
163
-
164
-
165
-
166
-
167
-
168
-
169
-
170
-
171
-
172
-
173
-
174
-
175
-
176
-
177
-
178
-
179
-
180
-
181
-
182
-
183
-
184
-
185
-
186
-
187
-
188
-
189
-
190
-
191
-
192
-
193
-
194
-
195
-
196
-
197
-
198
-
199
-
200
-
201
-
202
-
203
-
204
-
205
-
206
-
207
-
208
-
209
-
210
-
211
-
212
-
213
-
214
-
215
-
216
-
217
-
218
-
219
-
220
-
221
-
222
-
223
-
224
-
225
-
226
-
227
-
228
-
229
-
230
-
231
-
232
-
233
-
234
-
235
-
236
-
237
-
238
-
239
-
240
-
241
-
242
-
243
-
244
-
245
-
246
-
247
-
248
-
249
-
250
-
251
-
252
-
253
-
254
-
255
-
256
-
257
-
258
-
259
-
260
-
261
-
262
-
263
-
264
-
265
-
266
-
267
-
268
-
269
-
270
-
271
-
272
-
273
-
274
-
275
-
276
-
277
-
278
-
279
-
280
-
281
-
282
-
283
-
284
-
285
-
286
 |
 |
