HP J5780 User Guide - Microsoft Windows - Page 50
Set the fax header, Set up speed dialing, Run Fax Test
 |
UPC - 882780940253
View all HP J5780 manuals
Add to My Manuals
Save this manual to your list of manuals |
Page 50 highlights
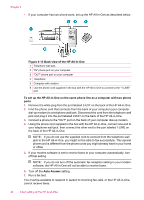
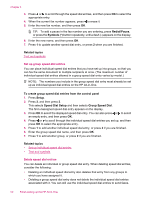
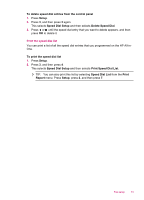
Chapter 4 • Checks for an active phone line • Tests the status of your phone line connection The HP All-in-One prints a report with the results of the test. If the test fails, review the report for information on how to fix the problem and rerun the test. To test your fax setup from the control panel 1. Set up the HP All-in-One for faxing according to your particular home or office setup instructions. 2. Insert the print cartridges and load full-size paper in the input tray before starting the test. 3. Press Setup. 4. Press 6, then press 6 again. This selects the Tools menu and then selects Run Fax Test. The HP All-in-One displays the status of the test on the display and prints a report. 5. Review the report. • If the test passes and you are still having problems faxing, check the fax settings listed in the report to verify the settings are correct. A blank or incorrect fax setting can cause problems faxing. • If the test fails, review the report for more information on how to fix any problems found. 6. After you pick up the fax report from the HP All-in-One, press OK. If necessary, resolve any problems found and rerun the test. Set the fax header The fax header prints your name and fax number on the top of every fax you send. HP recommends that you set up the fax header by using the software that you installed with the HP All-in-One. You can also set up the fax header from the control panel, as described here. NOTE: In some countries/regions the fax header information is a legal requirement. To set a default fax header from the control panel 1. Press Setup. 2. Press 4, and then press 1. This selects Basic Fax Setup and then selects Fax Header. 3. Enter your personal or company name, and then press OK. 4. Enter your fax number by using the numeric keypad, and then press OK. Related topics Text and symbols Set up speed dialing You can assign speed dial entries to fax numbers you use often. This lets you dial those numbers quickly by using the control panel. 48 Finish setting up the HP All-in-One
-
 1
1 -
2
-
3
-
4
-
5
-
6
-
7
-
8
-
9
-
10
-
11
-
12
-
13
-
14
-
15
-
16
-
17
-
18
-
19
-
20
-
21
-
22
-
23
-
24
-
25
-
26
-
27
-
28
-
29
-
30
-
31
-
32
-
33
-
34
-
35
-
36
-
37
-
38
-
39
-
40
-
41
-
42
-
43
-
44
-
 45
45 -
 46
46 -
 47
47 -
 48
48 -
 49
49 -
 50
50 -
 51
51 -
 52
52 -
 53
53 -
 54
54 -
 55
55 -
56
-
57
-
58
-
59
-
60
-
61
-
62
-
63
-
64
-
65
-
66
-
67
-
68
-
69
-
70
-
71
-
72
-
73
-
74
-
75
-
76
-
77
-
78
-
79
-
80
-
81
-
82
-
83
-
84
-
85
-
86
-
87
-
88
-
89
-
90
-
91
-
92
-
93
-
94
-
95
-
96
-
97
-
98
-
99
-
100
-
101
-
102
-
103
-
104
-
105
-
106
-
107
-
108
-
109
-
110
-
111
-
112
-
113
-
114
-
115
-
116
-
117
-
118
-
119
-
120
-
121
-
122
-
123
-
124
-
125
-
126
-
127
-
128
-
129
-
130
-
131
-
132
-
133
-
134
-
135
-
136
-
137
-
138
-
139
-
140
-
141
-
142
-
143
-
144
-
145
-
146
-
147
-
148
-
149
-
150
-
151
-
152
-
153
-
154
-
155
-
156
-
157
-
158
-
159
-
160
-
161
-
162
-
163
-
164
-
165
-
166
-
167
-
168
-
169
-
170
-
171
-
172
-
173
-
174
-
175
-
176
-
177
-
178
-
179
-
180
-
181
-
182
-
183
-
184
-
185
-
186
-
187
-
188
-
189
-
190
-
191
-
192
-
193
-
194
-
195
-
196
-
197
-
198
-
199
-
200
-
201
-
202
-
203
-
204
-
205
-
206
-
207
-
208
-
209
-
210
-
211
-
212
-
213
-
214
-
215
-
216
-
217
-
218
-
219
-
220
-
221
-
222
-
223
-
224
-
225
-
226
-
227
-
228
-
229
-
230
-
231
-
232
-
233
-
234
-
235
-
236
-
237
-
238
-
239
-
240
-
241
-
242
-
243
-
244
-
245
-
246
-
247
-
248
-
249
-
250
-
251
-
252
-
253
-
254
-
255
-
256
-
257
-
258
-
259
-
260
-
261
-
262
-
263
-
264
-
265
-
266
-
267
-
268
-
269
-
270
-
271
-
272
-
273
-
274
-
275
-
276
-
277
-
278
-
279
-
280
-
281
-
282
-
283
-
284
-
285
-
286
 |
 |