HP J5780 User Guide - Microsoft Windows - Page 78
Make a 10 x 15 cm (4 x 6 inch) borderless copy of a photo
 |
UPC - 882780940253
View all HP J5780 manuals
Add to My Manuals
Save this manual to your list of manuals |
Page 78 highlights
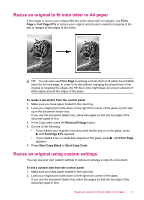
Chapter 8 NOTE: The settings you specify here are only saved on the HP All-in-One. They do not adjust the settings in the software. You can save your most frequently used settings by using the software that you installed with the HP All-in-One. Make a 10 x 15 cm (4 x 6 inch) borderless copy of a photo For the best quality when copying a photo, load photo paper in the input tray and change your copy settings for the correct paper type and photo enhancement. You might also want to use the photo print cartridge for superior print quality. With the tri-color and photo print cartridges installed, you have a six-ink system. To make a borderless copy of a photo from the control panel 1. Load 10 x 15 cm (4 x 6 inch) photo paper in the input tray. 2. Load your original photo print side down on the right front corner of the glass. Position the photo on the glass so the long edge of the photo is along the front edge of the glass, as indicated by the engraved guides along the edge of the glass. 3. Press Start Copy Black or Start Copy Color. The HP All-in-One makes a 10 x 15 cm (4 x 6 inch) borderless copy of your original photo. NOTE: If you loaded tabbed paper in the photo tray, you can remove the tab from the copy of your photo once the ink has completely dried. TIP: If the output is not borderless set the paper type to Premium Photo, and then try making the copy again. Related topics • Load 10 x 15 cm (4 x 6 inch) photo paper • Set the copy paper type • Use a photo print cartridge 76 Use the copy features
-
 1
1 -
2
-
3
-
4
-
5
-
6
-
7
-
8
-
9
-
10
-
11
-
12
-
13
-
14
-
15
-
16
-
17
-
18
-
19
-
20
-
21
-
22
-
23
-
24
-
25
-
26
-
27
-
28
-
29
-
30
-
31
-
32
-
33
-
34
-
35
-
36
-
37
-
38
-
39
-
40
-
41
-
42
-
43
-
44
-
45
-
46
-
47
-
48
-
49
-
50
-
51
-
52
-
53
-
54
-
55
-
56
-
57
-
58
-
59
-
60
-
61
-
62
-
63
-
64
-
65
-
66
-
67
-
68
-
69
-
70
-
71
-
72
-
 73
73 -
 74
74 -
 75
75 -
 76
76 -
 77
77 -
 78
78 -
 79
79 -
 80
80 -
 81
81 -
 82
82 -
 83
83 -
84
-
85
-
86
-
87
-
88
-
89
-
90
-
91
-
92
-
93
-
94
-
95
-
96
-
97
-
98
-
99
-
100
-
101
-
102
-
103
-
104
-
105
-
106
-
107
-
108
-
109
-
110
-
111
-
112
-
113
-
114
-
115
-
116
-
117
-
118
-
119
-
120
-
121
-
122
-
123
-
124
-
125
-
126
-
127
-
128
-
129
-
130
-
131
-
132
-
133
-
134
-
135
-
136
-
137
-
138
-
139
-
140
-
141
-
142
-
143
-
144
-
145
-
146
-
147
-
148
-
149
-
150
-
151
-
152
-
153
-
154
-
155
-
156
-
157
-
158
-
159
-
160
-
161
-
162
-
163
-
164
-
165
-
166
-
167
-
168
-
169
-
170
-
171
-
172
-
173
-
174
-
175
-
176
-
177
-
178
-
179
-
180
-
181
-
182
-
183
-
184
-
185
-
186
-
187
-
188
-
189
-
190
-
191
-
192
-
193
-
194
-
195
-
196
-
197
-
198
-
199
-
200
-
201
-
202
-
203
-
204
-
205
-
206
-
207
-
208
-
209
-
210
-
211
-
212
-
213
-
214
-
215
-
216
-
217
-
218
-
219
-
220
-
221
-
222
-
223
-
224
-
225
-
226
-
227
-
228
-
229
-
230
-
231
-
232
-
233
-
234
-
235
-
236
-
237
-
238
-
239
-
240
-
241
-
242
-
243
-
244
-
245
-
246
-
247
-
248
-
249
-
250
-
251
-
252
-
253
-
254
-
255
-
256
-
257
-
258
-
259
-
260
-
261
-
262
-
263
-
264
-
265
-
266
-
267
-
268
-
269
-
270
-
271
-
272
-
273
-
274
-
275
-
276
-
277
-
278
-
279
-
280
-
281
-
282
-
283
-
284
-
285
-
286
 |
 |
