HP J5780 User Guide - Microsoft Windows - Page 140
Cause, Solution, Error, Correction Mode, To change the ECM setting from the control panel, Setup
 |
UPC - 882780940253
View all HP J5780 manuals
Add to My Manuals
Save this manual to your list of manuals |
Page 140 highlights
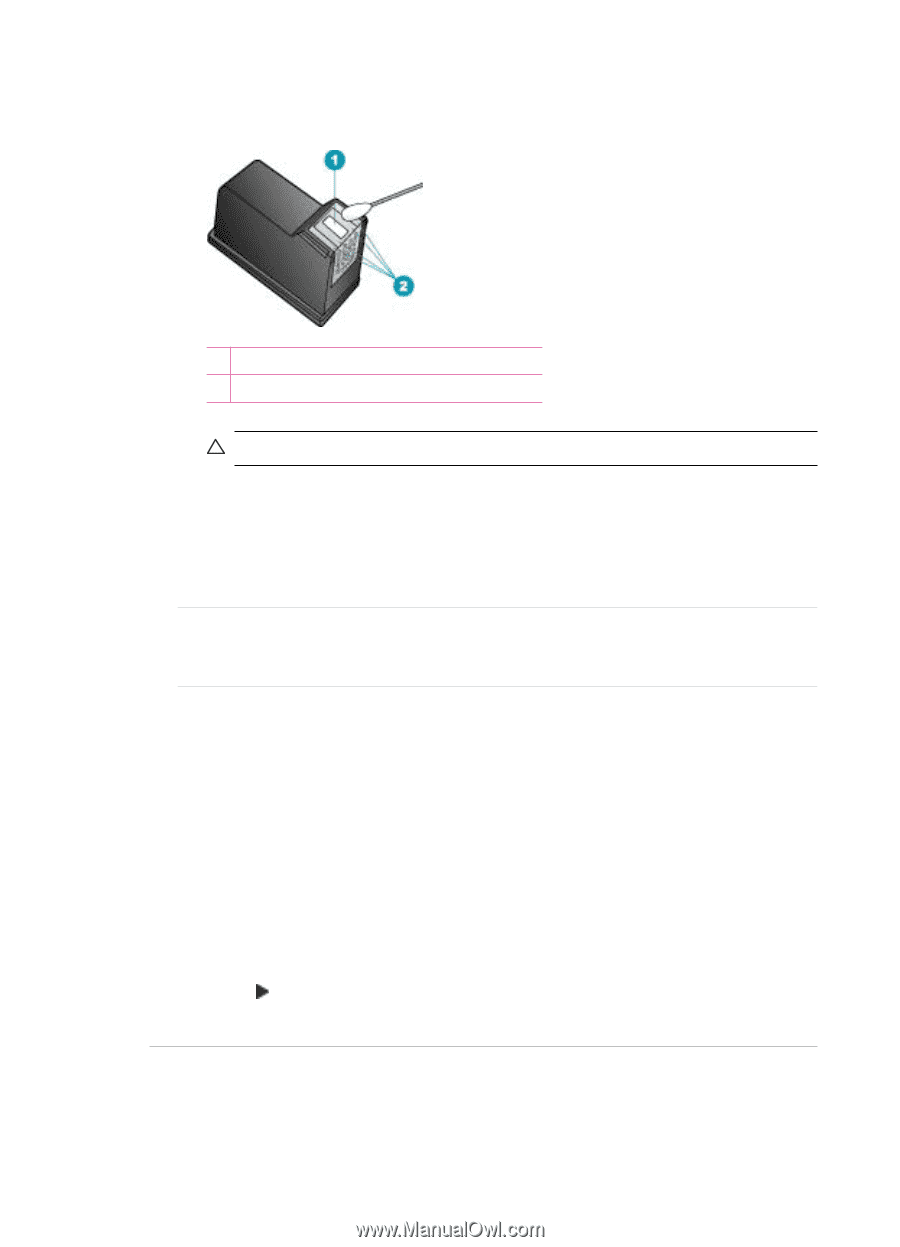
Chapter 12 6. Clean the face and edges around the ink nozzle area with the swab, as shown below. 1 Nozzle plate (do not clean) 2 Face and edges around the ink nozzle area CAUTION: Do not clean the nozzle plate. 7. Slide the print cartridge back into the slot. Push the print cartridge forward until it clicks into place. 8. Repeat if necessary for the other print cartridge. 9. Gently close the print cartridge door and plug the power cord into the back of the HP All-in-One. Cause: The sending fax machine is having problems. Solution: Ask the sender to check their fax machine for any problems. Cause: The phone line connection is noisy. Phone lines with poor sound quality (noise) can cause print quality problems. Solution: If the failure was due to noise on the phone line, contact the sender to have them resend the fax. The quality might be better when you try again. You can check the sound quality of the phone line by plugging a phone into the telephone wall jack and listening for static or other noise. If the problem persists, turn Error Correction Mode (ECM) off and contact your telephone company. To change the ECM setting from the control panel 1. Press Setup. 2. Press 5, and then press 6. This selects Advanced Fax Setup and then selects Error Correction Mode. 3. Press to select On or Off. 4. Press OK. Printouts are faded or have dull colors Cause: The print cartridges need to be cleaned or might be out of ink. 138 Troubleshooting
-
 1
1 -
2
-
3
-
4
-
5
-
6
-
7
-
8
-
9
-
10
-
11
-
12
-
13
-
14
-
15
-
16
-
17
-
18
-
19
-
20
-
21
-
22
-
23
-
24
-
25
-
26
-
27
-
28
-
29
-
30
-
31
-
32
-
33
-
34
-
35
-
36
-
37
-
38
-
39
-
40
-
41
-
42
-
43
-
44
-
45
-
46
-
47
-
48
-
49
-
50
-
51
-
52
-
53
-
54
-
55
-
56
-
57
-
58
-
59
-
60
-
61
-
62
-
63
-
64
-
65
-
66
-
67
-
68
-
69
-
70
-
71
-
72
-
73
-
74
-
75
-
76
-
77
-
78
-
79
-
80
-
81
-
82
-
83
-
84
-
85
-
86
-
87
-
88
-
89
-
90
-
91
-
92
-
93
-
94
-
95
-
96
-
97
-
98
-
99
-
100
-
101
-
102
-
103
-
104
-
105
-
106
-
107
-
108
-
109
-
110
-
111
-
112
-
113
-
114
-
115
-
116
-
117
-
118
-
119
-
120
-
121
-
122
-
123
-
124
-
125
-
126
-
127
-
128
-
129
-
130
-
131
-
132
-
133
-
134
-
 135
135 -
 136
136 -
 137
137 -
 138
138 -
 139
139 -
 140
140 -
 141
141 -
 142
142 -
 143
143 -
 144
144 -
 145
145 -
146
-
147
-
148
-
149
-
150
-
151
-
152
-
153
-
154
-
155
-
156
-
157
-
158
-
159
-
160
-
161
-
162
-
163
-
164
-
165
-
166
-
167
-
168
-
169
-
170
-
171
-
172
-
173
-
174
-
175
-
176
-
177
-
178
-
179
-
180
-
181
-
182
-
183
-
184
-
185
-
186
-
187
-
188
-
189
-
190
-
191
-
192
-
193
-
194
-
195
-
196
-
197
-
198
-
199
-
200
-
201
-
202
-
203
-
204
-
205
-
206
-
207
-
208
-
209
-
210
-
211
-
212
-
213
-
214
-
215
-
216
-
217
-
218
-
219
-
220
-
221
-
222
-
223
-
224
-
225
-
226
-
227
-
228
-
229
-
230
-
231
-
232
-
233
-
234
-
235
-
236
-
237
-
238
-
239
-
240
-
241
-
242
-
243
-
244
-
245
-
246
-
247
-
248
-
249
-
250
-
251
-
252
-
253
-
254
-
255
-
256
-
257
-
258
-
259
-
260
-
261
-
262
-
263
-
264
-
265
-
266
-
267
-
268
-
269
-
270
-
271
-
272
-
273
-
274
-
275
-
276
-
277
-
278
-
279
-
280
-
281
-
282
-
283
-
284
-
285
-
286
 |
 |