HP LaserJet 3200 Service Manual - Page 101
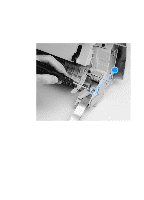
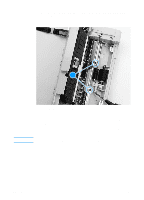
Open the printer door approximately halfway, and then lift the, printer door off of its hinges.
 |
View all HP LaserJet 3200 manuals
Add to My Manuals
Save this manual to your list of manuals |
Page 101 highlights
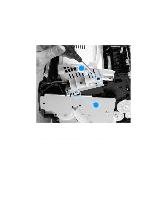
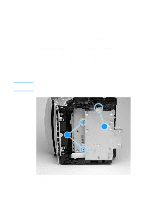
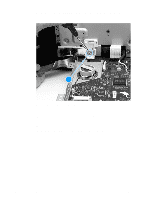
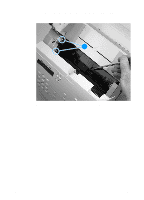
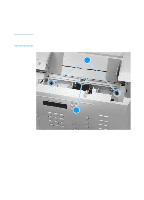
13 Tip the product back down so that it rests on its feet. 14 On the right side of the printer door, pull up on the front output door arm (callout 1) to separate it from the front output door. 15 On each side of the printer door, release the tab securing the hinge clip (callout 2) to the hinge, and pull the clip away from the printer door. 2 12 Figure 27. Printer door removal (4 of 4) Note 16 Open the printer door approximately halfway, and then lift the printer door off of its hinges. As you lift the printer door away from the product, make sure that the flat, flexible cable moves smoothly through the slot in the product. EN Document scanner assemblies 99
-
 1
1 -
2
-
3
-
4
-
5
-
6
-
7
-
8
-
9
-
10
-
11
-
12
-
13
-
14
-
15
-
16
-
17
-
18
-
19
-
20
-
21
-
22
-
23
-
24
-
25
-
26
-
27
-
28
-
29
-
30
-
31
-
32
-
33
-
34
-
35
-
36
-
37
-
38
-
39
-
40
-
41
-
42
-
43
-
44
-
45
-
46
-
47
-
48
-
49
-
50
-
51
-
52
-
53
-
54
-
55
-
56
-
57
-
58
-
59
-
60
-
61
-
62
-
63
-
64
-
65
-
66
-
67
-
68
-
69
-
70
-
71
-
72
-
73
-
74
-
75
-
76
-
77
-
78
-
79
-
80
-
81
-
82
-
83
-
84
-
85
-
86
-
87
-
88
-
89
-
90
-
91
-
92
-
93
-
94
-
95
-
 96
96 -
 97
97 -
 98
98 -
 99
99 -
 100
100 -
 101
101 -
 102
102 -
 103
103 -
 104
104 -
 105
105 -
 106
106 -
107
-
108
-
109
-
110
-
111
-
112
-
113
-
114
-
115
-
116
-
117
-
118
-
119
-
120
-
121
-
122
-
123
-
124
-
125
-
126
-
127
-
128
-
129
-
130
-
131
-
132
-
133
-
134
-
135
-
136
-
137
-
138
-
139
-
140
-
141
-
142
-
143
-
144
-
145
-
146
-
147
-
148
-
149
-
150
-
151
-
152
-
153
-
154
-
155
-
156
-
157
-
158
-
159
-
160
-
161
-
162
-
163
-
164
-
165
-
166
-
167
-
168
-
169
-
170
-
171
-
172
-
173
-
174
-
175
-
176
-
177
-
178
-
179
-
180
-
181
-
182
-
183
-
184
-
185
-
186
-
187
-
188
-
189
-
190
-
191
-
192
-
193
-
194
-
195
-
196
-
197
-
198
-
199
-
200
-
201
-
202
-
203
-
204
-
205
-
206
-
207
-
208
-
209
-
210
-
211
-
212
-
213
-
214
-
215
-
216
-
217
-
218
-
219
-
220
-
221
-
222
-
223
-
224
-
225
-
226
-
227
-
228
-
229
-
230
-
231
-
232
-
233
-
234
-
235
-
236
-
237
-
238
-
239
-
240
-
241
-
242
-
243
-
244
-
245
-
246
-
247
-
248
-
249
-
250
-
251
-
252
-
253
-
254
-
255
-
256
-
257
-
258
-
259
-
260
-
261
-
262
-
263
-
264
-
265
-
266
-
267
-
268
 |
 |

EN
Document scanner assemblies
99
13
Tip the product back down so that it rests on its feet.
14
On the right side of the printer door, pull up on the front output
door arm (callout 1) to separate it from the front output door.
15
On each side of the printer door, release the tab securing the
hinge clip (callout 2) to the hinge, and pull the clip away from the
printer door.
Figure 27.
Printer door removal (4 of 4)
16
Open the printer door approximately halfway, and then lift the
printer door off of its hinges.
Note
As you lift the printer door away from the product, make sure that the
flat, flexible cable moves smoothly through the slot in the product.
2
2
2
1