HP LaserJet 3200 Service Manual - Page 162
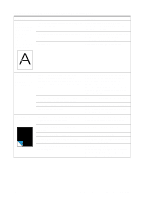
Characters are, only partially, printed also, referred to as, dropouts., Blank s, print
 |
View all HP LaserJet 3200 manuals
Add to My Manuals
Save this manual to your list of manuals |
Page 162 highlights
Table 12. Solving image-quality problems (continued) Problem Characters are only partially printed (also referred to as dropouts). Cause A single sheet of paper is defective. The print density needs to be adjusted. The moisture content of the paper is inconsistent or the paper has moist or wet spots on the surface. The paper was damaged by inconsistent manufacturing processes. A "draft mode" or "economy mode" is selected in the software. Solution Try reprinting the job. Adjust the print density from the control panel. Make sure that the media meets HP's specifications. Make sure that the media meets specifications detailed in HP's media specifications guide. Try a "normal" or "best" setting. Blank pages print occasionally. Page length and margins are not set correctly for the paper size. Your product is feeding two or more sheets of paper at a time because the paper is difficult to separate. If you are printing on small-sized paper and the page is blank, try printing on larger paper to see where the image is printing. Adjust the margins accordingly. Remove the paper from the paper input bin and align the edges of the paper. "Break" the ream of paper by curving it into an upside-down u-shape. Try turning the paper around to feed the other end first, or use a different type of paper. Blank pages are always printing. Your software application is sending an extra page-eject command. The toner cartridge was improperly installed. The toner cartridge is completely out of toner. Discontinuity exists in the high-voltage contact points. There is a problem in a part of the product. Clean the pickup roller and the separation pad. If the problem persists, replace the separation pad or subpads. Check your software's printing configuration information. If you are using a word-processing program, check for a natural page break and a forced page break that are close to each other. Make sure you removed the entire length of the sealing tape from the toner cartridge before you installed it. Replace the toner cartridge. Perform the high-voltage power supply check (see page 169). Print a self-test page. If the page is blank, follow the steps in "Basic troubleshooting" on page 146 to isolate the problem. Replace the laser/scanner or the ECU as needed. 160 Chapter 6 - Troubleshooting EN
-
 1
1 -
2
-
3
-
4
-
5
-
6
-
7
-
8
-
9
-
10
-
11
-
12
-
13
-
14
-
15
-
16
-
17
-
18
-
19
-
20
-
21
-
22
-
23
-
24
-
25
-
26
-
27
-
28
-
29
-
30
-
31
-
32
-
33
-
34
-
35
-
36
-
37
-
38
-
39
-
40
-
41
-
42
-
43
-
44
-
45
-
46
-
47
-
48
-
49
-
50
-
51
-
52
-
53
-
54
-
55
-
56
-
57
-
58
-
59
-
60
-
61
-
62
-
63
-
64
-
65
-
66
-
67
-
68
-
69
-
70
-
71
-
72
-
73
-
74
-
75
-
76
-
77
-
78
-
79
-
80
-
81
-
82
-
83
-
84
-
85
-
86
-
87
-
88
-
89
-
90
-
91
-
92
-
93
-
94
-
95
-
96
-
97
-
98
-
99
-
100
-
101
-
102
-
103
-
104
-
105
-
106
-
107
-
108
-
109
-
110
-
111
-
112
-
113
-
114
-
115
-
116
-
117
-
118
-
119
-
120
-
121
-
122
-
123
-
124
-
125
-
126
-
127
-
128
-
129
-
130
-
131
-
132
-
133
-
134
-
135
-
136
-
137
-
138
-
139
-
140
-
141
-
142
-
143
-
144
-
145
-
146
-
147
-
148
-
149
-
150
-
151
-
152
-
153
-
154
-
155
-
156
-
 157
157 -
 158
158 -
 159
159 -
 160
160 -
 161
161 -
 162
162 -
 163
163 -
 164
164 -
 165
165 -
 166
166 -
 167
167 -
168
-
169
-
170
-
171
-
172
-
173
-
174
-
175
-
176
-
177
-
178
-
179
-
180
-
181
-
182
-
183
-
184
-
185
-
186
-
187
-
188
-
189
-
190
-
191
-
192
-
193
-
194
-
195
-
196
-
197
-
198
-
199
-
200
-
201
-
202
-
203
-
204
-
205
-
206
-
207
-
208
-
209
-
210
-
211
-
212
-
213
-
214
-
215
-
216
-
217
-
218
-
219
-
220
-
221
-
222
-
223
-
224
-
225
-
226
-
227
-
228
-
229
-
230
-
231
-
232
-
233
-
234
-
235
-
236
-
237
-
238
-
239
-
240
-
241
-
242
-
243
-
244
-
245
-
246
-
247
-
248
-
249
-
250
-
251
-
252
-
253
-
254
-
255
-
256
-
257
-
258
-
259
-
260
-
261
-
262
-
263
-
264
-
265
-
266
-
267
-
268
 |
 |
