HP LaserJet 3200 Service Manual - Page 99
direction of the arrow, and then lift the cover away from the, Release the connector stay
 |
View all HP LaserJet 3200 manuals
Add to My Manuals
Save this manual to your list of manuals |
Page 99 highlights
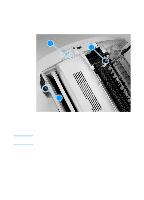
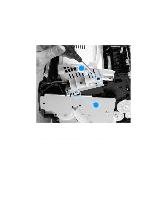
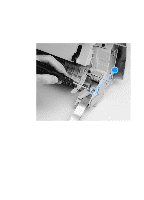
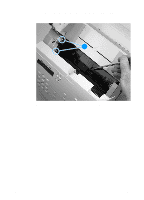
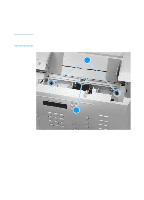
Note 6 Lift the formatter pan up slightly, toward the right side of the product, and then rotate the formatter pan down so that it rests on the ESD mat. 7 Release the scanner cable cover (callout 1) by pushing it in the direction of the arrow, and then lift the cover away from the product. 8 Release the connector stay, and then pull the flat, flexible cable (callout 2) out of its connector on the formatter. The cable is "notched" so that it clears the speaker. Make sure the cable is reattached in the correct orientation when you reassemble the product. 12 2 Figure 25. Printer door removal (2 of 4) EN Document scanner assemblies 97
-
 1
1 -
2
-
3
-
4
-
5
-
6
-
7
-
8
-
9
-
10
-
11
-
12
-
13
-
14
-
15
-
16
-
17
-
18
-
19
-
20
-
21
-
22
-
23
-
24
-
25
-
26
-
27
-
28
-
29
-
30
-
31
-
32
-
33
-
34
-
35
-
36
-
37
-
38
-
39
-
40
-
41
-
42
-
43
-
44
-
45
-
46
-
47
-
48
-
49
-
50
-
51
-
52
-
53
-
54
-
55
-
56
-
57
-
58
-
59
-
60
-
61
-
62
-
63
-
64
-
65
-
66
-
67
-
68
-
69
-
70
-
71
-
72
-
73
-
74
-
75
-
76
-
77
-
78
-
79
-
80
-
81
-
82
-
83
-
84
-
85
-
86
-
87
-
88
-
89
-
90
-
91
-
92
-
93
-
 94
94 -
 95
95 -
 96
96 -
 97
97 -
 98
98 -
 99
99 -
 100
100 -
 101
101 -
 102
102 -
 103
103 -
 104
104 -
105
-
106
-
107
-
108
-
109
-
110
-
111
-
112
-
113
-
114
-
115
-
116
-
117
-
118
-
119
-
120
-
121
-
122
-
123
-
124
-
125
-
126
-
127
-
128
-
129
-
130
-
131
-
132
-
133
-
134
-
135
-
136
-
137
-
138
-
139
-
140
-
141
-
142
-
143
-
144
-
145
-
146
-
147
-
148
-
149
-
150
-
151
-
152
-
153
-
154
-
155
-
156
-
157
-
158
-
159
-
160
-
161
-
162
-
163
-
164
-
165
-
166
-
167
-
168
-
169
-
170
-
171
-
172
-
173
-
174
-
175
-
176
-
177
-
178
-
179
-
180
-
181
-
182
-
183
-
184
-
185
-
186
-
187
-
188
-
189
-
190
-
191
-
192
-
193
-
194
-
195
-
196
-
197
-
198
-
199
-
200
-
201
-
202
-
203
-
204
-
205
-
206
-
207
-
208
-
209
-
210
-
211
-
212
-
213
-
214
-
215
-
216
-
217
-
218
-
219
-
220
-
221
-
222
-
223
-
224
-
225
-
226
-
227
-
228
-
229
-
230
-
231
-
232
-
233
-
234
-
235
-
236
-
237
-
238
-
239
-
240
-
241
-
242
-
243
-
244
-
245
-
246
-
247
-
248
-
249
-
250
-
251
-
252
-
253
-
254
-
255
-
256
-
257
-
258
-
259
-
260
-
261
-
262
-
263
-
264
-
265
-
266
-
267
-
268
 |
 |

EN
Document scanner assemblies
97
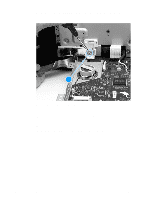
6
Lift the formatter pan up slightly, toward the right side of the
product, and then rotate the formatter pan down so that it rests on
the ESD mat.
7
Release the scanner cable cover (callout 1) by pushing it in the
direction of the arrow, and then lift the cover away from the
product.
8
Release the connector stay, and then pull the flat, flexible cable
(callout 2) out of its connector on the formatter.
Note
The cable is “notched” so that it clears the speaker. Make sure the
cable is reattached in the correct orientation when you reassemble the
product.
Figure 25.
Printer door removal (2 of 4)
2
2
2
1