HP Media Center m400 HP Media Center PC - User's Guide 5990-6456 - Page 196
Replacing the drive cage
 |
View all HP Media Center m400 manuals
Add to My Manuals
Save this manual to your list of manuals |
Page 196 highlights
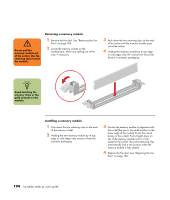
Replacing the drive cage 1 Cover the front of the cage as you lift it so that the 7-In-1 memory card reader does not slide out. 2 Hold the drive cage at a 45-degree angle, and place the two nubs (G) on the cage into the two guides (H) on the chassis. 3 Align the track on the top of the drive cage (K) with the track guide on the bottom of optical drive bay (J). Push the drive cage firmly toward the track guide to engage it as you rotate the drive cage down into position. The release tab should latch. (If you can remove the cage by pulling up on it, the track did not properly engage the track guide. Repeat the steps to replace the drive cage.) 4 Push the 7-In-1 memory card reader toward the front of the chassis until the two screw holes align with the drive cage. (You may have to push down the front of the reader as you slide it out into the front panel.) Replace the two screws that secure the 7-In-1 memory card reader. 5 Reattach the cables to the back of the drives. 6 Replace the fan duct. See "Replacing the Fan Duct" on page 184. G H J K G Nub on drive cage H Nub guides in chassis (2) 190 hp media center pc user's guide J Track guide on the bottom of the optical drive bay K Track on drive cage
-
 1
1 -
2
-
3
-
4
-
5
-
6
-
7
-
8
-
9
-
10
-
11
-
12
-
13
-
14
-
15
-
16
-
17
-
18
-
19
-
20
-
21
-
22
-
23
-
24
-
25
-
26
-
27
-
28
-
29
-
30
-
31
-
32
-
33
-
34
-
35
-
36
-
37
-
38
-
39
-
40
-
41
-
42
-
43
-
44
-
45
-
46
-
47
-
48
-
49
-
50
-
51
-
52
-
53
-
54
-
55
-
56
-
57
-
58
-
59
-
60
-
61
-
62
-
63
-
64
-
65
-
66
-
67
-
68
-
69
-
70
-
71
-
72
-
73
-
74
-
75
-
76
-
77
-
78
-
79
-
80
-
81
-
82
-
83
-
84
-
85
-
86
-
87
-
88
-
89
-
90
-
91
-
92
-
93
-
94
-
95
-
96
-
97
-
98
-
99
-
100
-
101
-
102
-
103
-
104
-
105
-
106
-
107
-
108
-
109
-
110
-
111
-
112
-
113
-
114
-
115
-
116
-
117
-
118
-
119
-
120
-
121
-
122
-
123
-
124
-
125
-
126
-
127
-
128
-
129
-
130
-
131
-
132
-
133
-
134
-
135
-
136
-
137
-
138
-
139
-
140
-
141
-
142
-
143
-
144
-
145
-
146
-
147
-
148
-
149
-
150
-
151
-
152
-
153
-
154
-
155
-
156
-
157
-
158
-
159
-
160
-
161
-
162
-
163
-
164
-
165
-
166
-
167
-
168
-
169
-
170
-
171
-
172
-
173
-
174
-
175
-
176
-
177
-
178
-
179
-
180
-
181
-
182
-
183
-
184
-
185
-
186
-
187
-
188
-
189
-
190
-
 191
191 -
 192
192 -
 193
193 -
 194
194 -
 195
195 -
 196
196 -
 197
197 -
 198
198 -
 199
199 -
 200
200 -
 201
201 -
202
-
203
-
204
-
205
-
206
-
207
-
208
-
209
-
210
-
211
-
212
-
213
-
214
-
215
-
216
-
217
-
218
-
219
-
220
-
221
-
222
-
223
-
224
-
225
-
226
-
227
-
228
-
229
-
230
-
231
-
232
 |
 |
