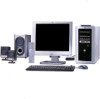
HP Media Center m400 HP Media Center PC - User's Guide 5990-6456 - Page 35
Klipsch Speaker System
 |
View all HP Media Center m400 manuals
Add to My Manuals
Save this manual to your list of manuals |
Page 35 highlights
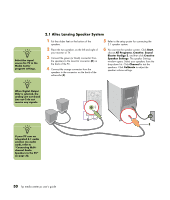
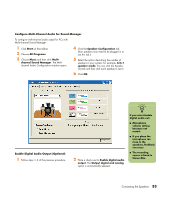
2.1 Klipsch Speaker System 1 Put the rubber feet on the bottom of the speakers. 2 Place the two speakers on the left and right of your monitor or TV. 3 Connect the green (or black) connector from the speakers to the Line-Out connector (A) on the back of the PC. 4 Connect the Preamp Input connector to the Preamp Input connector on the back of the PC (C). 5 Place the subwoofer on the floor beneath your computer desk or TV. Do not block the side or front of the subwoofer, and allow for ventilation to reach the rear of the subwoofer. Do not place the subwoofer by the computer monitor; to avoid interference, place the subwoofer 10 inches or more away from the monitor. 6 Connect the speakers to the subwoofer (B). 7 Refer to the setup poster for connecting the 2.1 speaker system. 8 You can test the speaker system. Click Start, choose All Programs, Creative, Sound Blaster Audigy 2, and then click Creative Speaker Settings. The Speaker Settings window opens. Select your speakers from the drop-down list. Click Channel to test the speakers. Click Calibrate to adjust the speaker volume settings. C n Location and number of connectors may vary by model. B A LINE OUT Connecting the Speakers 29
-
 1
1 -
2
-
3
-
4
-
5
-
6
-
7
-
8
-
9
-
10
-
11
-
12
-
13
-
14
-
15
-
16
-
17
-
18
-
19
-
20
-
21
-
22
-
23
-
24
-
25
-
26
-
27
-
28
-
29
-
 30
30 -
 31
31 -
 32
32 -
 33
33 -
 34
34 -
 35
35 -
 36
36 -
 37
37 -
 38
38 -
 39
39 -
 40
40 -
41
-
42
-
43
-
44
-
45
-
46
-
47
-
48
-
49
-
50
-
51
-
52
-
53
-
54
-
55
-
56
-
57
-
58
-
59
-
60
-
61
-
62
-
63
-
64
-
65
-
66
-
67
-
68
-
69
-
70
-
71
-
72
-
73
-
74
-
75
-
76
-
77
-
78
-
79
-
80
-
81
-
82
-
83
-
84
-
85
-
86
-
87
-
88
-
89
-
90
-
91
-
92
-
93
-
94
-
95
-
96
-
97
-
98
-
99
-
100
-
101
-
102
-
103
-
104
-
105
-
106
-
107
-
108
-
109
-
110
-
111
-
112
-
113
-
114
-
115
-
116
-
117
-
118
-
119
-
120
-
121
-
122
-
123
-
124
-
125
-
126
-
127
-
128
-
129
-
130
-
131
-
132
-
133
-
134
-
135
-
136
-
137
-
138
-
139
-
140
-
141
-
142
-
143
-
144
-
145
-
146
-
147
-
148
-
149
-
150
-
151
-
152
-
153
-
154
-
155
-
156
-
157
-
158
-
159
-
160
-
161
-
162
-
163
-
164
-
165
-
166
-
167
-
168
-
169
-
170
-
171
-
172
-
173
-
174
-
175
-
176
-
177
-
178
-
179
-
180
-
181
-
182
-
183
-
184
-
185
-
186
-
187
-
188
-
189
-
190
-
191
-
192
-
193
-
194
-
195
-
196
-
197
-
198
-
199
-
200
-
201
-
202
-
203
-
204
-
205
-
206
-
207
-
208
-
209
-
210
-
211
-
212
-
213
-
214
-
215
-
216
-
217
-
218
-
219
-
220
-
221
-
222
-
223
-
224
-
225
-
226
-
227
-
228
-
229
-
230
-
231
-
232
 |
 |
