HP Surestore Disk Array FC60 HP SureStore E Disk Array 12H User's and Service - Page 192
Front Door AssemblyŒHP-qualified personnel only, Removal
 |
View all HP Surestore Disk Array FC60 manuals
Add to My Manuals
Save this manual to your list of manuals |
Page 192 highlights
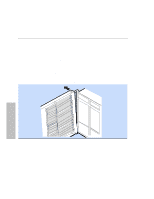
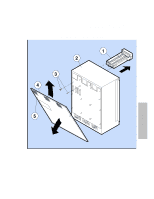
Removal and Replacement Front Door Assembly-HP-qualified personnel only Front Door Assembly-HP-qualified personnel only To replace the front door (See Figure 31): 1. Open the door to a position 90 degrees from the closed position. 2. Center the top hinge pin in the top slot of the door. 3. Push the door top outward, so the hinge pin exits through the perpendicular slot. 4. Pull the door up and free it from the bottom hinge pin. 5. Replace the door by dropping the lower door mounting hole onto the lower hinge pin. 6. Swing the upper corner mounting slot into the upper hinge bracket pin until it snaps into place. Figure 31. Replacing the Front Door 192 Removal
-
 1
1 -
2
-
3
-
4
-
5
-
6
-
7
-
8
-
9
-
10
-
11
-
12
-
13
-
14
-
15
-
16
-
17
-
18
-
19
-
20
-
21
-
22
-
23
-
24
-
25
-
26
-
27
-
28
-
29
-
30
-
31
-
32
-
33
-
34
-
35
-
36
-
37
-
38
-
39
-
40
-
41
-
42
-
43
-
44
-
45
-
46
-
47
-
48
-
49
-
50
-
51
-
52
-
53
-
54
-
55
-
56
-
57
-
58
-
59
-
60
-
61
-
62
-
63
-
64
-
65
-
66
-
67
-
68
-
69
-
70
-
71
-
72
-
73
-
74
-
75
-
76
-
77
-
78
-
79
-
80
-
81
-
82
-
83
-
84
-
85
-
86
-
87
-
88
-
89
-
90
-
91
-
92
-
93
-
94
-
95
-
96
-
97
-
98
-
99
-
100
-
101
-
102
-
103
-
104
-
105
-
106
-
107
-
108
-
109
-
110
-
111
-
112
-
113
-
114
-
115
-
116
-
117
-
118
-
119
-
120
-
121
-
122
-
123
-
124
-
125
-
126
-
127
-
128
-
129
-
130
-
131
-
132
-
133
-
134
-
135
-
136
-
137
-
138
-
139
-
140
-
141
-
142
-
143
-
144
-
145
-
146
-
147
-
148
-
149
-
150
-
151
-
152
-
153
-
154
-
155
-
156
-
157
-
158
-
159
-
160
-
161
-
162
-
163
-
164
-
165
-
166
-
167
-
168
-
169
-
170
-
171
-
172
-
173
-
174
-
175
-
176
-
177
-
178
-
179
-
180
-
181
-
182
-
183
-
184
-
185
-
186
-
 187
187 -
 188
188 -
 189
189 -
 190
190 -
 191
191 -
 192
192 -
 193
193 -
 194
194 -
 195
195 -
 196
196 -
 197
197 -
198
-
199
-
200
-
201
-
202
-
203
-
204
-
205
-
206
-
207
-
208
-
209
-
210
-
211
-
212
-
213
-
214
-
215
-
216
-
217
-
218
-
219
-
220
-
221
-
222
-
223
-
224
-
225
-
226
-
227
-
228
-
229
-
230
-
231
-
232
-
233
-
234
-
235
-
236
-
237
-
238
-
239
-
240
-
241
-
242
-
243
-
244
-
245
-
246
-
247
-
248
-
249
-
250
-
251
-
252
-
253
-
254
-
255
-
256
-
257
-
258
-
259
-
260
-
261
-
262
-
263
-
264
-
265
-
266
-
267
-
268
-
269
-
270
-
271
-
272
-
273
-
274
-
275
-
276
 |
 |

Removal and Replacement
Front Door Assembly–HP-qualified personnel only
192
Removal
Front Door Assembly–HP-qualified personnel only
To replace the front door (See
Figure 31
):
1.
Open the door to a position 90 degrees from the closed position.
2.
Center the top hinge pin in the top slot of the door.
3.
Push the door top outward, so the hinge pin exits through the perpendicular slot.
4.
Pull the door up and free it from the bottom hinge pin.
5.
Replace the door by dropping the lower door mounting hole onto the lower hinge pin.
6.
Swing the upper corner mounting slot into the upper hinge bracket pin until it snaps into place.
Figure 31. Replacing the Front Door