HP Surestore Disk Array FC60 HP SureStore E Disk Array 12H User's and Service - Page 230
Installing the Disk Array into a Rack, Table 18
 |
View all HP Surestore Disk Array FC60 manuals
Add to My Manuals
Save this manual to your list of manuals |
Page 230 highlights
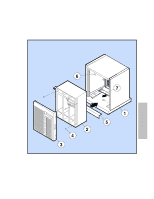
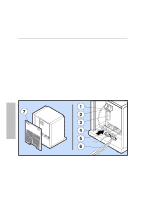
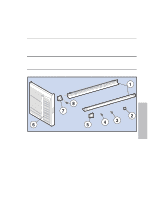
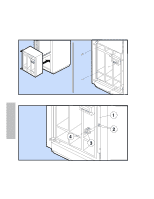
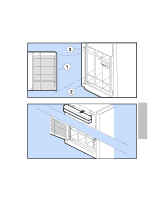
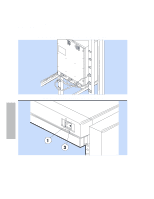
Appendix C. Cabinet Configurations Rackmount Cabinets Installing the Disk Array into a Rack 1. Install one clip nut (Figure 42, Item 1) on each of the four rail standards on hole number 3. Secure the rails (2) with four T-25 screws (3). See Table 18 for rail standard clip nut spacing for multiple disk arrays. (This spacing begins installation by installing an array in the lowest cabinet, EIA, position.) 2. Install two clip nuts on the front left and two on the front right ear standards; one clip nut (Figure 42, Item 4) on hole number 7 and one clip nut (5) on hole number 33. See Table 18 for ear standard clip nut spacing for multiple disk arrays. 3. Slide the enclosure into the cabinet (see Figure 43). Secure the enclosure with four T-25 screws. 4. Slip the Retainer Clip (Figure 41 Item 7) up against the back of the array enclosure and secure the clip with retainer clip screw. 5. Install the door snap (see Figure 44, Item 3) on the latch bracket (1), using the alignment holes (2) as a guide. Secure the door snap with one T-15 screw (4). 6. Install the enclosure door (see Figure 45, Item 1). Drop the lower corner mounting hole onto the lower hinge bracket pin (2) then swing the upper corner mounting slot into the upper hinge bracket pin (3). Gently press on the upper left corner of the door and snap the upper corner onto the hinge bracket. 7. Repeat steps 1 through 6 to install additional disk arrays. 8. Install two filler panels in the top two EIA slots (see Figure 46). 9. Connect the disk array power cords (see Figure 47) to the cabinet power distribution units (PDUs). 10. Press the cabinet power switch (see Figure 48, Item 1) to switch on the cabinet power. The cabinet power light (2) should be green. NOTE! For greater power redundancy, you can connect each power module into a separate PDU. This will require ordering the Power Upgrade Kit A4915A to obtain additional PDUs, refer to Appendix D for additional information. CAUTION! To prevent the current rating of the PDU from being exceeded, observe the maximum current rating of the PDU. Do not connect more enclosures than the PDU rating. You may have to upgrade your PDU to provide enough total current for a full back-to-back rack configuration. 230 Cabinets
-
 1
1 -
2
-
3
-
4
-
5
-
6
-
7
-
8
-
9
-
10
-
11
-
12
-
13
-
14
-
15
-
16
-
17
-
18
-
19
-
20
-
21
-
22
-
23
-
24
-
25
-
26
-
27
-
28
-
29
-
30
-
31
-
32
-
33
-
34
-
35
-
36
-
37
-
38
-
39
-
40
-
41
-
42
-
43
-
44
-
45
-
46
-
47
-
48
-
49
-
50
-
51
-
52
-
53
-
54
-
55
-
56
-
57
-
58
-
59
-
60
-
61
-
62
-
63
-
64
-
65
-
66
-
67
-
68
-
69
-
70
-
71
-
72
-
73
-
74
-
75
-
76
-
77
-
78
-
79
-
80
-
81
-
82
-
83
-
84
-
85
-
86
-
87
-
88
-
89
-
90
-
91
-
92
-
93
-
94
-
95
-
96
-
97
-
98
-
99
-
100
-
101
-
102
-
103
-
104
-
105
-
106
-
107
-
108
-
109
-
110
-
111
-
112
-
113
-
114
-
115
-
116
-
117
-
118
-
119
-
120
-
121
-
122
-
123
-
124
-
125
-
126
-
127
-
128
-
129
-
130
-
131
-
132
-
133
-
134
-
135
-
136
-
137
-
138
-
139
-
140
-
141
-
142
-
143
-
144
-
145
-
146
-
147
-
148
-
149
-
150
-
151
-
152
-
153
-
154
-
155
-
156
-
157
-
158
-
159
-
160
-
161
-
162
-
163
-
164
-
165
-
166
-
167
-
168
-
169
-
170
-
171
-
172
-
173
-
174
-
175
-
176
-
177
-
178
-
179
-
180
-
181
-
182
-
183
-
184
-
185
-
186
-
187
-
188
-
189
-
190
-
191
-
192
-
193
-
194
-
195
-
196
-
197
-
198
-
199
-
200
-
201
-
202
-
203
-
204
-
205
-
206
-
207
-
208
-
209
-
210
-
211
-
212
-
213
-
214
-
215
-
216
-
217
-
218
-
219
-
220
-
221
-
222
-
223
-
224
-
 225
225 -
 226
226 -
 227
227 -
 228
228 -
 229
229 -
 230
230 -
 231
231 -
 232
232 -
 233
233 -
 234
234 -
 235
235 -
236
-
237
-
238
-
239
-
240
-
241
-
242
-
243
-
244
-
245
-
246
-
247
-
248
-
249
-
250
-
251
-
252
-
253
-
254
-
255
-
256
-
257
-
258
-
259
-
260
-
261
-
262
-
263
-
264
-
265
-
266
-
267
-
268
-
269
-
270
-
271
-
272
-
273
-
274
-
275
-
276
 |
 |
