HP Surestore Disk Array FC60 HP SureStore E Disk Array 12H User's and Service - Page 226
Installing the Disk Array into the Deskside Cabinet,
 |
View all HP Surestore Disk Array FC60 manuals
Add to My Manuals
Save this manual to your list of manuals |
Page 226 highlights
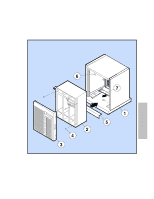
Appendix C. Cabinet Configurations Installing the Disk Array into the Deskside Cabinet Installing the Disk Array into the Deskside Cabinet If the disk array is already installed into the deskside cabinet, skip this set of steps. To install the disk array into the deskside cabinet, see Figure 39 and perform the following steps: 1. Attach the edge protector (5) along the lower front of the cabinet as shown in Figure 39. This will protect the cabinet from being scratched when installing the disk array enclosure. 2. Install the four provided clip nuts (6) onto the front of the deskside cabinet as shown in Figure 39. 3. Lift the disk array enclosure into the cabinet, and secure it with the four screws (4) as shown in Figure 39. Remove the edge protector. 4. Loosen the two screws on the clamp (7) at the rear of the deskside cabinet, and slide the clamp forward until the tabs of the clamp engage in the slots in the lower rear corners of the disk array as shown in Figure 39. 5. Loosen the two screws on the clamp at the rear of the deskside cabinet, and slide the clamp forward until the tabs of the clamp engage in the slots in the lower rear corners of the disk array as shown in Figure 39. Retighten the two screws. 6. Install the disk array door (3) as shown in Figure 45. 7. Proceed to the next section to install the cabling. 226 Cabinets
-
 1
1 -
2
-
3
-
4
-
5
-
6
-
7
-
8
-
9
-
10
-
11
-
12
-
13
-
14
-
15
-
16
-
17
-
18
-
19
-
20
-
21
-
22
-
23
-
24
-
25
-
26
-
27
-
28
-
29
-
30
-
31
-
32
-
33
-
34
-
35
-
36
-
37
-
38
-
39
-
40
-
41
-
42
-
43
-
44
-
45
-
46
-
47
-
48
-
49
-
50
-
51
-
52
-
53
-
54
-
55
-
56
-
57
-
58
-
59
-
60
-
61
-
62
-
63
-
64
-
65
-
66
-
67
-
68
-
69
-
70
-
71
-
72
-
73
-
74
-
75
-
76
-
77
-
78
-
79
-
80
-
81
-
82
-
83
-
84
-
85
-
86
-
87
-
88
-
89
-
90
-
91
-
92
-
93
-
94
-
95
-
96
-
97
-
98
-
99
-
100
-
101
-
102
-
103
-
104
-
105
-
106
-
107
-
108
-
109
-
110
-
111
-
112
-
113
-
114
-
115
-
116
-
117
-
118
-
119
-
120
-
121
-
122
-
123
-
124
-
125
-
126
-
127
-
128
-
129
-
130
-
131
-
132
-
133
-
134
-
135
-
136
-
137
-
138
-
139
-
140
-
141
-
142
-
143
-
144
-
145
-
146
-
147
-
148
-
149
-
150
-
151
-
152
-
153
-
154
-
155
-
156
-
157
-
158
-
159
-
160
-
161
-
162
-
163
-
164
-
165
-
166
-
167
-
168
-
169
-
170
-
171
-
172
-
173
-
174
-
175
-
176
-
177
-
178
-
179
-
180
-
181
-
182
-
183
-
184
-
185
-
186
-
187
-
188
-
189
-
190
-
191
-
192
-
193
-
194
-
195
-
196
-
197
-
198
-
199
-
200
-
201
-
202
-
203
-
204
-
205
-
206
-
207
-
208
-
209
-
210
-
211
-
212
-
213
-
214
-
215
-
216
-
217
-
218
-
219
-
220
-
 221
221 -
 222
222 -
 223
223 -
 224
224 -
 225
225 -
 226
226 -
 227
227 -
 228
228 -
 229
229 -
 230
230 -
 231
231 -
232
-
233
-
234
-
235
-
236
-
237
-
238
-
239
-
240
-
241
-
242
-
243
-
244
-
245
-
246
-
247
-
248
-
249
-
250
-
251
-
252
-
253
-
254
-
255
-
256
-
257
-
258
-
259
-
260
-
261
-
262
-
263
-
264
-
265
-
266
-
267
-
268
-
269
-
270
-
271
-
272
-
273
-
274
-
275
-
276
 |
 |
