HP Surestore Disk Array FC60 HP SureStore E Disk Array 12H User's and Service - Page 224
Unpacking the Deskside Cabinet, Cabinets
 |
View all HP Surestore Disk Array FC60 manuals
Add to My Manuals
Save this manual to your list of manuals |
Page 224 highlights
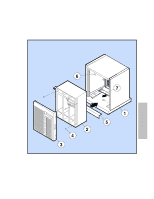
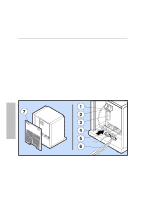
Appendix C. Cabinet Configurations Unpacking the Deskside Cabinet Unpacking the Deskside Cabinet To unpack the deskside cabinet, perform the following steps: 1. Cut the strapping bands, and slide the fully-packaged product off of the pallet as shown in Figure 38, View 1 2. Remove the four plastic clips and lift the carton off of the cabinet. Also, remove the accessory tray and then remove the top, front, and rear foam cushioning as shown in Figure 38, View 2. 3. Lift one edge of the cabinet, and then remove the bottom cushion from the opposite side. Repeat this step for the other side of the cabinet. See Figure 38, View 3 4. Roll the cabinet off of the bottom tray as shown in Figure 38, View 4 224 Cabinets
-
 1
1 -
2
-
3
-
4
-
5
-
6
-
7
-
8
-
9
-
10
-
11
-
12
-
13
-
14
-
15
-
16
-
17
-
18
-
19
-
20
-
21
-
22
-
23
-
24
-
25
-
26
-
27
-
28
-
29
-
30
-
31
-
32
-
33
-
34
-
35
-
36
-
37
-
38
-
39
-
40
-
41
-
42
-
43
-
44
-
45
-
46
-
47
-
48
-
49
-
50
-
51
-
52
-
53
-
54
-
55
-
56
-
57
-
58
-
59
-
60
-
61
-
62
-
63
-
64
-
65
-
66
-
67
-
68
-
69
-
70
-
71
-
72
-
73
-
74
-
75
-
76
-
77
-
78
-
79
-
80
-
81
-
82
-
83
-
84
-
85
-
86
-
87
-
88
-
89
-
90
-
91
-
92
-
93
-
94
-
95
-
96
-
97
-
98
-
99
-
100
-
101
-
102
-
103
-
104
-
105
-
106
-
107
-
108
-
109
-
110
-
111
-
112
-
113
-
114
-
115
-
116
-
117
-
118
-
119
-
120
-
121
-
122
-
123
-
124
-
125
-
126
-
127
-
128
-
129
-
130
-
131
-
132
-
133
-
134
-
135
-
136
-
137
-
138
-
139
-
140
-
141
-
142
-
143
-
144
-
145
-
146
-
147
-
148
-
149
-
150
-
151
-
152
-
153
-
154
-
155
-
156
-
157
-
158
-
159
-
160
-
161
-
162
-
163
-
164
-
165
-
166
-
167
-
168
-
169
-
170
-
171
-
172
-
173
-
174
-
175
-
176
-
177
-
178
-
179
-
180
-
181
-
182
-
183
-
184
-
185
-
186
-
187
-
188
-
189
-
190
-
191
-
192
-
193
-
194
-
195
-
196
-
197
-
198
-
199
-
200
-
201
-
202
-
203
-
204
-
205
-
206
-
207
-
208
-
209
-
210
-
211
-
212
-
213
-
214
-
215
-
216
-
217
-
218
-
 219
219 -
 220
220 -
 221
221 -
 222
222 -
 223
223 -
 224
224 -
 225
225 -
 226
226 -
 227
227 -
 228
228 -
 229
229 -
230
-
231
-
232
-
233
-
234
-
235
-
236
-
237
-
238
-
239
-
240
-
241
-
242
-
243
-
244
-
245
-
246
-
247
-
248
-
249
-
250
-
251
-
252
-
253
-
254
-
255
-
256
-
257
-
258
-
259
-
260
-
261
-
262
-
263
-
264
-
265
-
266
-
267
-
268
-
269
-
270
-
271
-
272
-
273
-
274
-
275
-
276
 |
 |

Appendix C. Cabinet Configurations
Unpacking the Deskside Cabinet
224
Cabinets
Unpacking the Deskside Cabinet
To unpack the deskside cabinet, perform the following steps:
1.
Cut the strapping bands, and slide the fully-packaged product off of the pallet as shown in
Figure 38
,
View 1
2.
Remove the four plastic clips and lift the carton off of the cabinet. Also, remove the accessory tray and
then remove the top, front, and rear foam cushioning as shown in
Figure 38
, View 2.
3.
Lift one edge of the cabinet, and then remove the bottom cushion from the opposite side. Repeat this
step for the other side of the cabinet. See
Figure 38
, View 3
4.
Roll the cabinet off of the bottom tray as shown in
Figure 38
, View 4