HP Surestore Disk Array FC60 HP SureStore E Disk Array 12H User's and Service - Page 246
meter, 6 Meter Rack
 |
View all HP Surestore Disk Array FC60 manuals
Add to My Manuals
Save this manual to your list of manuals |
Page 246 highlights
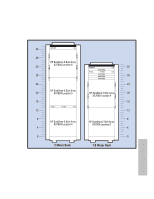
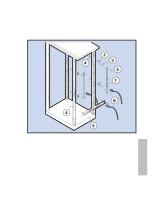
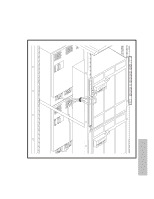
Appendix D. Back-to-Back Racking Installation Procedure 5. Install Replacement PDU brackets Install the PDU angle brackets supplied in the A4915A HP Power Upgrade Kit as described below (see Figure 51): a) Install the PDU brackets at the rear of the cabinet as described in the A4915A Upgrade Kit Quick Installation Guide. However, when installing the brackets, two on the right column and two on the left column, install them in the positions as indicated in the table below, not as described in the quick installation guide. Rack 1.6 Meter Rack - 2-meter Rack - Accessory Holes (as counted from the top of the rack, down) 12 and 33 16 and 37 NOTE -.Do not install the PDUs until after the disk array enclosures have been installed. 6. Install the disk enclosures Replace any array enclosures you removed from the rack and install any new arrays. Refer to appendix C of this document for array enclosure installation. Remember, when installing the disk modules, ensure that they are installed back into the same enclosure from which they were removed. NOTE! For optimum cooling efficiency, array enclosures should be racked from top to bottom in the front of the rack and from bottom to top in the back of the rack. If side access to the rack is not going to be possible, install the bottom and then the top array enclosure, leaving the array position in the middle or top, open (middle for a 2-meter rack or top for a 1.6 meter rack). Racking 246
-
 1
1 -
2
-
3
-
4
-
5
-
6
-
7
-
8
-
9
-
10
-
11
-
12
-
13
-
14
-
15
-
16
-
17
-
18
-
19
-
20
-
21
-
22
-
23
-
24
-
25
-
26
-
27
-
28
-
29
-
30
-
31
-
32
-
33
-
34
-
35
-
36
-
37
-
38
-
39
-
40
-
41
-
42
-
43
-
44
-
45
-
46
-
47
-
48
-
49
-
50
-
51
-
52
-
53
-
54
-
55
-
56
-
57
-
58
-
59
-
60
-
61
-
62
-
63
-
64
-
65
-
66
-
67
-
68
-
69
-
70
-
71
-
72
-
73
-
74
-
75
-
76
-
77
-
78
-
79
-
80
-
81
-
82
-
83
-
84
-
85
-
86
-
87
-
88
-
89
-
90
-
91
-
92
-
93
-
94
-
95
-
96
-
97
-
98
-
99
-
100
-
101
-
102
-
103
-
104
-
105
-
106
-
107
-
108
-
109
-
110
-
111
-
112
-
113
-
114
-
115
-
116
-
117
-
118
-
119
-
120
-
121
-
122
-
123
-
124
-
125
-
126
-
127
-
128
-
129
-
130
-
131
-
132
-
133
-
134
-
135
-
136
-
137
-
138
-
139
-
140
-
141
-
142
-
143
-
144
-
145
-
146
-
147
-
148
-
149
-
150
-
151
-
152
-
153
-
154
-
155
-
156
-
157
-
158
-
159
-
160
-
161
-
162
-
163
-
164
-
165
-
166
-
167
-
168
-
169
-
170
-
171
-
172
-
173
-
174
-
175
-
176
-
177
-
178
-
179
-
180
-
181
-
182
-
183
-
184
-
185
-
186
-
187
-
188
-
189
-
190
-
191
-
192
-
193
-
194
-
195
-
196
-
197
-
198
-
199
-
200
-
201
-
202
-
203
-
204
-
205
-
206
-
207
-
208
-
209
-
210
-
211
-
212
-
213
-
214
-
215
-
216
-
217
-
218
-
219
-
220
-
221
-
222
-
223
-
224
-
225
-
226
-
227
-
228
-
229
-
230
-
231
-
232
-
233
-
234
-
235
-
236
-
237
-
238
-
239
-
240
-
 241
241 -
 242
242 -
 243
243 -
 244
244 -
 245
245 -
 246
246 -
 247
247 -
 248
248 -
 249
249 -
 250
250 -
 251
251 -
252
-
253
-
254
-
255
-
256
-
257
-
258
-
259
-
260
-
261
-
262
-
263
-
264
-
265
-
266
-
267
-
268
-
269
-
270
-
271
-
272
-
273
-
274
-
275
-
276
 |
 |
