Intel 640 User Guide - Page 85
Removing Excess Adhesive from IHS, Filling the Groove with Adhesive
 |
UPC - 683728178901
View all Intel 640 manuals
Add to My Manuals
Save this manual to your list of manuals |
Page 85 highlights
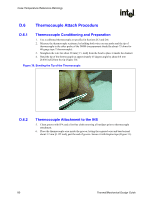
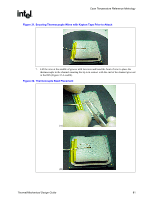
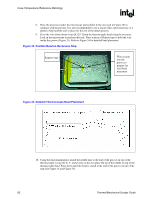
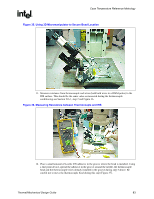
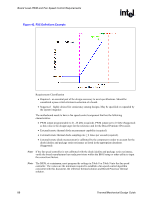
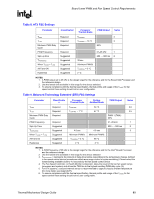
Case Temperature Reference Metrology R 18. Use a blade to carefully shave excess adhesive above the IHS surface (Figure 39). Note: Take usual safety precautions when using open blades and performing this operation. Figure 39. Removing Excess Adhesive from IHS 19. Install new Kapton tape to hold the thermocouple wire down and fill the rest of the groove with adhesive (see Figure 40). Make sure the wire and insulation is entirely within the groove and below the IHS surface. Figure 40. Filling the Groove with Adhesive Filling with Adhesive Kapton* Tape 20. Curing time for the rest of the adhesive in the groove can be reduced using Loctite Accelerator 7452. 21. Repeat step 5 to remove any access adhesive to ensure flat IHS for proper mechanical contact to the heatsink surface. Thermal/Mechanical Design Guide 85
-
 1
1 -
2
-
3
-
4
-
5
-
6
-
7
-
8
-
9
-
10
-
11
-
12
-
13
-
14
-
15
-
16
-
17
-
18
-
19
-
20
-
21
-
22
-
23
-
24
-
25
-
26
-
27
-
28
-
29
-
30
-
31
-
32
-
33
-
34
-
35
-
36
-
37
-
38
-
39
-
40
-
41
-
42
-
43
-
44
-
45
-
46
-
47
-
48
-
49
-
50
-
51
-
52
-
53
-
54
-
55
-
56
-
57
-
58
-
59
-
60
-
61
-
62
-
63
-
64
-
65
-
66
-
67
-
68
-
69
-
70
-
71
-
72
-
73
-
74
-
75
-
76
-
77
-
78
-
79
-
 80
80 -
 81
81 -
 82
82 -
 83
83 -
 84
84 -
 85
85 -
 86
86 -
 87
87 -
 88
88 -
 89
89 -
 90
90 -
91
-
92
-
93
-
94
-
95
-
96
-
97
-
98
-
99
-
100
-
101
-
102
-
103
-
104
-
105
 |
 |