Lexmark X560n User's Guide - Page 170
Administrative support, Locking the administrator menus, Adjusting Power Saver
 |
View all Lexmark X560n manuals
Add to My Manuals
Save this manual to your list of manuals |
Page 170 highlights
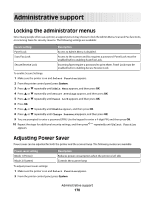
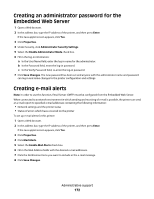
Administrative support Locking the administrator menus Since many people often use a printer, a support person may choose to lock the Admin Menu, Scan and Fax functions, or incoming faxes for security reasons. The following settings are available: Secure setting Description Panel Lock Access to Admin Menu is disabled. Scan/Fax Lock Access to the scanner and fax requires a password. Panel Lock must be enabled before enabling Scan/Fax Lock. Secure Receive Lock Incoming faxes require a password to print them. Panel Lock must be enabled before enabling Secure Receive Lock. To enable Secure Settings: 1 Make sure the printer is on and Select Function appears. 2 From the printer control panel, press System. 3 Press or repeatedly until Admin Menu appears, and then press OK. 4 Press or repeatedly until Secure Settings appears, and then press OK. 5 Press or repeatedly until Panel Lock appears, and then press OK. 6 Press OK. 7 Press or repeatedly until Enable appears, and then press OK. 8 Press or repeatedly until Change Password appears, and then press OK. 9 You are prompted to enter a password (PIN). Use the keypad to enter a 4-digit PIN, and then press OK. 10 Repeat the steps for additional security settings, and then press appears. repeatedly until Select Function Adjusting Power Saver Power saver can be adjusted for both the printer and the scanner lamp. The following modes are available: Power saver setting Mode 1 (Printer) Description Reduces power consumption when the printer is left idle Mode 2 (System) Controls the scanner lamp To adjust power saver settings: 1 Make sure the printer is on and Select Function appears. 2 From the printer control panel, press System. Administrative support 170
-
 1
1 -
2
-
3
-
4
-
5
-
6
-
7
-
8
-
9
-
10
-
11
-
12
-
13
-
14
-
15
-
16
-
17
-
18
-
19
-
20
-
21
-
22
-
23
-
24
-
25
-
26
-
27
-
28
-
29
-
30
-
31
-
32
-
33
-
34
-
35
-
36
-
37
-
38
-
39
-
40
-
41
-
42
-
43
-
44
-
45
-
46
-
47
-
48
-
49
-
50
-
51
-
52
-
53
-
54
-
55
-
56
-
57
-
58
-
59
-
60
-
61
-
62
-
63
-
64
-
65
-
66
-
67
-
68
-
69
-
70
-
71
-
72
-
73
-
74
-
75
-
76
-
77
-
78
-
79
-
80
-
81
-
82
-
83
-
84
-
85
-
86
-
87
-
88
-
89
-
90
-
91
-
92
-
93
-
94
-
95
-
96
-
97
-
98
-
99
-
100
-
101
-
102
-
103
-
104
-
105
-
106
-
107
-
108
-
109
-
110
-
111
-
112
-
113
-
114
-
115
-
116
-
117
-
118
-
119
-
120
-
121
-
122
-
123
-
124
-
125
-
126
-
127
-
128
-
129
-
130
-
131
-
132
-
133
-
134
-
135
-
136
-
137
-
138
-
139
-
140
-
141
-
142
-
143
-
144
-
145
-
146
-
147
-
148
-
149
-
150
-
151
-
152
-
153
-
154
-
155
-
156
-
157
-
158
-
159
-
160
-
161
-
162
-
163
-
164
-
 165
165 -
 166
166 -
 167
167 -
 168
168 -
 169
169 -
 170
170 -
 171
171 -
 172
172 -
 173
173 -
 174
174 -
 175
175 -
176
-
177
-
178
-
179
-
180
-
181
-
182
-
183
-
184
-
185
-
186
-
187
-
188
-
189
-
190
-
191
-
192
-
193
-
194
-
195
-
196
-
197
-
198
-
199
-
200
-
201
-
202
-
203
-
204
-
205
-
206
-
207
-
208
-
209
-
210
 |
 |