Lexmark X560n User's Guide - Page 81
Scanning to an e-mail address, Customizing the default scan settings from the printer control panel
 |
View all Lexmark X560n manuals
Add to My Manuals
Save this manual to your list of manuals |
Page 81 highlights
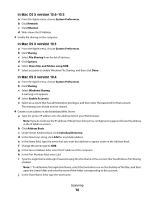
8 Click Edit next to the group that was just created. 9 Select the e-mail addresses to be included in the group, and then click Save Changes to add the addresses to the group. Scanning to an e-mail address 1 Make sure the printer is connected to the network through a print server, and the printer, the print server, and the computer receiving the scan are all turned on. 2 Load an original document faceup into the ADF or facedown on the scanner glass. Note: Do not load postcards, photos, small items, transparencies, photo paper, or thin media (such as magazine clippings) into the ADF. Place these items on the scanner glass. 3 If you are loading a document into the ADF, adjust the paper guides. 4 From the printer control panel, press E-mail. 5 Press or repeatedly until Email to appears, and then press OK. 6 Press or repeatedly to choose the method for selecting a recipient, and then press OK. 7 If you are using the Address Book or Email Group, press or repeatedly to select the address that points to the recipient you want, and then press to select the address. 8 Repeat this to add additional addresses or groups, and then press OK. Notes: • To change the recipient from To to BCC, or to remove the recipient from the send list, press repeatedly. • To edit the recipient list, follow the instructions at the top of the display. 9 If you want to adjust any scan settings, press or repeatedly to select the scan setting to modify, and then press OK. Note: The scan settings are only changed temporarily. After returning to Select Function, the current default settings are restored. 10 Press Start to begin scanning to e-mail. 11 When the scan is finished, press repeatedly until Select Function appears. Customizing the default scan settings from the printer control panel Adjusting the auto exposure of scanned images When using originals printed on thin paper, text or images printed on one side of the paper can sometimes be seen on the other side of the paper. To prevent this from happening in your scanned document, and to improve the quality for two-sided scanned pages, use the Auto Exposure setting on the printer control panel. This setting minimizes the sensitivity of the scanner to variations in light background colors. 1 From the printer control panel, press System. 2 Press or repeatedly until Default Settings appears, and then press OK. Scanning 81
-
 1
1 -
2
-
3
-
4
-
5
-
6
-
7
-
8
-
9
-
10
-
11
-
12
-
13
-
14
-
15
-
16
-
17
-
18
-
19
-
20
-
21
-
22
-
23
-
24
-
25
-
26
-
27
-
28
-
29
-
30
-
31
-
32
-
33
-
34
-
35
-
36
-
37
-
38
-
39
-
40
-
41
-
42
-
43
-
44
-
45
-
46
-
47
-
48
-
49
-
50
-
51
-
52
-
53
-
54
-
55
-
56
-
57
-
58
-
59
-
60
-
61
-
62
-
63
-
64
-
65
-
66
-
67
-
68
-
69
-
70
-
71
-
72
-
73
-
74
-
75
-
 76
76 -
 77
77 -
 78
78 -
 79
79 -
 80
80 -
 81
81 -
 82
82 -
 83
83 -
 84
84 -
 85
85 -
 86
86 -
87
-
88
-
89
-
90
-
91
-
92
-
93
-
94
-
95
-
96
-
97
-
98
-
99
-
100
-
101
-
102
-
103
-
104
-
105
-
106
-
107
-
108
-
109
-
110
-
111
-
112
-
113
-
114
-
115
-
116
-
117
-
118
-
119
-
120
-
121
-
122
-
123
-
124
-
125
-
126
-
127
-
128
-
129
-
130
-
131
-
132
-
133
-
134
-
135
-
136
-
137
-
138
-
139
-
140
-
141
-
142
-
143
-
144
-
145
-
146
-
147
-
148
-
149
-
150
-
151
-
152
-
153
-
154
-
155
-
156
-
157
-
158
-
159
-
160
-
161
-
162
-
163
-
164
-
165
-
166
-
167
-
168
-
169
-
170
-
171
-
172
-
173
-
174
-
175
-
176
-
177
-
178
-
179
-
180
-
181
-
182
-
183
-
184
-
185
-
186
-
187
-
188
-
189
-
190
-
191
-
192
-
193
-
194
-
195
-
196
-
197
-
198
-
199
-
200
-
201
-
202
-
203
-
204
-
205
-
206
-
207
-
208
-
209
-
210
 |
 |