Lexmark X560n User's Guide - Page 77
Scanning to a computer over the network, Scanning to an FTP server
 |
View all Lexmark X560n manuals
Add to My Manuals
Save this manual to your list of manuals |
Page 77 highlights
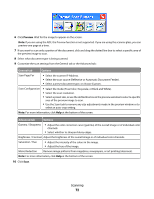
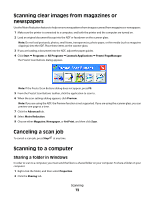
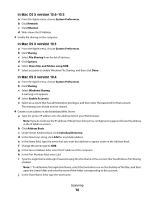
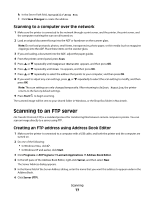
k In the Server Path field, type public\Drop Box. l Click Save Changes to create the address. Scanning to a computer over the network 1 Make sure the printer is connected to the network through a print server, and the printer, the print server, and the computer receiving the scan are all turned on. 2 Load an original document faceup into the ADF or facedown on the scanner glass. Note: Do not load postcards, photos, small items, transparencies, photo paper, or thin media (such as magazine clippings) into the ADF. Place these items on the scanner glass. 3 If you are loading a document into the ADF, adjust the paper guides. 4 From the printer control panel, press Scan. 5 Press or repeatedly until Computer(Network) appears, and then press OK. 6 Press or repeatedly until Scan to appears, and then press OK. 7 Press or repeatedly to select the address that points to your computer, and then press OK. 8 If you want to adjust any scan settings, press or repeatedly to select the scan setting to modify, and then press OK. Note: The scan settings are only changed temporarily. After returning to Select Function, the printer returns to the factory default settings. 9 Press Start to begin scanning. The scanned image will be sent to your shared folder in Windows, or the Drop Box folder in Macintosh. Scanning to an FTP server File Transfer Protocol (FTP) is a standard protocol for transferring files between remote computer systems. You can scan an image directly to a server using FTP. Creating an FTP address using Address Book Editor 1 Make sure the printer is connected to a computer with a USB cable, and both the printer and the computer are turned on. 2 Do one of the following: • In Windows Vista, click . • In Windows XP and earlier, click Start. 3 Click Programs or All Programs Œ Lexmark Applications Œ Address Book Editor. 4 In the left pane of the Address Book Editor, right-click Server, and then select New. The Server Address dialog appears. 5 In the Name field of the Server Address dialog, enter the name that you want this address to appear under in the Address Book. 6 Click Server (FTP). Scanning 77
-
 1
1 -
2
-
3
-
4
-
5
-
6
-
7
-
8
-
9
-
10
-
11
-
12
-
13
-
14
-
15
-
16
-
17
-
18
-
19
-
20
-
21
-
22
-
23
-
24
-
25
-
26
-
27
-
28
-
29
-
30
-
31
-
32
-
33
-
34
-
35
-
36
-
37
-
38
-
39
-
40
-
41
-
42
-
43
-
44
-
45
-
46
-
47
-
48
-
49
-
50
-
51
-
52
-
53
-
54
-
55
-
56
-
57
-
58
-
59
-
60
-
61
-
62
-
63
-
64
-
65
-
66
-
67
-
68
-
69
-
70
-
71
-
 72
72 -
 73
73 -
 74
74 -
 75
75 -
 76
76 -
 77
77 -
 78
78 -
 79
79 -
 80
80 -
 81
81 -
 82
82 -
83
-
84
-
85
-
86
-
87
-
88
-
89
-
90
-
91
-
92
-
93
-
94
-
95
-
96
-
97
-
98
-
99
-
100
-
101
-
102
-
103
-
104
-
105
-
106
-
107
-
108
-
109
-
110
-
111
-
112
-
113
-
114
-
115
-
116
-
117
-
118
-
119
-
120
-
121
-
122
-
123
-
124
-
125
-
126
-
127
-
128
-
129
-
130
-
131
-
132
-
133
-
134
-
135
-
136
-
137
-
138
-
139
-
140
-
141
-
142
-
143
-
144
-
145
-
146
-
147
-
148
-
149
-
150
-
151
-
152
-
153
-
154
-
155
-
156
-
157
-
158
-
159
-
160
-
161
-
162
-
163
-
164
-
165
-
166
-
167
-
168
-
169
-
170
-
171
-
172
-
173
-
174
-
175
-
176
-
177
-
178
-
179
-
180
-
181
-
182
-
183
-
184
-
185
-
186
-
187
-
188
-
189
-
190
-
191
-
192
-
193
-
194
-
195
-
196
-
197
-
198
-
199
-
200
-
201
-
202
-
203
-
204
-
205
-
206
-
207
-
208
-
209
-
210
 |
 |
