Lexmark X560n User's Guide - Page 74
Creating a computer address using Address Book Editor, Computer Settings Wizard - scan to network
 |
View all Lexmark X560n manuals
Add to My Manuals
Save this manual to your list of manuals |
Page 74 highlights
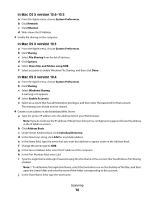
3 Do one of the following: • In Windows Vista: a Under the Advanced Sharing section, click Advanced Sharing. b When the User Account Control dialog appears, click Continue. c Make sure that Share this folder is selected. The Share name is the name used when scanning to this folder. By default, the share name is the same as the folder name. d Click OK to save the shared folder settings and close the window. e Click Close to close the folder properties window. The folder is now set up for sharing. • In Windows XP and earlier: a Under the Network Sharing and Security section, make sure that Share this folder on the network and Allow network users to change my files are both selected. The Share name is the name used when scanning to this folder. By default, the share name is the same as the folder name. Note: If you do not see these options under the Sharing tab, it could be because sharing is not enabled. If so, you will see a link that will let you enable sharing with the option of using the sharing wizard. b Click OK to save the shared folder settings and close the window. The folder is now set up for sharing. Creating a computer address using Address Book Editor 1 Make sure the printer is connected to a computer with a USB cable, and both the printer and the computer are turned on. 2 Do one of the following: • In Windows Vista, click . • In Windows XP and earlier, click Start. 3 Click Programs or All Programs Œ Lexmark Applications Œ Address Book Editor. 4 In the left pane of the Address Book Editor, right-click Server, and then select New. The Server Address dialog appears. 5 Click Computer (SMB). 6 Click Computer Settings Wizard. 7 Click Browse, and then select a shared folder on the computer. 8 Click OK, and then click Next. 9 Enter the name and password that you log in with, and then click Next. 10 Confirm the settings, and then click Finish. The Computer Settings Wizard closes. 11 In the Name field of the Server Address dialog, enter the name that you want this address to appear under in the Address Book, and then click OK. 12 From the File menu, select Save All. The Address Book is saved with the new entry. Scanning 74
-
 1
1 -
2
-
3
-
4
-
5
-
6
-
7
-
8
-
9
-
10
-
11
-
12
-
13
-
14
-
15
-
16
-
17
-
18
-
19
-
20
-
21
-
22
-
23
-
24
-
25
-
26
-
27
-
28
-
29
-
30
-
31
-
32
-
33
-
34
-
35
-
36
-
37
-
38
-
39
-
40
-
41
-
42
-
43
-
44
-
45
-
46
-
47
-
48
-
49
-
50
-
51
-
52
-
53
-
54
-
55
-
56
-
57
-
58
-
59
-
60
-
61
-
62
-
63
-
64
-
65
-
66
-
67
-
68
-
 69
69 -
 70
70 -
 71
71 -
 72
72 -
 73
73 -
 74
74 -
 75
75 -
 76
76 -
 77
77 -
 78
78 -
 79
79 -
80
-
81
-
82
-
83
-
84
-
85
-
86
-
87
-
88
-
89
-
90
-
91
-
92
-
93
-
94
-
95
-
96
-
97
-
98
-
99
-
100
-
101
-
102
-
103
-
104
-
105
-
106
-
107
-
108
-
109
-
110
-
111
-
112
-
113
-
114
-
115
-
116
-
117
-
118
-
119
-
120
-
121
-
122
-
123
-
124
-
125
-
126
-
127
-
128
-
129
-
130
-
131
-
132
-
133
-
134
-
135
-
136
-
137
-
138
-
139
-
140
-
141
-
142
-
143
-
144
-
145
-
146
-
147
-
148
-
149
-
150
-
151
-
152
-
153
-
154
-
155
-
156
-
157
-
158
-
159
-
160
-
161
-
162
-
163
-
164
-
165
-
166
-
167
-
168
-
169
-
170
-
171
-
172
-
173
-
174
-
175
-
176
-
177
-
178
-
179
-
180
-
181
-
182
-
183
-
184
-
185
-
186
-
187
-
188
-
189
-
190
-
191
-
192
-
193
-
194
-
195
-
196
-
197
-
198
-
199
-
200
-
201
-
202
-
203
-
204
-
205
-
206
-
207
-
208
-
209
-
210
 |
 |