Lexmark X560n User's Guide - Page 86
Faxing, Sending a fax, Sending a fax using the ADF, Sending a fax using the scanner glass - user s guide
 |
View all Lexmark X560n manuals
Add to My Manuals
Save this manual to your list of manuals |
Page 86 highlights
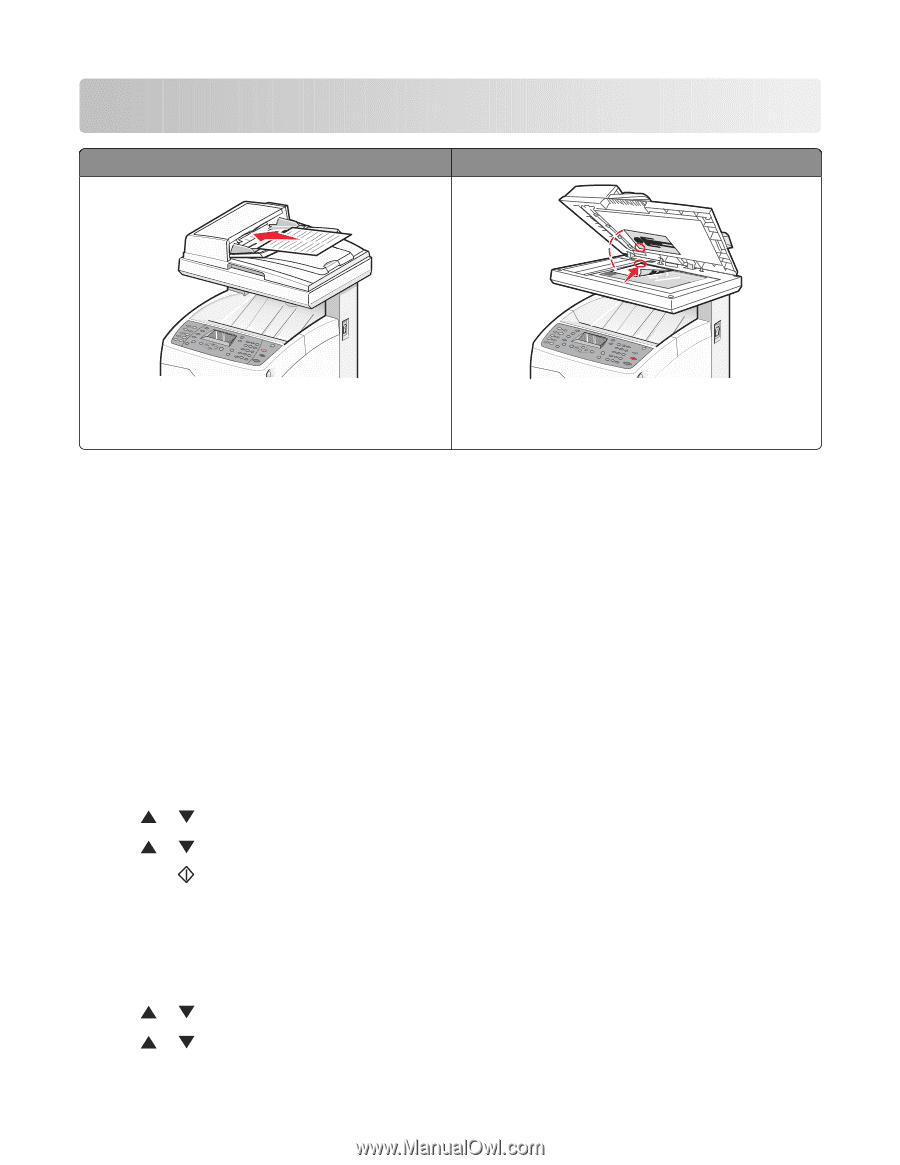
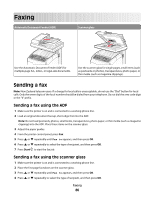
Faxing Automatic Document Feeder (ADF) Scanner glass Use the Automatic Document Feeder (ADF) for multiple-page A4-, letter-, or legal-size documents. Use the scanner glass for single pages, small items (such as postcards or photos), transparencies, photo paper, or thin media (such as magazine clippings). Sending a fax Note: New Zealand telecom users: If a charge for local calls is unacceptable, do not use the "Dial" button for local calls. Only the seven digits of the local number should be dialed from your telephone. Do not dial the area code digit or the "0" prefix. Sending a fax using the ADF 1 Make sure the printer is on and is connected to a working phone line. 2 Load an original document faceup, short edge first into the ADF. Note: Do not load postcards, photos, small items, transparencies, photo paper, or thin media (such as magazine clippings) into the ADF. Place these items on the scanner glass. 3 Adjust the paper guides. 4 From the printer control panel, press Fax. 5 Press or repeatedly until Fax to appears, and then press OK. 6 Press or repeatedly to select the type of recipient, and then press OK. 7 Press Start to start the fax job. Sending a fax using the scanner glass 1 Make sure the printer is on and is connected to a working phone line. 2 Place the first page facedown on the scanner glass. 3 Press or repeatedly until Fax to appears, and then press OK. 4 Press or repeatedly to select the type of recipient, and then press OK. Faxing 86
-
 1
1 -
2
-
3
-
4
-
5
-
6
-
7
-
8
-
9
-
10
-
11
-
12
-
13
-
14
-
15
-
16
-
17
-
18
-
19
-
20
-
21
-
22
-
23
-
24
-
25
-
26
-
27
-
28
-
29
-
30
-
31
-
32
-
33
-
34
-
35
-
36
-
37
-
38
-
39
-
40
-
41
-
42
-
43
-
44
-
45
-
46
-
47
-
48
-
49
-
50
-
51
-
52
-
53
-
54
-
55
-
56
-
57
-
58
-
59
-
60
-
61
-
62
-
63
-
64
-
65
-
66
-
67
-
68
-
69
-
70
-
71
-
72
-
73
-
74
-
75
-
76
-
77
-
78
-
79
-
80
-
 81
81 -
 82
82 -
 83
83 -
 84
84 -
 85
85 -
 86
86 -
 87
87 -
 88
88 -
 89
89 -
 90
90 -
 91
91 -
92
-
93
-
94
-
95
-
96
-
97
-
98
-
99
-
100
-
101
-
102
-
103
-
104
-
105
-
106
-
107
-
108
-
109
-
110
-
111
-
112
-
113
-
114
-
115
-
116
-
117
-
118
-
119
-
120
-
121
-
122
-
123
-
124
-
125
-
126
-
127
-
128
-
129
-
130
-
131
-
132
-
133
-
134
-
135
-
136
-
137
-
138
-
139
-
140
-
141
-
142
-
143
-
144
-
145
-
146
-
147
-
148
-
149
-
150
-
151
-
152
-
153
-
154
-
155
-
156
-
157
-
158
-
159
-
160
-
161
-
162
-
163
-
164
-
165
-
166
-
167
-
168
-
169
-
170
-
171
-
172
-
173
-
174
-
175
-
176
-
177
-
178
-
179
-
180
-
181
-
182
-
183
-
184
-
185
-
186
-
187
-
188
-
189
-
190
-
191
-
192
-
193
-
194
-
195
-
196
-
197
-
198
-
199
-
200
-
201
-
202
-
203
-
204
-
205
-
206
-
207
-
208
-
209
-
210
 |
 |