Sharp AR-M237 AR-M237 AR-M277 Operation Manual Suite - Page 105
Installation In Windows 98/me/2000 Usb Cable - printer drivers
 |
View all Sharp AR-M237 manuals
Add to My Manuals
Save this manual to your list of manuals |
Page 105 highlights
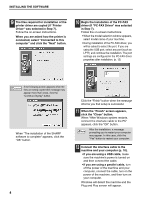
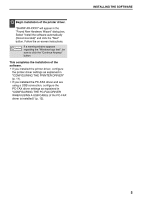
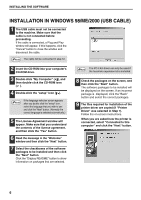
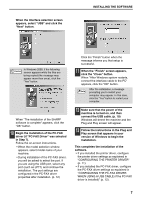
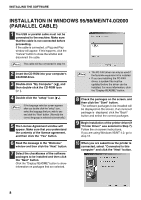
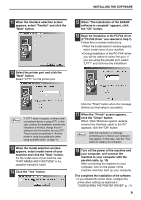
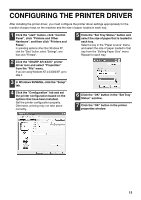
INSTALLING THE SOFTWARE INSTALLATION IN WINDOWS 98/ME/2000 (USB CABLE) 1 The USB cable must not be connected to the machine. Make sure that the cable is not connected before proceeding. If the cable is connected, a Plug and Play window will appear. If this happens, click the "Cancel" button to close the window and disconnect the cable. Note The cable will be connected in step 12. 2 Insert the CD-ROM into your computer's CD-ROM drive. 3 Double-click "My Computer" ( ), and then double-click the CD-ROM icon ( ). 4 Double-click the "setup" icon ( ). If the language selection screen appears Note after you double click the "setup" icon, select the language that you wish to use and click the "Next" button. (Normally the correct language is selected automatically.) 5 The License Agreement window will appear. Make sure that you understand the contents of the license agreement, and then click the "Yes" button. 6 Read the message in the "Welcome" window and then click the "Next" button. 7 Select the checkboxes of the software packages to be installed and then click the "Next" button. Click the "Display README" button to show information on packages that are selected. Note The PC-FAX driver can only be used if the facsimile expansion kit is installed. 8 Check the packages on the screen, and then click the "Start" button. The software packages to be installed will be displayed on the screen. If an incorrect package is displayed, click the "Back" button and select the correct packages. 9 The files required for installation of the printer driver are copied (if "Printer Driver" was selected in Step 7). Follow the on-screen instructions. When you are asked how the printer is connected, select "Connected to this computer" and click the "Next" button. 6
-
 1
1 -
2
-
3
-
4
-
5
-
6
-
7
-
8
-
9
-
10
-
11
-
12
-
13
-
14
-
15
-
16
-
17
-
18
-
19
-
20
-
21
-
22
-
23
-
24
-
25
-
26
-
27
-
28
-
29
-
30
-
31
-
32
-
33
-
34
-
35
-
36
-
37
-
38
-
39
-
40
-
41
-
42
-
43
-
44
-
45
-
46
-
47
-
48
-
49
-
50
-
51
-
52
-
53
-
54
-
55
-
56
-
57
-
58
-
59
-
60
-
61
-
62
-
63
-
64
-
65
-
66
-
67
-
68
-
69
-
70
-
71
-
72
-
73
-
74
-
75
-
76
-
77
-
78
-
79
-
80
-
81
-
82
-
83
-
84
-
85
-
86
-
87
-
88
-
89
-
90
-
91
-
92
-
93
-
94
-
95
-
96
-
97
-
98
-
99
-
 100
100 -
 101
101 -
 102
102 -
 103
103 -
 104
104 -
 105
105 -
 106
106 -
 107
107 -
 108
108 -
 109
109 -
 110
110 -
111
-
112
-
113
-
114
-
115
-
116
-
117
-
118
-
119
-
120
-
121
-
122
-
123
-
124
-
125
-
126
-
127
-
128
-
129
-
130
-
131
-
132
-
133
-
134
-
135
-
136
-
137
-
138
-
139
-
140
-
141
-
142
-
143
-
144
-
145
-
146
-
147
-
148
-
149
-
150
-
151
-
152
-
153
-
154
-
155
-
156
-
157
-
158
-
159
-
160
-
161
-
162
-
163
-
164
-
165
-
166
-
167
-
168
-
169
-
170
-
171
-
172
-
173
-
174
-
175
-
176
-
177
-
178
-
179
-
180
-
181
-
182
-
183
-
184
-
185
-
186
-
187
-
188
-
189
-
190
-
191
-
192
-
193
-
194
-
195
-
196
-
197
-
198
-
199
-
200
-
201
-
202
-
203
-
204
-
205
-
206
-
207
-
208
-
209
-
210
-
211
-
212
-
213
-
214
-
215
-
216
-
217
-
218
-
219
-
220
-
221
-
222
-
223
-
224
-
225
-
226
-
227
-
228
-
229
-
230
-
231
-
232
-
233
-
234
-
235
-
236
-
237
-
238
-
239
-
240
-
241
-
242
-
243
-
244
-
245
-
246
-
247
-
248
-
249
-
250
-
251
-
252
-
253
-
254
-
255
-
256
-
257
-
258
-
259
-
260
-
261
-
262
-
263
 |
 |
