Toshiba Satellite Pro 4300 User Manual - Page 134
Connecting the spacer to the Card Station III, Remove the rubber cover from the computer
 |
View all Toshiba Satellite Pro 4300 manuals
Add to My Manuals
Save this manual to your list of manuals |
Page 134 highlights
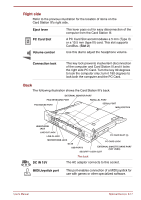
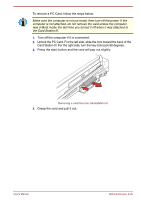
Connecting the spacer to the Card Station III This section describes connection of the spacer to the Card Station III. 1. Make sure the engaging pins on the Card Station III are down (pull the release lever forward). 2. Seat the spacer between the guide rails on the Card Station III. Connecting the spacer 3. Hold the Card Station III and spacer together on each side and slide the spacer forward with your thumbs. 4. Remove the rubber cover from the computer's Docking Interface port, and set the computer lock on the bottom of the spacer to the unlock position. 5. Make sure the engaging pins are down (pull the release lever forward). 8-22 Optional Devices User's Manual
-
 1
1 -
2
-
3
-
4
-
5
-
6
-
7
-
8
-
9
-
10
-
11
-
12
-
13
-
14
-
15
-
16
-
17
-
18
-
19
-
20
-
21
-
22
-
23
-
24
-
25
-
26
-
27
-
28
-
29
-
30
-
31
-
32
-
33
-
34
-
35
-
36
-
37
-
38
-
39
-
40
-
41
-
42
-
43
-
44
-
45
-
46
-
47
-
48
-
49
-
50
-
51
-
52
-
53
-
54
-
55
-
56
-
57
-
58
-
59
-
60
-
61
-
62
-
63
-
64
-
65
-
66
-
67
-
68
-
69
-
70
-
71
-
72
-
73
-
74
-
75
-
76
-
77
-
78
-
79
-
80
-
81
-
82
-
83
-
84
-
85
-
86
-
87
-
88
-
89
-
90
-
91
-
92
-
93
-
94
-
95
-
96
-
97
-
98
-
99
-
100
-
101
-
102
-
103
-
104
-
105
-
106
-
107
-
108
-
109
-
110
-
111
-
112
-
113
-
114
-
115
-
116
-
117
-
118
-
119
-
120
-
121
-
122
-
123
-
124
-
125
-
126
-
127
-
128
-
 129
129 -
 130
130 -
 131
131 -
 132
132 -
 133
133 -
 134
134 -
 135
135 -
 136
136 -
 137
137 -
 138
138 -
 139
139 -
140
-
141
-
142
-
143
-
144
-
145
-
146
-
147
-
148
-
149
-
150
-
151
-
152
-
153
-
154
-
155
-
156
-
157
-
158
-
159
-
160
-
161
-
162
-
163
-
164
-
165
-
166
-
167
-
168
-
169
-
170
-
171
-
172
-
173
-
174
-
175
-
176
-
177
-
178
-
179
-
180
-
181
-
182
-
183
-
184
-
185
-
186
-
187
-
188
-
189
-
190
-
191
-
192
-
193
-
194
-
195
-
196
-
197
-
198
-
199
-
200
-
201
-
202
-
203
-
204
-
205
-
206
-
207
-
208
-
209
-
210
-
211
-
212
-
213
-
214
-
215
-
216
-
217
-
218
-
219
-
220
-
221
-
222
-
223
-
224
-
225
-
226
-
227
-
228
-
229
-
230
 |
 |

8-22
Optional Devices
User's Manual
Connecting the spacer to the Card Station III
This section describes connection of the spacer to the Card Station III.
1.
Make sure the engaging pins on the Card Station III are down (pull the
release lever forward).
2.
Seat the spacer between the guide rails on the Card Station III.
Connecting the spacer
3.
Hold the Card Station III and spacer together on each side and slide
the spacer forward with your thumbs.
4.
Remove the rubber cover from the computer
’
s Docking Interface port,
and set the computer lock on the bottom of the spacer to the unlock
position.
5.
Make sure the engaging pins are down (pull the release lever forward).