Toshiba Satellite Pro 4300 User Manual - Page 65
Video out, Cleaning the computer, Disconnecting
 |
View all Toshiba Satellite Pro 4300 manuals
Add to My Manuals
Save this manual to your list of manuals |
Page 65 highlights
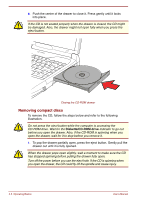
Disconnecting To disconnect the internal modem cable, follow the steps below. 1. Pinch the lever on the connector in the telephone jack and pull out the connector. 2. Disconnect the cable from the computer in the same manner. Video out Use this jack to connect to a television. Be sure to use a video cable. Cleaning the computer To help ensure long, trouble-free operation, keep the computer free of dust and use care with liquids around the computer. Be careful not to spill liquids into the computer. If the computer does get wet, turn the power off immediately and let the computer dry completely before you turn it on again. Clean the computer using a slightly damp (with water) cloth. You can use glass cleaner on the display. Spray a small amount of cleaner on a soft, clean cloth and wipe the screen gently with the cloth. Never spray cleaner directly onto the computer or let liquid run into any part of it. Never use harsh or caustic chemical products to clean the computer. Moving the computer The computer is designed for rugged durability. However, a few simple precautions taken when moving the computer will help ensure trouble-free operation. Make sure all disk activity has ended before moving the computer. Check the Built-in HDD and Diskette/CD-ROM/DVD-ROM drive indicators on the computer. If a diskette is in the diskette drive, remove it. If a CD-ROM is in the CD-ROM drive, remove it. Also make sure the CD-ROM drawer is securely closed. Turn off the power to the computer. Disconnect all peripherals before moving the computer. Close the display. Do not pick up the computer by its display panel or back (where the interface ports are located). Close all port covers. Disconnect the AC adaptor if it is connected. Use the carrying case when transporting the computer. User's Manual Operating Basics 4-11
-
 1
1 -
2
-
3
-
4
-
5
-
6
-
7
-
8
-
9
-
10
-
11
-
12
-
13
-
14
-
15
-
16
-
17
-
18
-
19
-
20
-
21
-
22
-
23
-
24
-
25
-
26
-
27
-
28
-
29
-
30
-
31
-
32
-
33
-
34
-
35
-
36
-
37
-
38
-
39
-
40
-
41
-
42
-
43
-
44
-
45
-
46
-
47
-
48
-
49
-
50
-
51
-
52
-
53
-
54
-
55
-
56
-
57
-
58
-
59
-
 60
60 -
 61
61 -
 62
62 -
 63
63 -
 64
64 -
 65
65 -
 66
66 -
 67
67 -
 68
68 -
 69
69 -
 70
70 -
71
-
72
-
73
-
74
-
75
-
76
-
77
-
78
-
79
-
80
-
81
-
82
-
83
-
84
-
85
-
86
-
87
-
88
-
89
-
90
-
91
-
92
-
93
-
94
-
95
-
96
-
97
-
98
-
99
-
100
-
101
-
102
-
103
-
104
-
105
-
106
-
107
-
108
-
109
-
110
-
111
-
112
-
113
-
114
-
115
-
116
-
117
-
118
-
119
-
120
-
121
-
122
-
123
-
124
-
125
-
126
-
127
-
128
-
129
-
130
-
131
-
132
-
133
-
134
-
135
-
136
-
137
-
138
-
139
-
140
-
141
-
142
-
143
-
144
-
145
-
146
-
147
-
148
-
149
-
150
-
151
-
152
-
153
-
154
-
155
-
156
-
157
-
158
-
159
-
160
-
161
-
162
-
163
-
164
-
165
-
166
-
167
-
168
-
169
-
170
-
171
-
172
-
173
-
174
-
175
-
176
-
177
-
178
-
179
-
180
-
181
-
182
-
183
-
184
-
185
-
186
-
187
-
188
-
189
-
190
-
191
-
192
-
193
-
194
-
195
-
196
-
197
-
198
-
199
-
200
-
201
-
202
-
203
-
204
-
205
-
206
-
207
-
208
-
209
-
210
-
211
-
212
-
213
-
214
-
215
-
216
-
217
-
218
-
219
-
220
-
221
-
222
-
223
-
224
-
225
-
226
-
227
-
228
-
229
-
230
 |
 |
