Yamaha DME32 DME32 Owners Manual - Page 20
Installing DME Manager, Upgrading & Reinstalling DME Manager, System Requirements
 |
View all Yamaha DME32 manuals
Add to My Manuals
Save this manual to your list of manuals |
Page 20 highlights
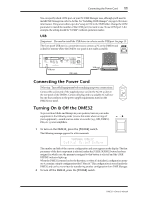
12 Chapter 2-Getting Started Installing DME Manager System Requirements • A computer with a 200 MHz or faster Intel Pentium MMX processor or equivalent • At least 32 MB of RAM (64 MB or more recommended) • A hard disk with at least 20 MB of free space • A CD-ROM or DVD-ROM drive (installation only) • A VGA or better display (640 x 480, 256 color minimum) • An RS232 or RS422 serial port or a USB port • Windows 95/98 Installing DME Manager Before installing DME Manager, make sure that your PC meets the system requirements listed previously. 1 Turn on your PC and, if it's not running already, start Windows. The PC does not need to be connected to the DME32 in order to install DME Manager. 2 Insert the DME32 CD-ROM disc into your CD-ROM or DVD-ROM drive. If the Windows CD-ROM Autorun feature is turned on, the installation start up screen appears automatically. 3 Continue with the installation as prompted. If the Windows CD-ROM Autorun feature is not turned on, you must start the installation manually, as explained below. 4 Double-click the My Computer icon. The My Computer window opens. 5 Double-click the "DME32" CD-ROM icon. The installation start up screen appears. 6 Continue with the installation as prompted. When the installation process is complete, remove the CD-ROM disc from the CD-ROM drive and return it to its case for safe keeping. The installation program adds a DME item to the Windows Programs menu. Upgrading & Reinstalling DME Manager Before upgrading or reinstalling DME Manager, you must delete the previously installed version as follows. 1 Use the "Add/Remove Programs" control panel to remove DME Manager. 2 Locate the "DME" folder and delete all the files inside it (do not delete the "AddIn," "Midi," or "Module" folders or the files inside them). Normally the "DME" folder is in "C:\Program Files." Starting DME Manager 1 Click the Windows "Start" button and select Programs, DME. DME Manager starts. When DME Manager is started, it checks whether any active DME32s are connected, active meaning connected and turned on. If an active DME32 containing configuration data is detected, a message asking whether or not you want to receive the configuration data appears. If you choose to receive it, all the configuration data in the DME32 is transferred to DME Manager and displayed in new configuration windows, and DME Manager switches to DME32-Owner's Manual
-
 1
1 -
2
-
3
-
4
-
5
-
6
-
7
-
8
-
9
-
10
-
11
-
12
-
13
-
14
-
 15
15 -
 16
16 -
 17
17 -
 18
18 -
 19
19 -
 20
20 -
 21
21 -
 22
22 -
 23
23 -
 24
24 -
 25
25 -
26
-
27
-
28
-
29
-
30
-
31
-
32
-
33
-
34
-
35
-
36
-
37
-
38
-
39
-
40
-
41
-
42
-
43
-
44
-
45
-
46
-
47
-
48
-
49
-
50
-
51
-
52
-
53
-
54
-
55
-
56
-
57
-
58
-
59
-
60
-
61
-
62
-
63
-
64
-
65
-
66
-
67
-
68
-
69
-
70
-
71
-
72
-
73
-
74
-
75
-
76
-
77
-
78
-
79
-
80
-
81
-
82
-
83
-
84
-
85
-
86
-
87
-
88
-
89
-
90
-
91
-
92
-
93
-
94
-
95
-
96
-
97
-
98
-
99
-
100
-
101
-
102
-
103
-
104
-
105
-
106
-
107
-
108
-
109
-
110
-
111
-
112
-
113
-
114
-
115
-
116
-
117
-
118
-
119
-
120
-
121
-
122
-
123
-
124
-
125
-
126
-
127
-
128
-
129
-
130
-
131
-
132
-
133
-
134
-
135
-
136
-
137
-
138
-
139
-
140
-
141
-
142
-
143
-
144
-
145
-
146
-
147
-
148
-
149
-
150
-
151
-
152
-
153
-
154
-
155
-
156
-
157
-
158
-
159
-
160
-
161
-
162
-
163
-
164
-
165
-
166
-
167
-
168
-
169
-
170
-
171
-
172
-
173
-
174
-
175
-
176
-
177
-
178
-
179
-
180
-
181
-
182
-
183
-
184
-
185
-
186
-
187
-
188
-
189
-
190
-
191
-
192
-
193
-
194
-
195
-
196
-
197
-
198
-
199
-
200
-
201
-
202
-
203
-
204
-
205
-
206
-
207
-
208
-
209
-
210
-
211
-
212
-
213
-
214
-
215
-
216
-
217
-
218
-
219
-
220
-
221
-
222
-
223
-
224
-
225
-
226
-
227
-
228
-
229
-
230
-
231
-
232
-
233
-
234
-
235
-
236
-
237
-
238
-
239
-
240
-
241
-
242
-
243
-
244
-
245
-
246
-
247
-
248
-
249
-
250
-
251
-
252
-
253
-
254
-
255
-
256
-
257
-
258
-
259
-
260
-
261
-
262
-
263
-
264
-
265
-
266
-
267
-
268
-
269
-
270
-
271
-
272
-
273
-
274
-
275
-
276
-
277
-
278
-
279
-
280
-
281
-
282
-
283
-
284
-
285
-
286
-
287
-
288
-
289
-
290
-
291
-
292
-
293
-
294
-
295
-
296
 |
 |
