ZyXEL VMG1312-B10A User Guide - Page 205
The Auto Switch Off Add or Modify Screen
 |
View all ZyXEL VMG1312-B10A manuals
Add to My Manuals
Save this manual to your list of manuals |
Page 205 highlights
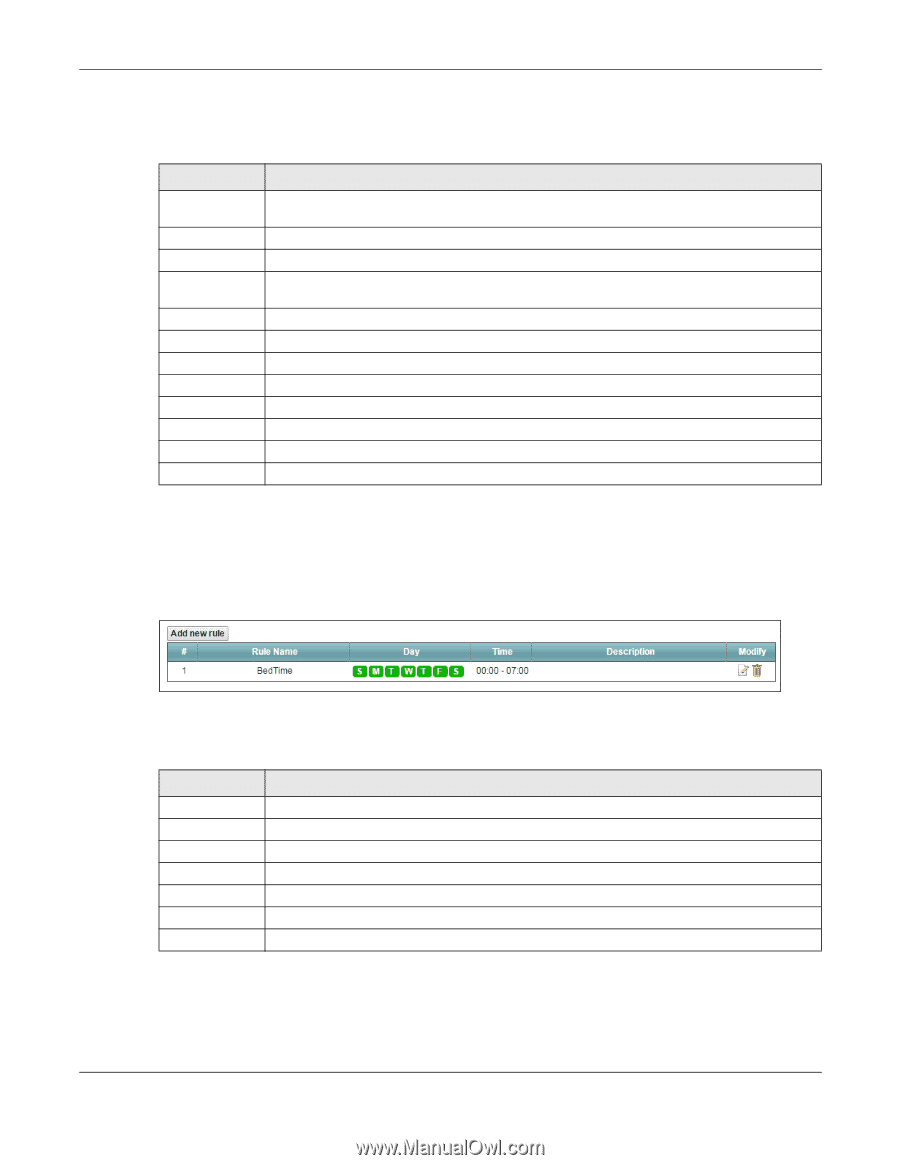
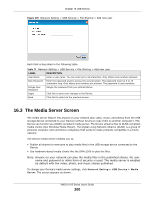
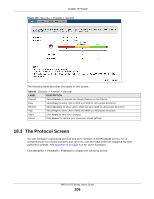
Chapter 17 Power Management The following table describes the labels in this menu. Table 81 Network Setting > Power Managment > Auto Switch OffNetwork Setting > Power Managment > Auto Switch Off LABEL Add or modify rules # DESCRIPTION Click this link to create or edit a schedule. This is the index number of a schedule rule. Rule Name This field shows the name of the schedule rule. Day This field shows which week days (in green) the interface(s) and/or LEDs are turned on and the days (grayed-out) they are turned off automatically. Time This field shows the time period the interface(s) and/or LEDs are turned on. Wireless This field shows whether this schedule applies to the wireless LAN interface. DSL WAN This field shows whether this schedule applies to the DSL WAN interface. Eth WAN LAN1~LAN4 This field shows whether this schedule applies to the Ethernet WAN interface. This field shows whether this schedule applies to the corresponding LAN interface. LED This field shows whether this schedule applies to the LEDs. Apply Click Apply to save your changes. Cancel Click Cancel to restore your previously saved settings. 17.3.1 The Auto Switch Off Add or Modify Screen Use this screen to manage the auto switch off schedules. To access this screen, click the Add or modify rules link in the Network Setting > Power Management > Auto Switch Off screen. Figure 110 Network Setting > Power Managment > Auto Switch Off > Add or modify rules The following table describes the labels in this menu. Table 82 Network Setting > Power Managment > Auto Switch Off Network Setting > Power Managment > Auto Switch Off > Add or modify rules LABEL Add new rule # Rule Name Day Time Description Modify DESCRIPTION Click this link to create a rule. This is the index number of a rule. This field shows the name of the rule. This field shows the week days of the schedule (in green). This field shows the time period of the schedule. This field shows more information about this rule. Click the Edit icon to modify the rule or click the Delete icon to remove it. VMG1312-B Series User's Guide 205
-
 1
1 -
2
-
3
-
4
-
5
-
6
-
7
-
8
-
9
-
10
-
11
-
12
-
13
-
14
-
15
-
16
-
17
-
18
-
19
-
20
-
21
-
22
-
23
-
24
-
25
-
26
-
27
-
28
-
29
-
30
-
31
-
32
-
33
-
34
-
35
-
36
-
37
-
38
-
39
-
40
-
41
-
42
-
43
-
44
-
45
-
46
-
47
-
48
-
49
-
50
-
51
-
52
-
53
-
54
-
55
-
56
-
57
-
58
-
59
-
60
-
61
-
62
-
63
-
64
-
65
-
66
-
67
-
68
-
69
-
70
-
71
-
72
-
73
-
74
-
75
-
76
-
77
-
78
-
79
-
80
-
81
-
82
-
83
-
84
-
85
-
86
-
87
-
88
-
89
-
90
-
91
-
92
-
93
-
94
-
95
-
96
-
97
-
98
-
99
-
100
-
101
-
102
-
103
-
104
-
105
-
106
-
107
-
108
-
109
-
110
-
111
-
112
-
113
-
114
-
115
-
116
-
117
-
118
-
119
-
120
-
121
-
122
-
123
-
124
-
125
-
126
-
127
-
128
-
129
-
130
-
131
-
132
-
133
-
134
-
135
-
136
-
137
-
138
-
139
-
140
-
141
-
142
-
143
-
144
-
145
-
146
-
147
-
148
-
149
-
150
-
151
-
152
-
153
-
154
-
155
-
156
-
157
-
158
-
159
-
160
-
161
-
162
-
163
-
164
-
165
-
166
-
167
-
168
-
169
-
170
-
171
-
172
-
173
-
174
-
175
-
176
-
177
-
178
-
179
-
180
-
181
-
182
-
183
-
184
-
185
-
186
-
187
-
188
-
189
-
190
-
191
-
192
-
193
-
194
-
195
-
196
-
197
-
198
-
199
-
 200
200 -
 201
201 -
 202
202 -
 203
203 -
 204
204 -
 205
205 -
 206
206 -
 207
207 -
 208
208 -
 209
209 -
 210
210 -
211
-
212
-
213
-
214
-
215
-
216
-
217
-
218
-
219
-
220
-
221
-
222
-
223
-
224
-
225
-
226
-
227
-
228
-
229
-
230
-
231
-
232
-
233
-
234
-
235
-
236
-
237
-
238
-
239
-
240
-
241
-
242
-
243
-
244
-
245
-
246
-
247
-
248
-
249
-
250
-
251
-
252
-
253
-
254
-
255
-
256
-
257
-
258
-
259
-
260
-
261
-
262
-
263
-
264
-
265
-
266
-
267
-
268
-
269
-
270
-
271
-
272
-
273
-
274
-
275
-
276
-
277
-
278
-
279
-
280
-
281
-
282
-
283
-
284
-
285
-
286
-
287
-
288
-
289
-
290
-
291
-
292
-
293
-
294
-
295
-
296
-
297
-
298
-
299
-
300
-
301
-
302
-
303
-
304
-
305
-
306
-
307
-
308
-
309
-
310
-
311
-
312
-
313
-
314
-
315
-
316
-
317
-
318
-
319
-
320
-
321
-
322
-
323
-
324
-
325
-
326
-
327
-
328
-
329
-
330
-
331
 |
 |